1. Introduction
Welcome to Cynic - Digital Agency WordPress Theme
Cynic is a Digital Agency WordPress Theme for startup Digital Agency that offers design, development and online marketing services to its client.
1.1. Requirements
There are system requirements in order to install and setup Cynic theme and its components properly. Make sure that you are running the latest version of WordPress, PHP version 5.6 or higher and MySQL version 5.6 or higher. We also recommend the following PHP configuration limits.
Recommended PHP configuration limits
- upload_max_filesize = 32M
- post_max_size = 32M
- max_execution_time = 300
- max_input_time = 300
- memory_limit = 256M
1.2. What's Included
After purchasing Cynic theme on themeforest.net with your Envato account, go to your Download page. You can choose to download Cynic theme only (Installable WordPress Theme) or the entire Cynic theme package which contains the following files:
- Cynic theme: An Installable WordPress Theme zip file.
- Cynic child-theme: A child-theme zip file and a readme.txt note about the child-theme.
- Documentation: A link to this documentation.
- Plugins: All Premium Plugins. (Revolution Slider, Visual Composer)
- Icons: All Premium Icons. (Linearicons, Miniline Icons)
- Licensing.
2. WordPress Installation
Please follow the instructions in the video to see how you can install WordPress on your hosting:
- For local host: https://www.youtube.com/watch?v=snFzbPm_RUE
- For cPanel: https://www.youtube.com/watch?v=LIhNlzLgF78
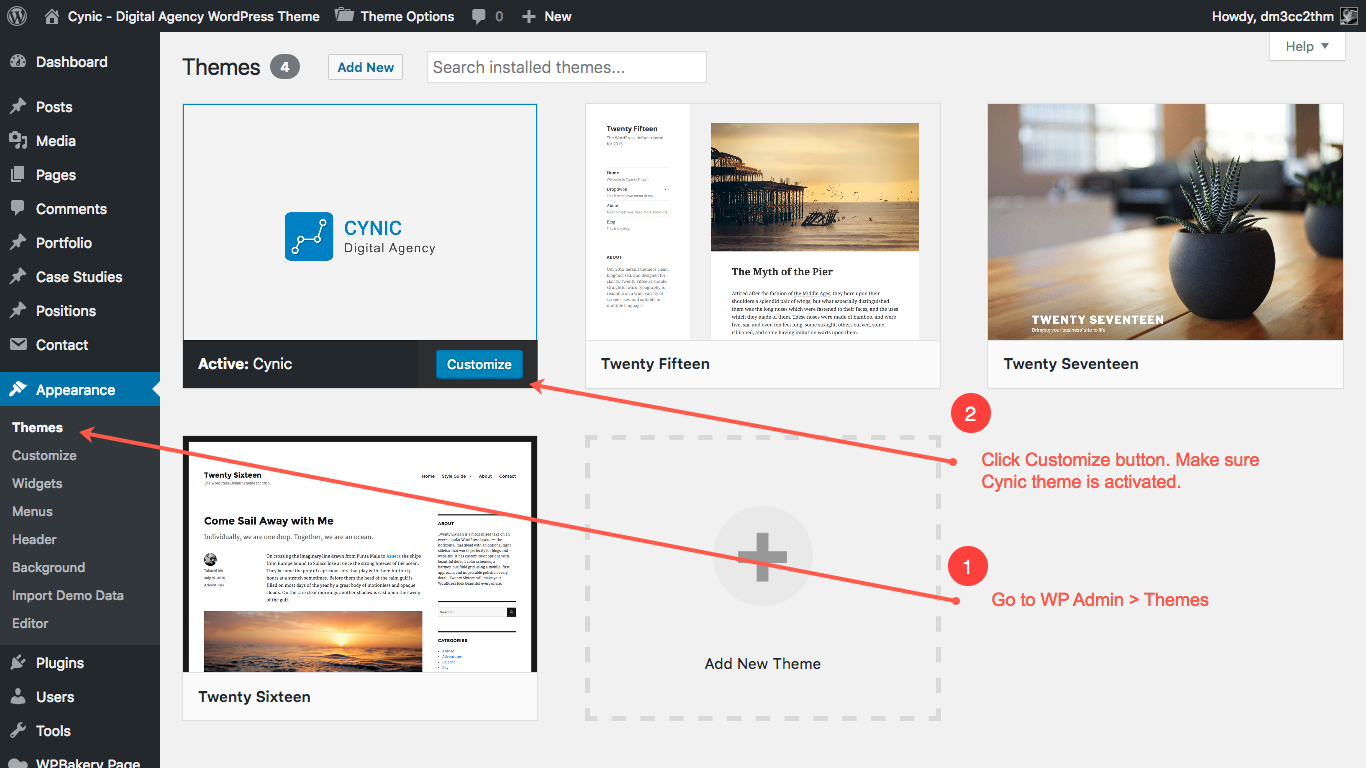
3. Upload and Activate Theme
When you are ready to install a theme, you must first upload the theme files and then activate the theme itself. The theme files can be uploaded in two ways:
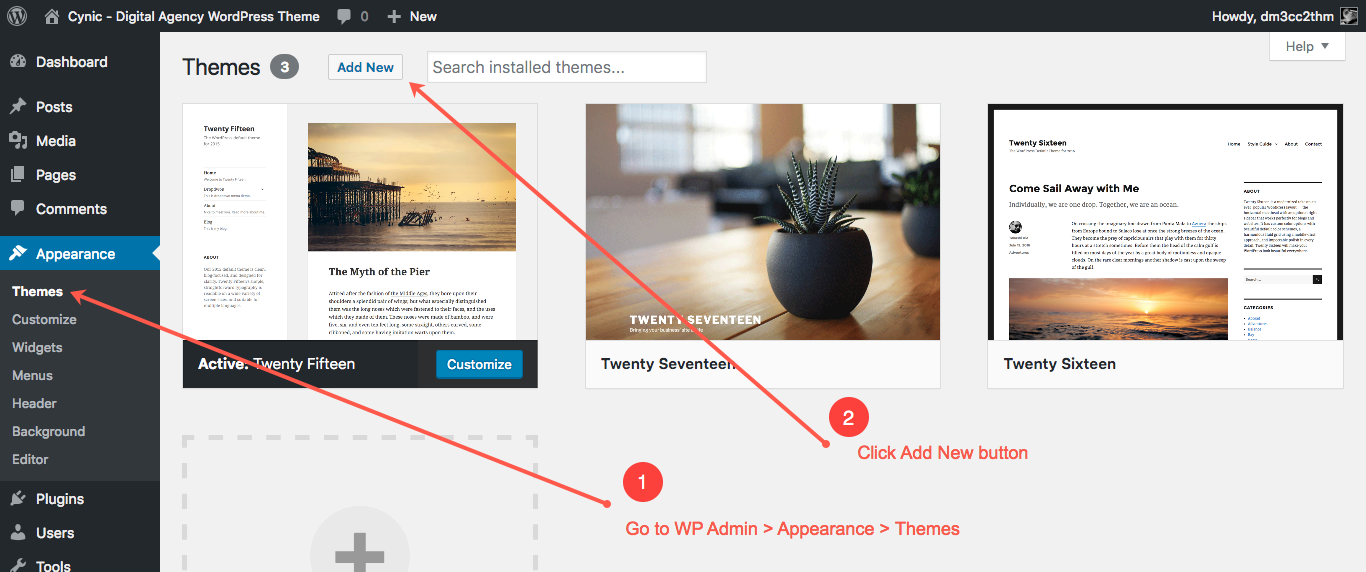
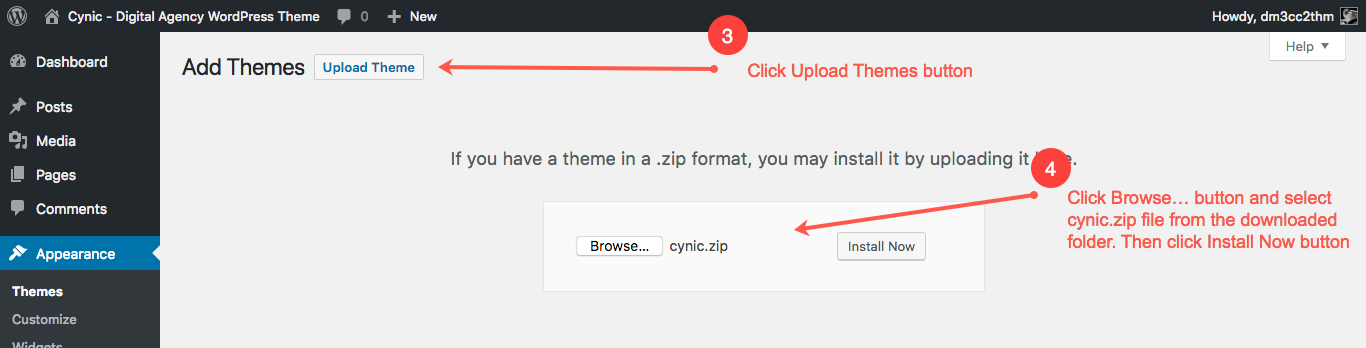
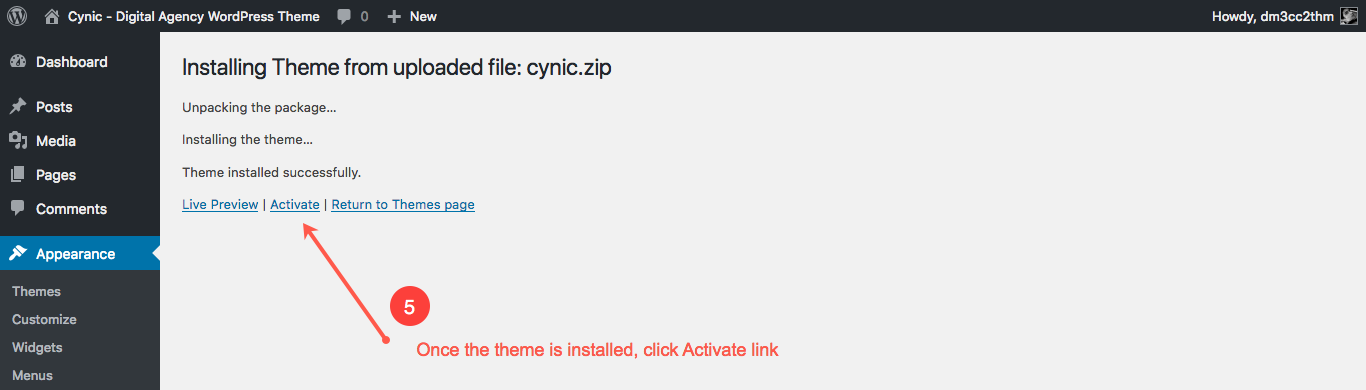
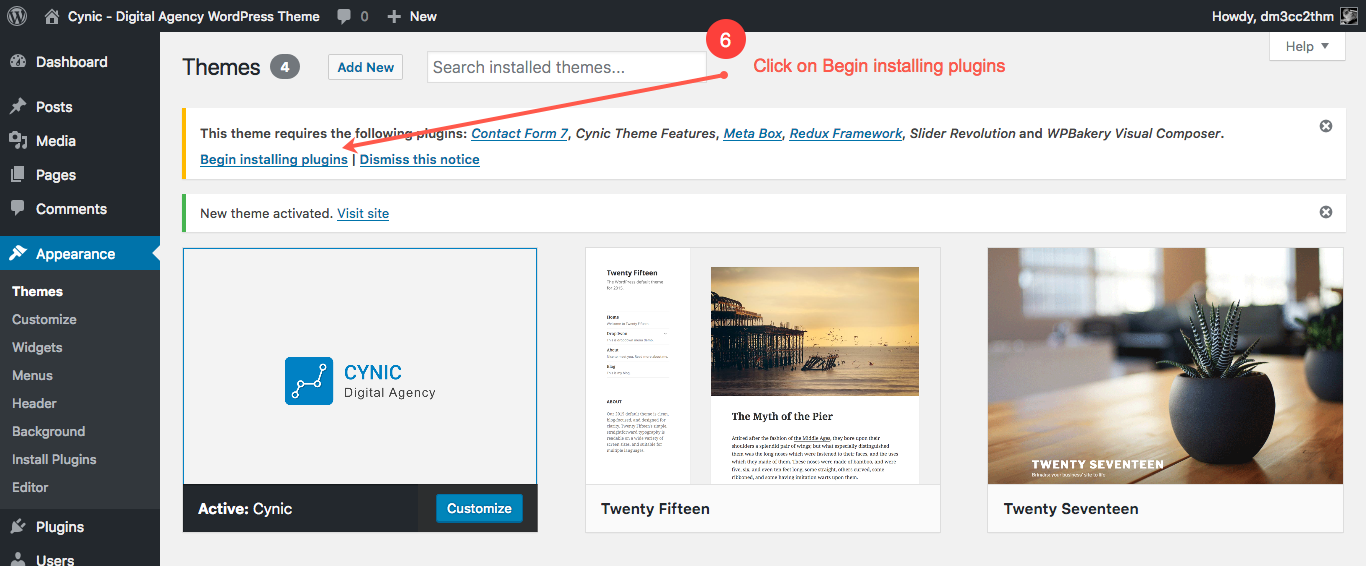
3.1. Using Theme Uploader
Follow the steps as instructed in the images below:
3.2. Using FTP Clients
Follow the following steps to upload your theme using FTP clients:
- Use an FTP such as FileZilla and go to your WordPress installation director
- Navigate to /wp-content/themes/ folder and upload the theme folder ther
- Log in to your WP Admin Dashboard and open the 'Appearance / Themes' menu
- You will now see Schorl Theme listed among the other themes. Click on activate and you’re done!
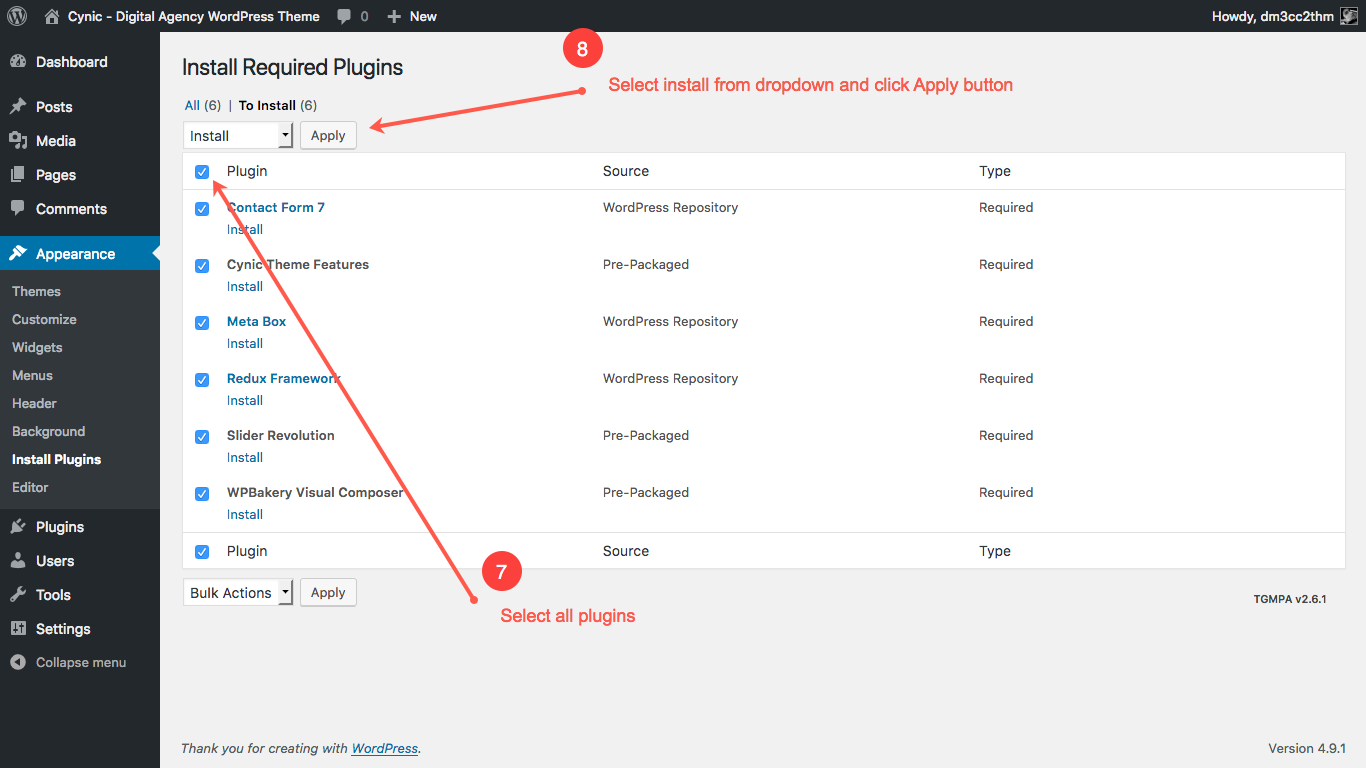
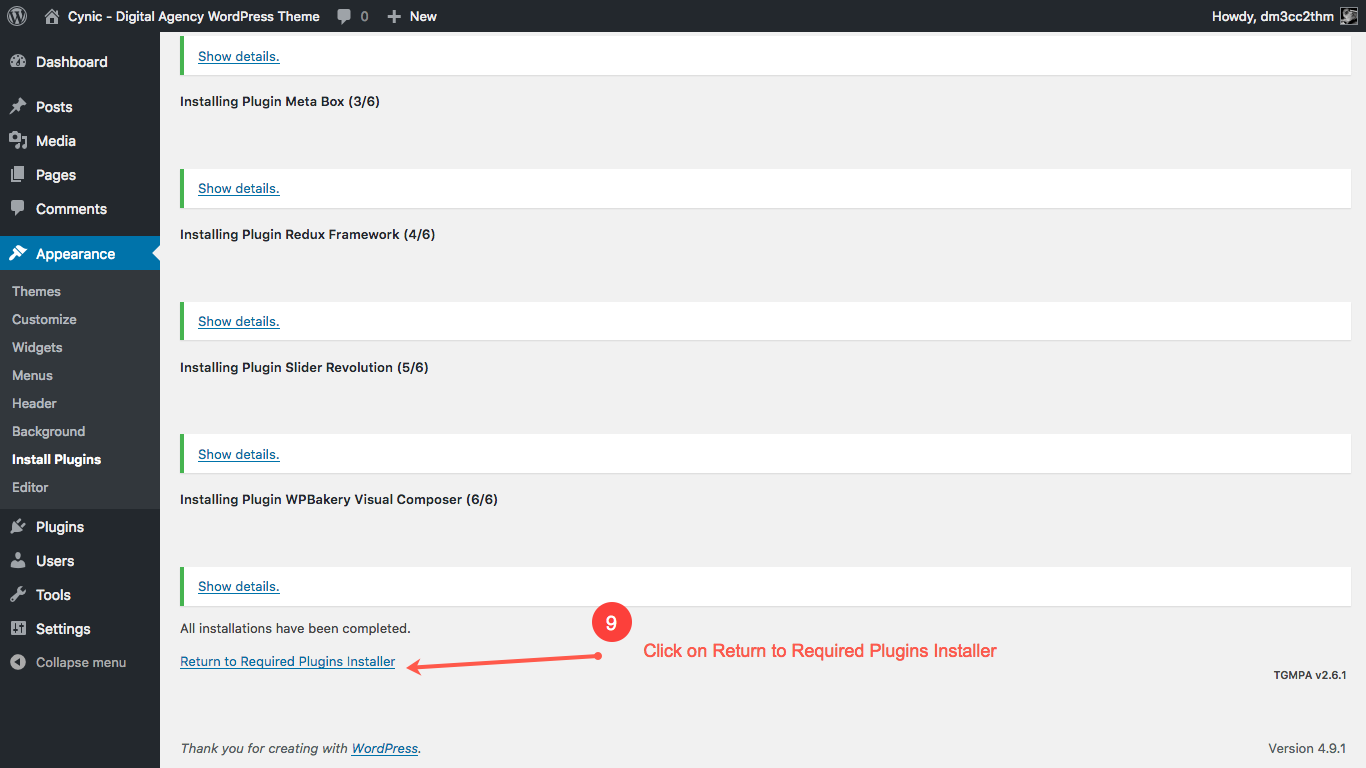
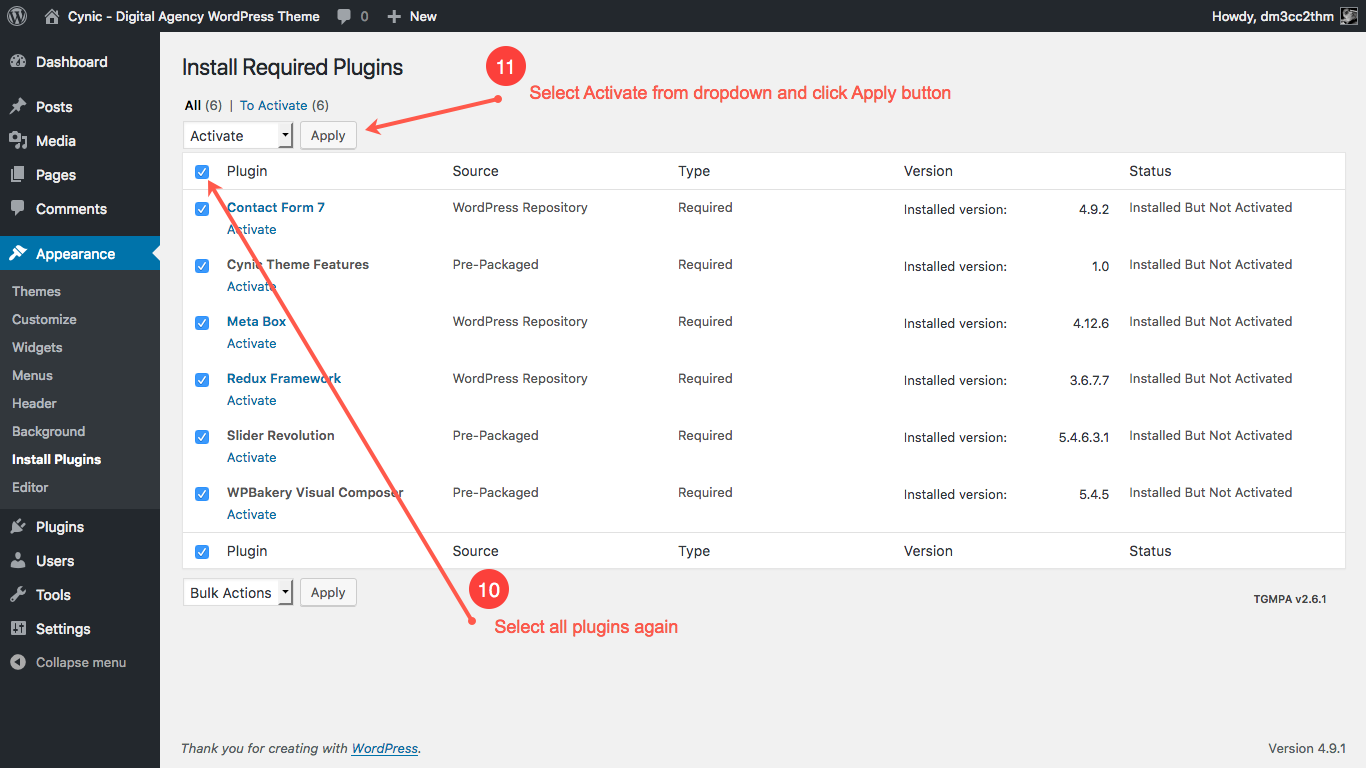
4. Importing Demo Contents
Cynic provides easy solution for importing demo that you saw on our preview website. Please follow the instructions below:
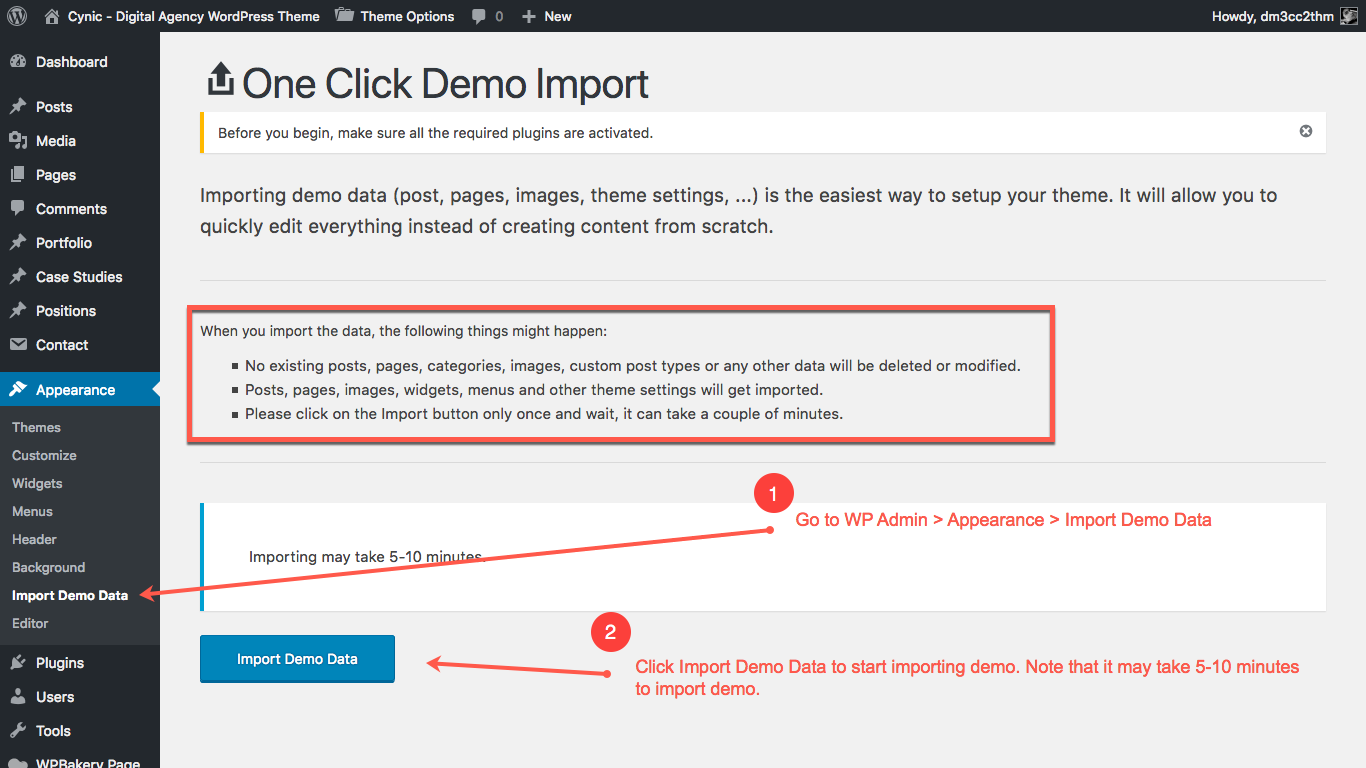
Note: we have included all the necessary contents in the demo. Some unnecessary contents such as dummy blog posts, portfolio projects, case studies, team members are not included in the demo because you will not need them. Please upload your actual content in the site.
5. Theme Modification
You can see the following settings from Theme Options tab in the left menu:
5.1 Theme Options
You can see the following settings from Theme Options tab in the left menu:
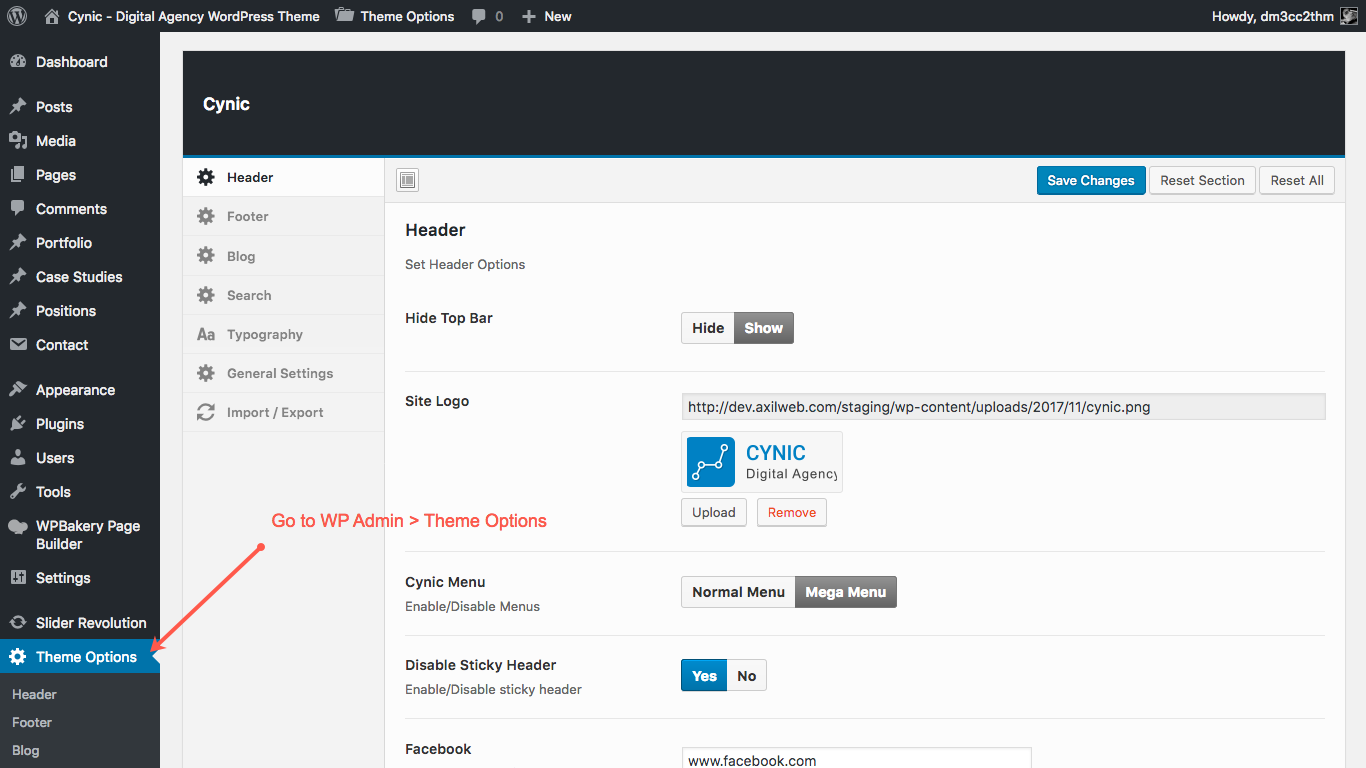
You can change the following items from Theme Options:
- Header
- Top bar show/hide
- Change logo
- Change menu type (normal/mega menu)
- Sticky header enable/disable
- Social medial links
- Email address and phone number in top bar
- Featured button action in header
- Footer
- Scroll to top show/hide
- Google map API link
- Copyright text
- Footer link modals
- Blog
- Author information show/hide
- Related post show/hide
- Sidebar show/hide
- Comment section show/hide
- Typography
- Heading font
- Body font
- Menu font
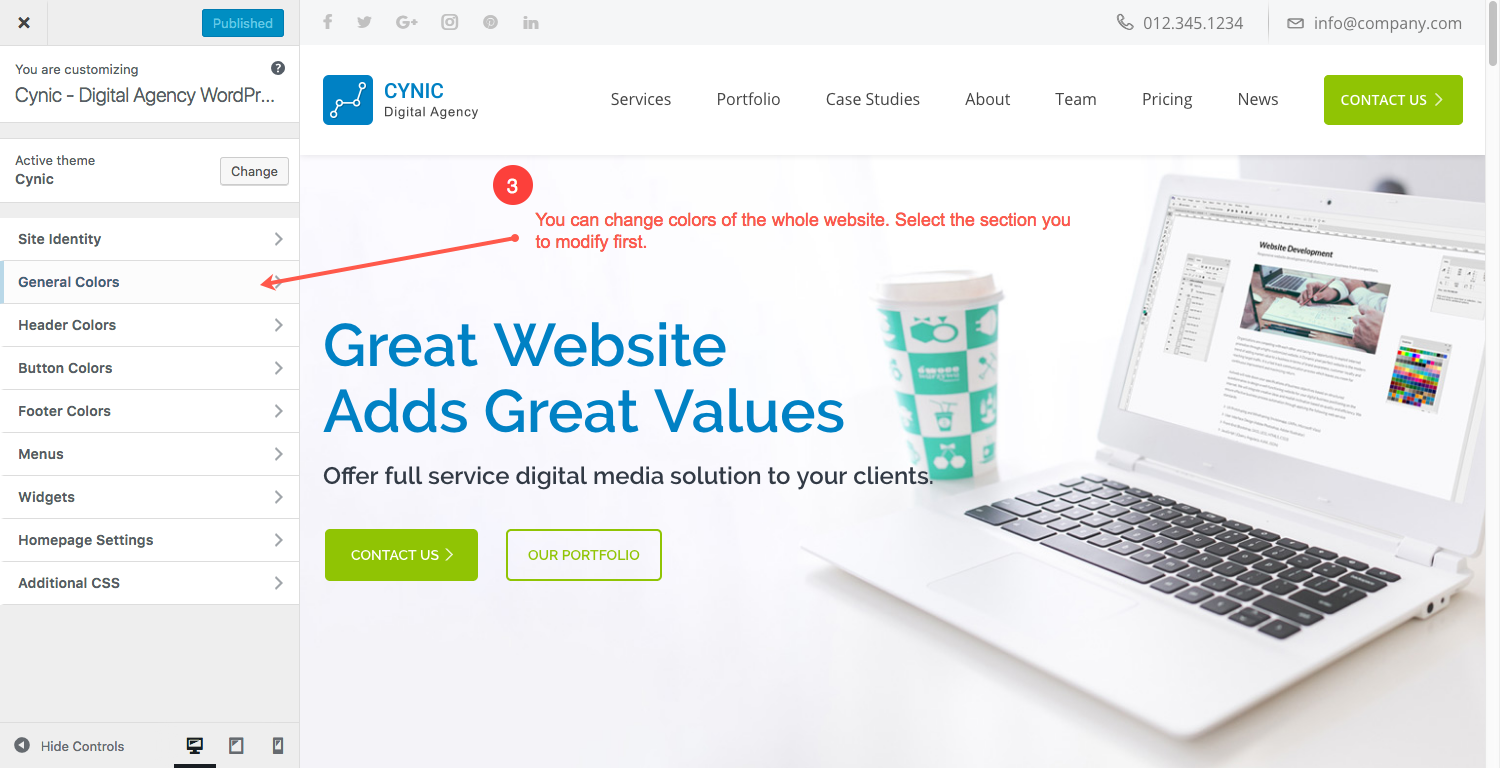
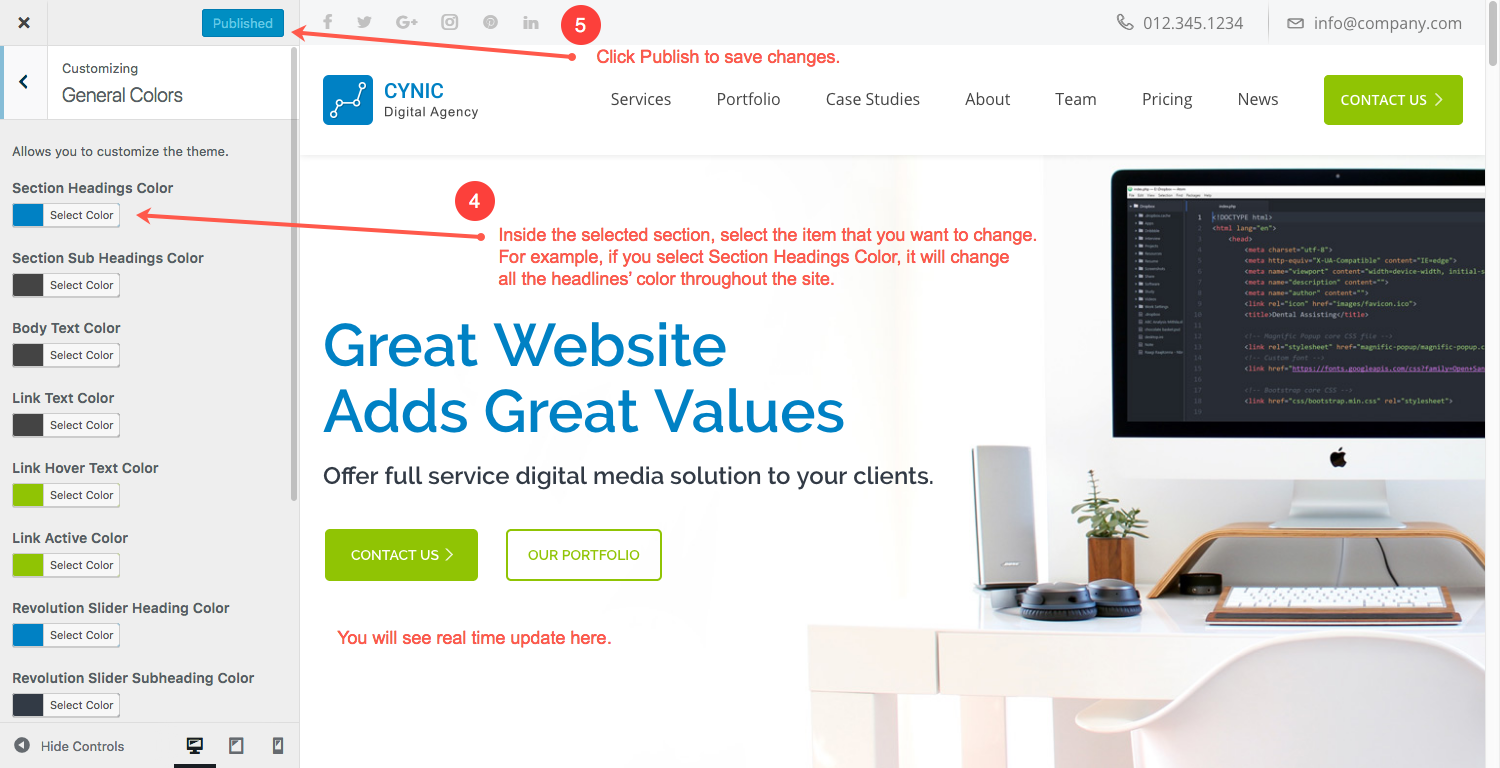
5.2 Theme Colors
Please follow the steps below to change the theme colors. You can almost change every color and test before changing the color.
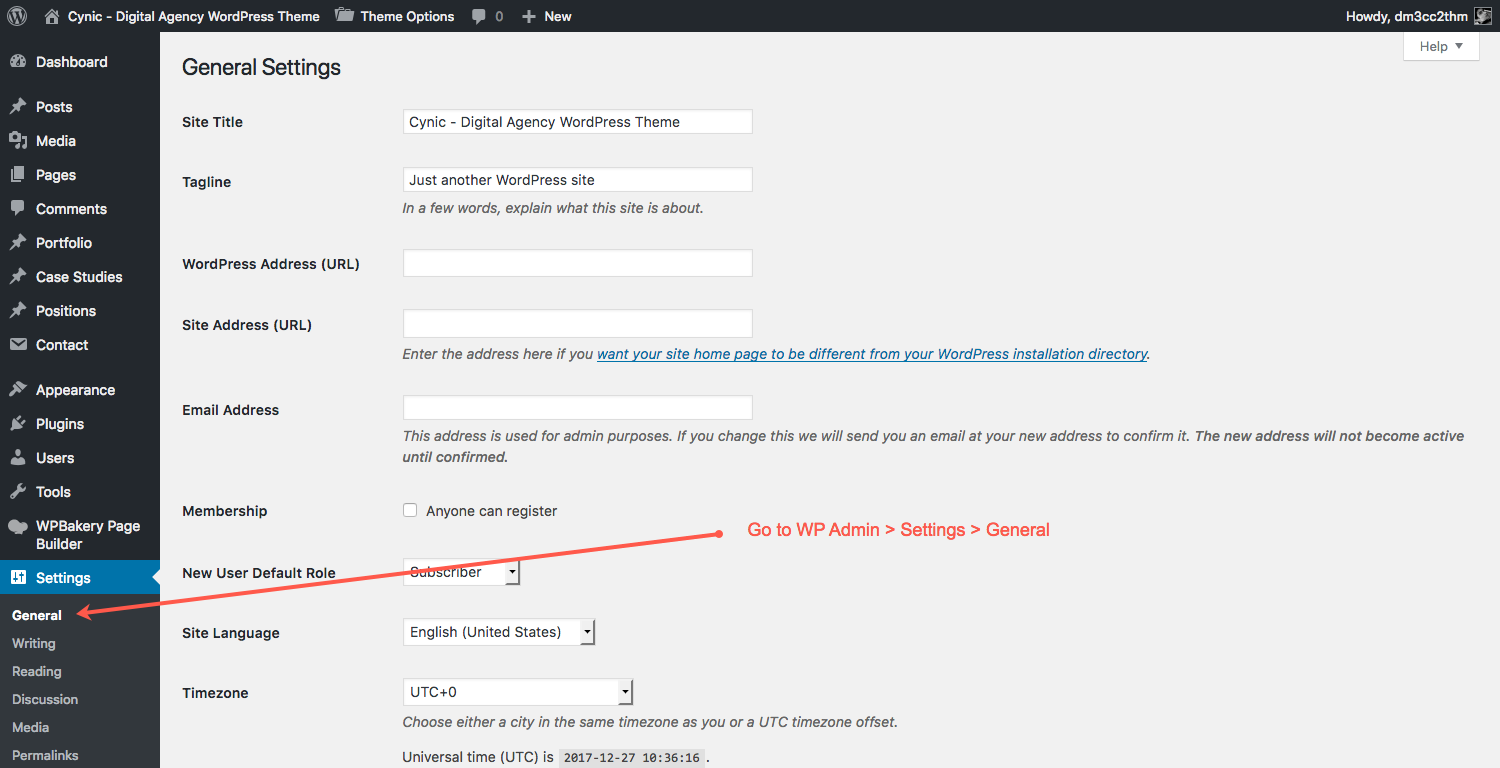
5.3 General Settings
You can change the following settings from this option:
- Site title
- Tagline of the site for showing on browser title
- WordPress URL and Site URL
- Super admin email address
6. Modify Site Contents and Structure
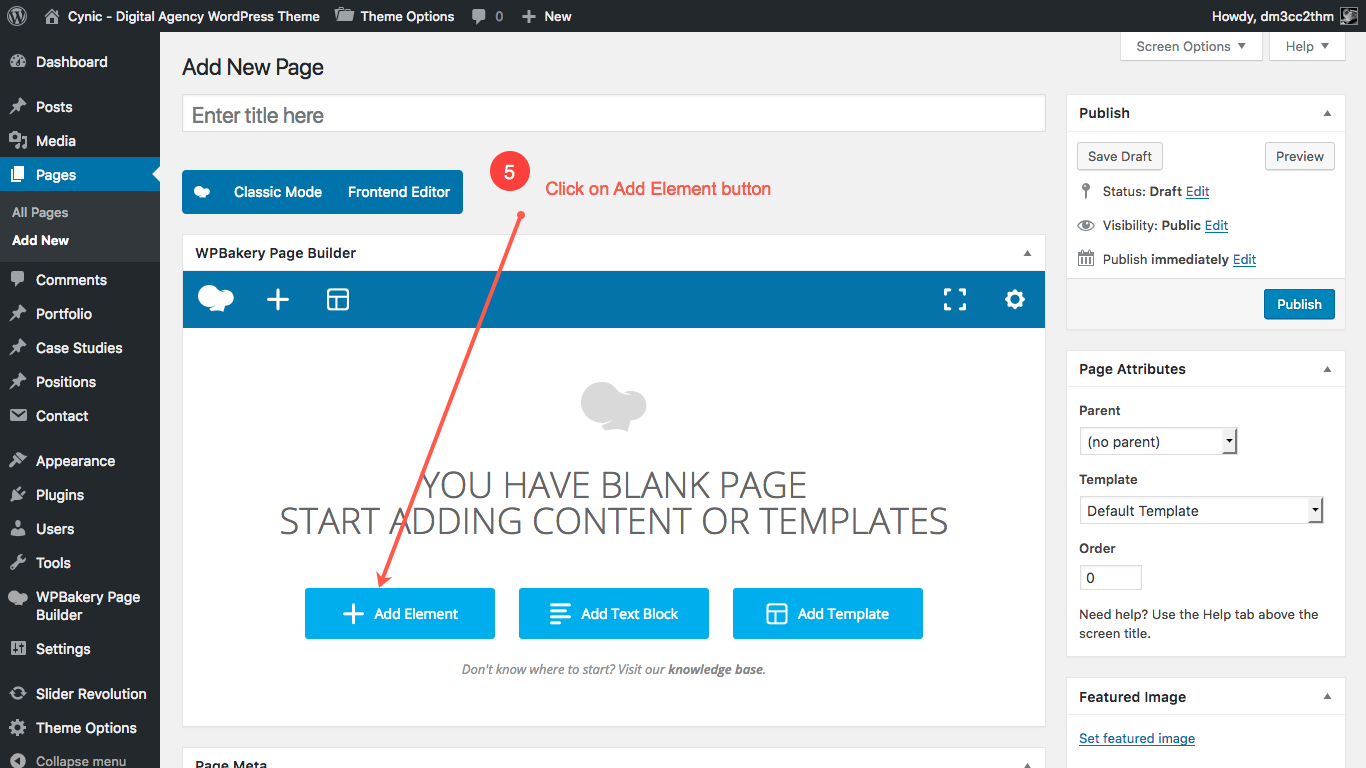
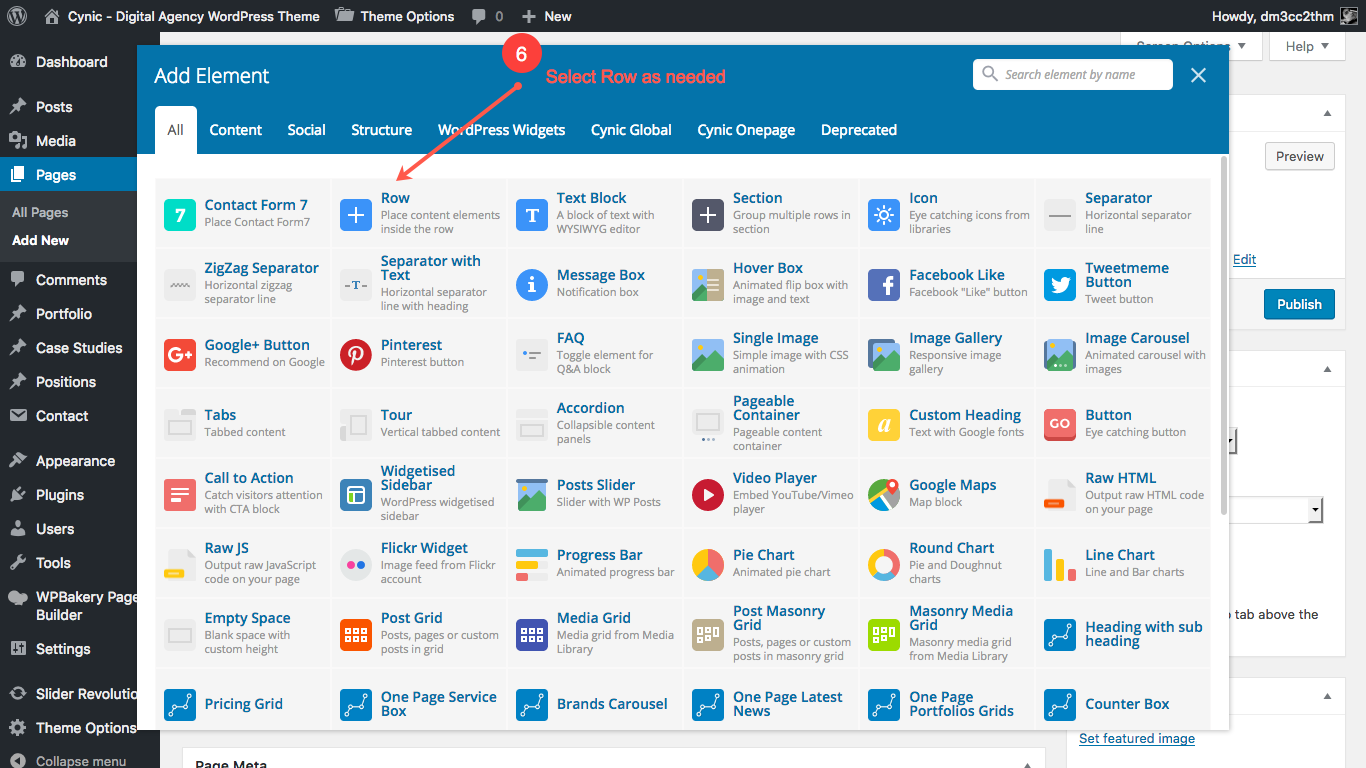
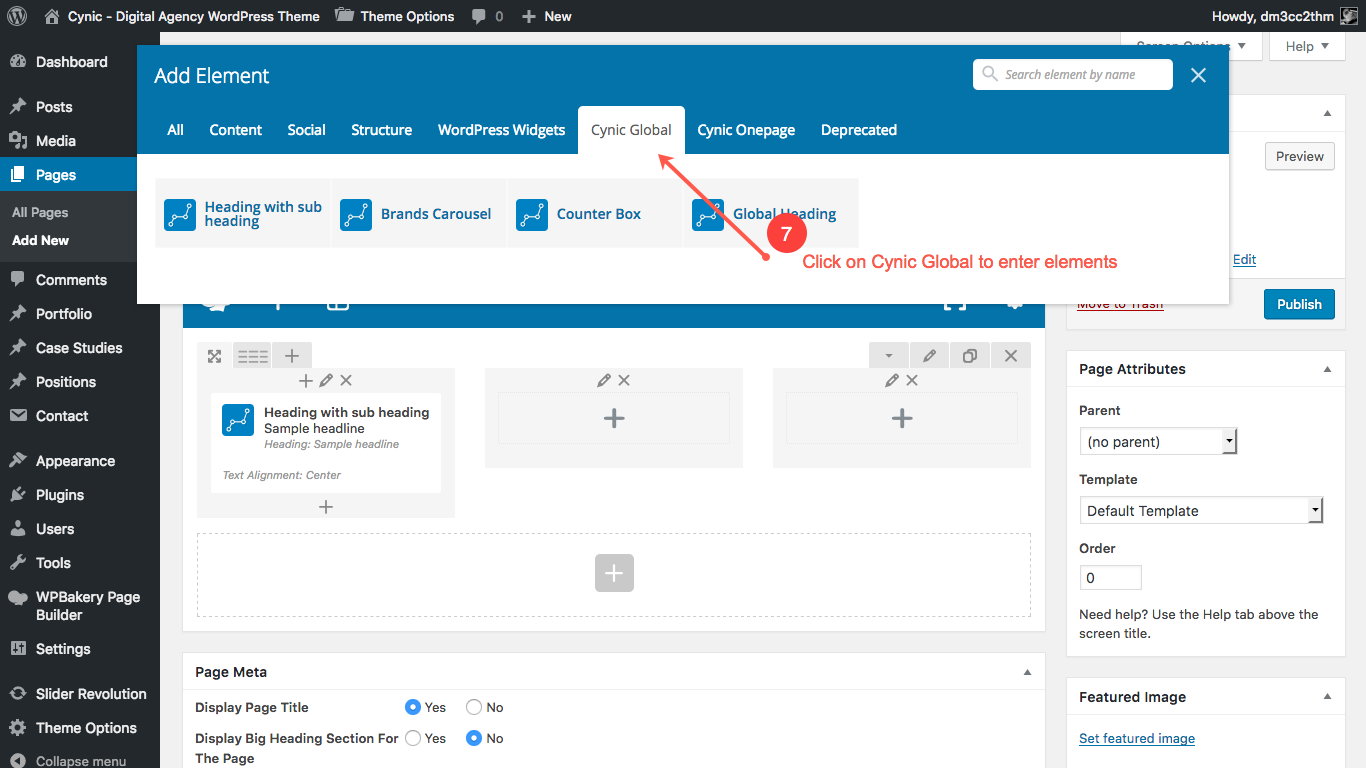
6.1 Add New Page
To add a new page, you will need to follow the specific steps carefully. These are the generic steps for adding any kind of pages.


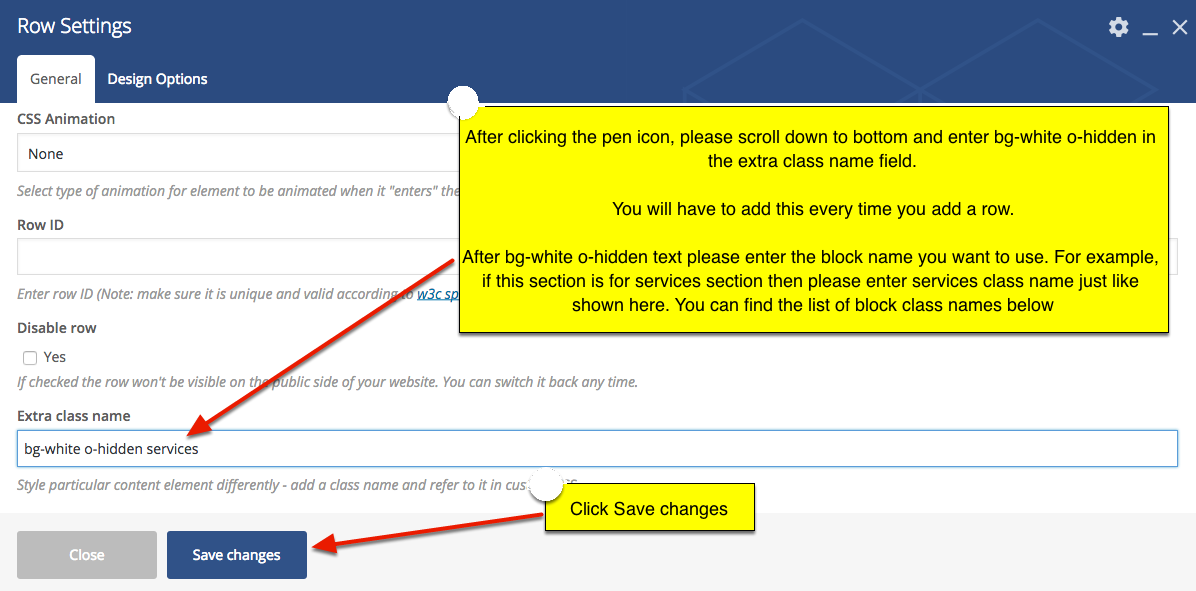
- bg-white - Used for keeping 90px spacing at the top of a content.
- banner-inner - Used for inner page banners.
- common-form-section - Used for the content blocks with a right side form element.
- customise-form - Used for forms.
- design-process-section - Used for process sections.
- success-number - Used in front-page 'Success in Numbers' section.
- grey-dark-bg - Used for dark-grey backgrounds.
- light-ash-bg - Used for footer's background color.
- full-portfolio - Used in the filterable portfolio section of the Porfolio page.
- team_members - Used in team page 'It Takes Two Flints to Make a Fire' section.
- join-our-team - Used in career page 'Why Join Our Team?' section.
- blog-item - Used on blog page content blocks.
- contact-form-wrapper - Used in contact page 'Send Us a Message' section.
- error-404 - Used in 404-error-page content section.
- under-construction - Used in under-construction page content section.
- privecy-content - Used in terms-conditions and privacy-policy page content sections.
Visual Composer documentation for further help:
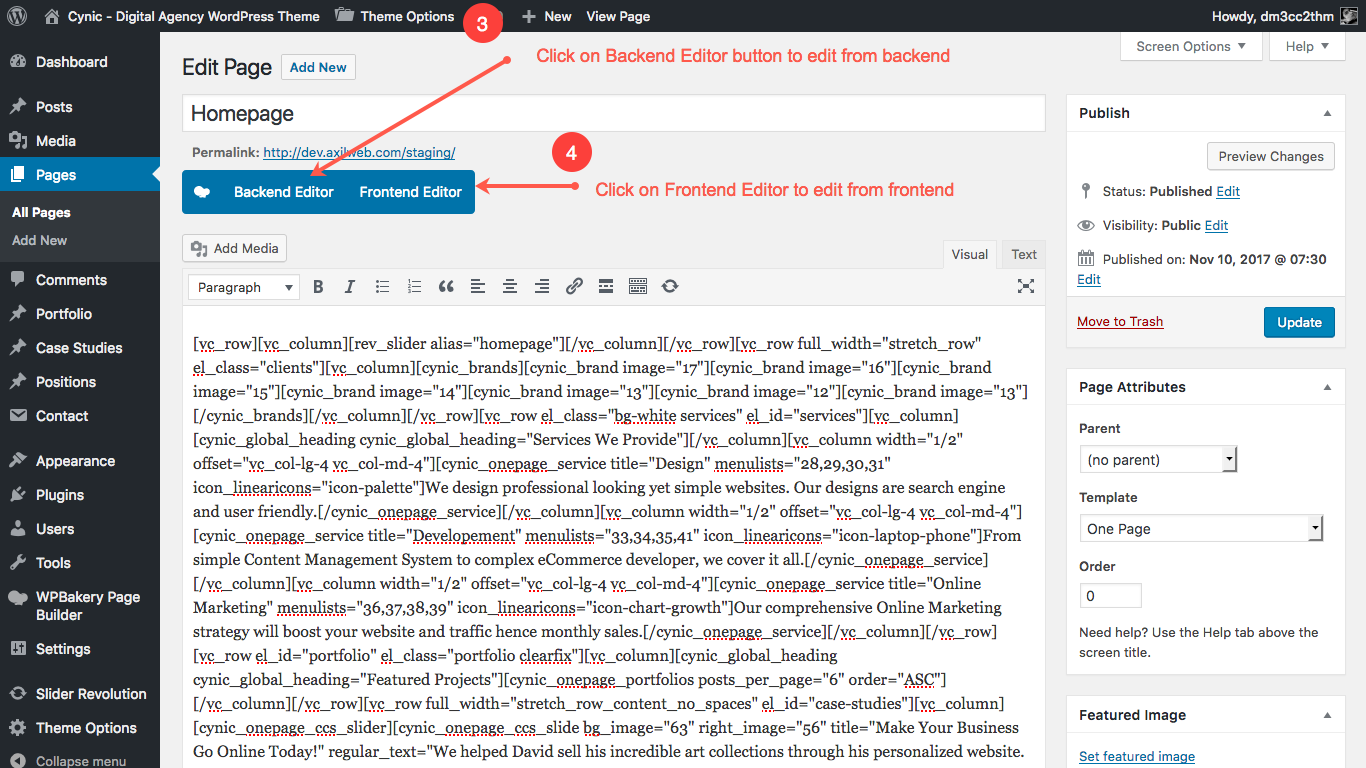
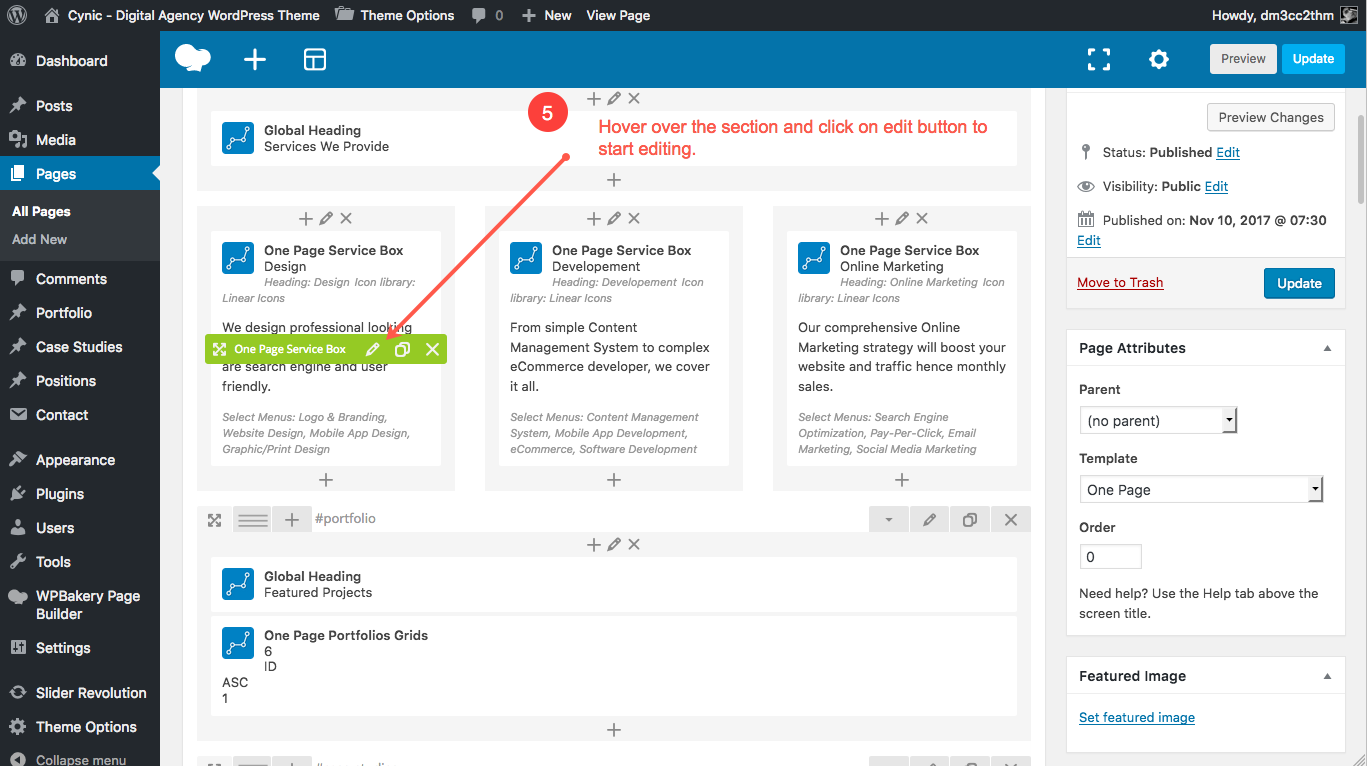
https://wpbakery.atlassian.net/wiki/spaces/VC/pages/524303/Getting+Started6.2 Edit Page Contents

6.3 Homepage Slider
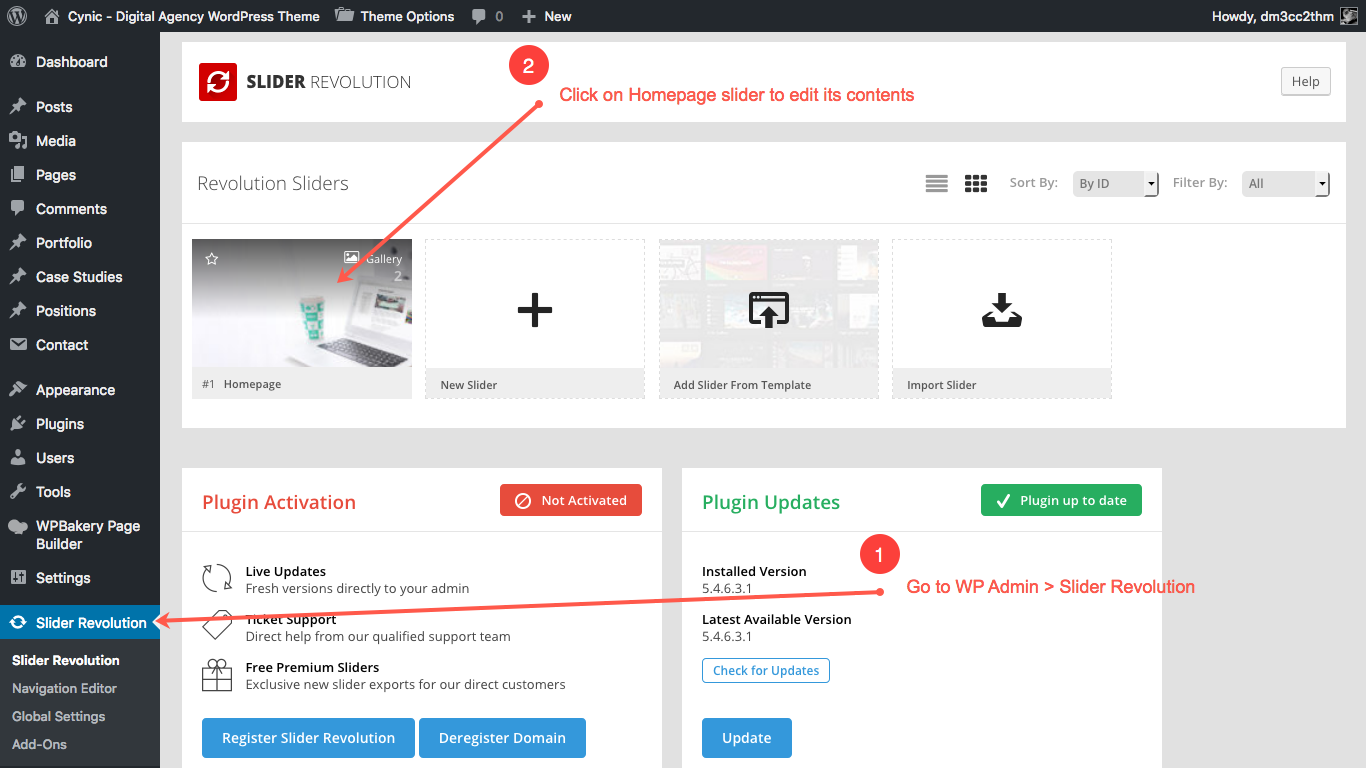
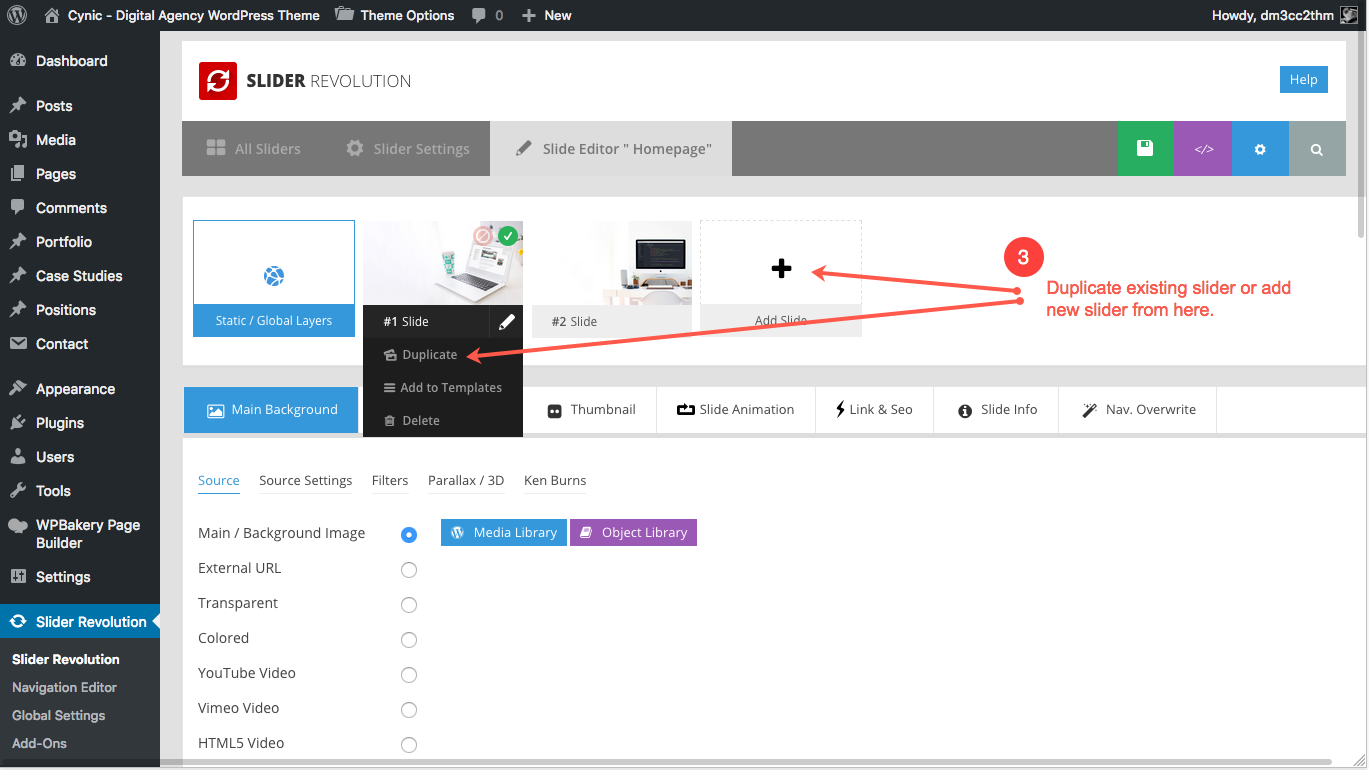
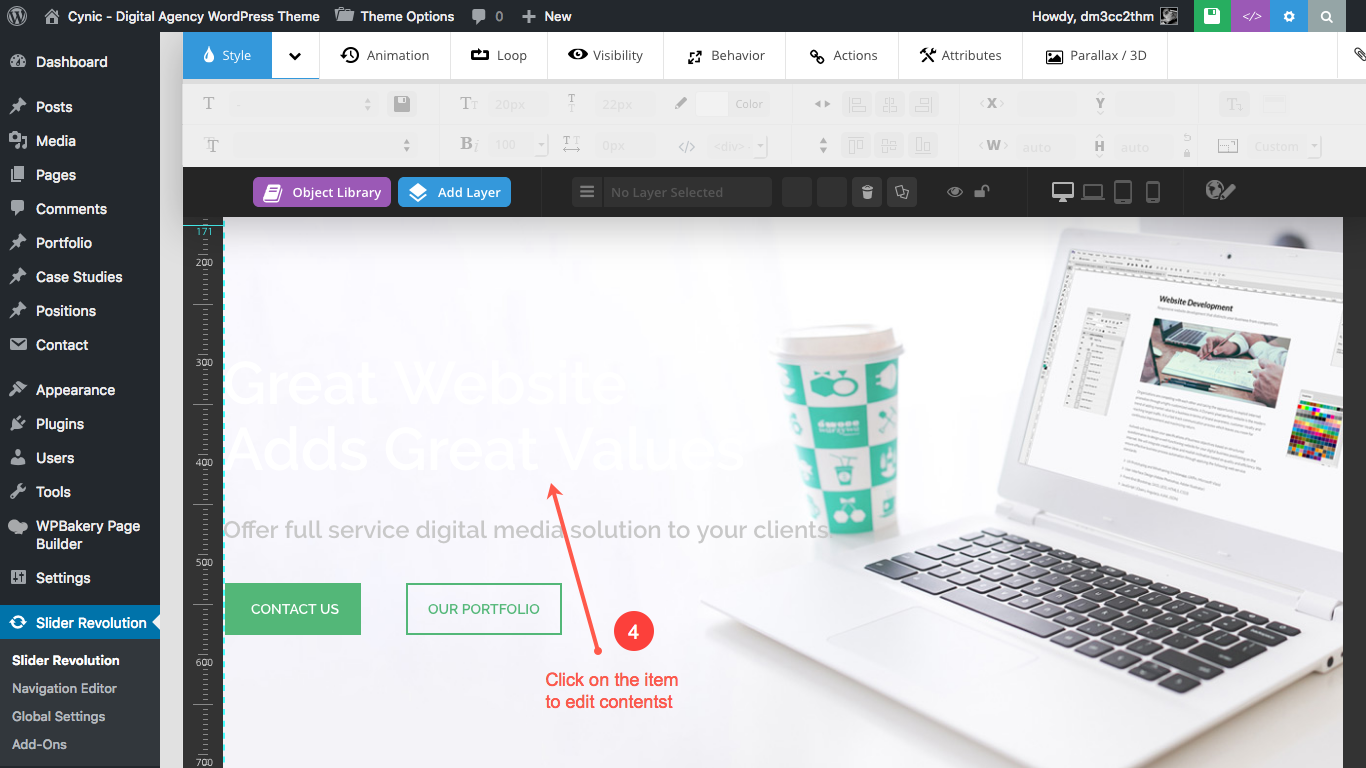
Revolution Slider documentation for further help
https://www.themepunch.com/revslider-doc/slider-revolution-documentation/6.4 Contact Email Address
To change the email addresses that will receive the messages from contact forms and quotation forms, please follow the instructions below:
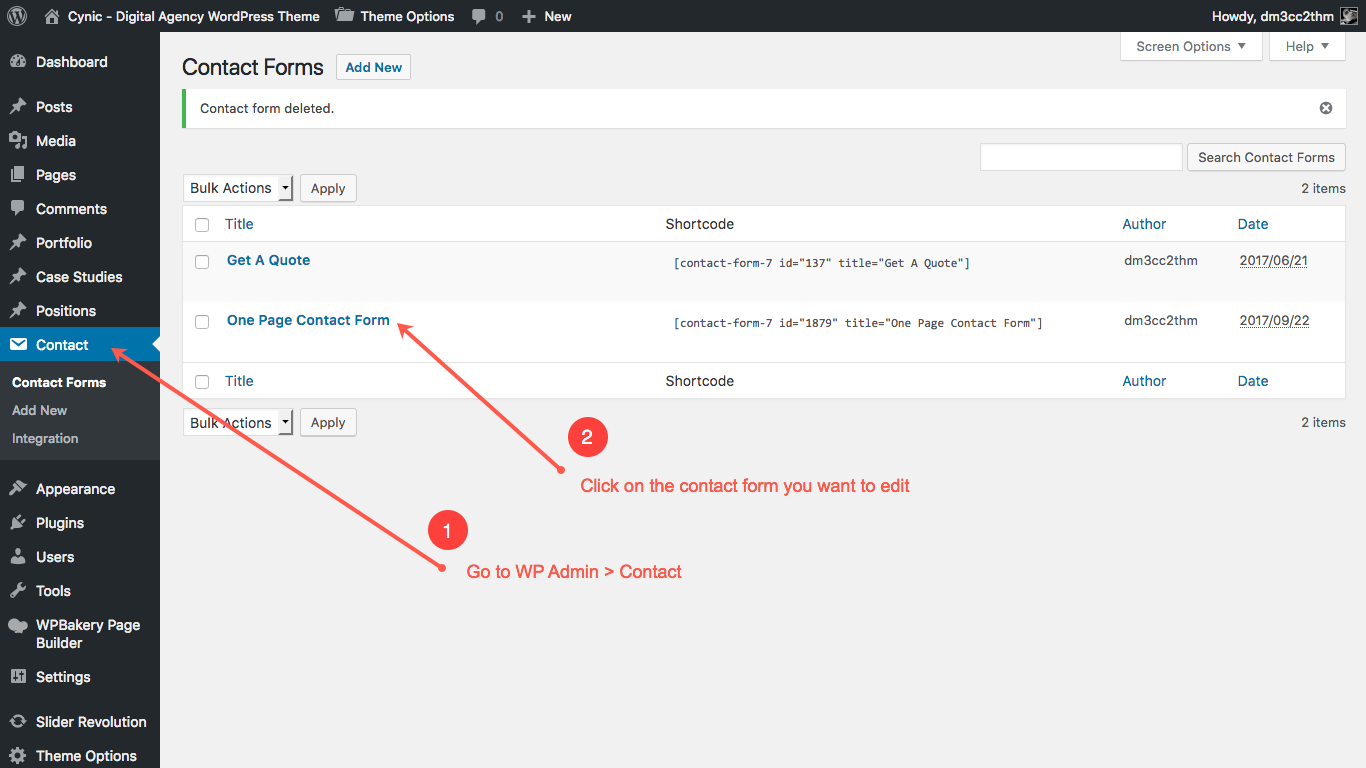
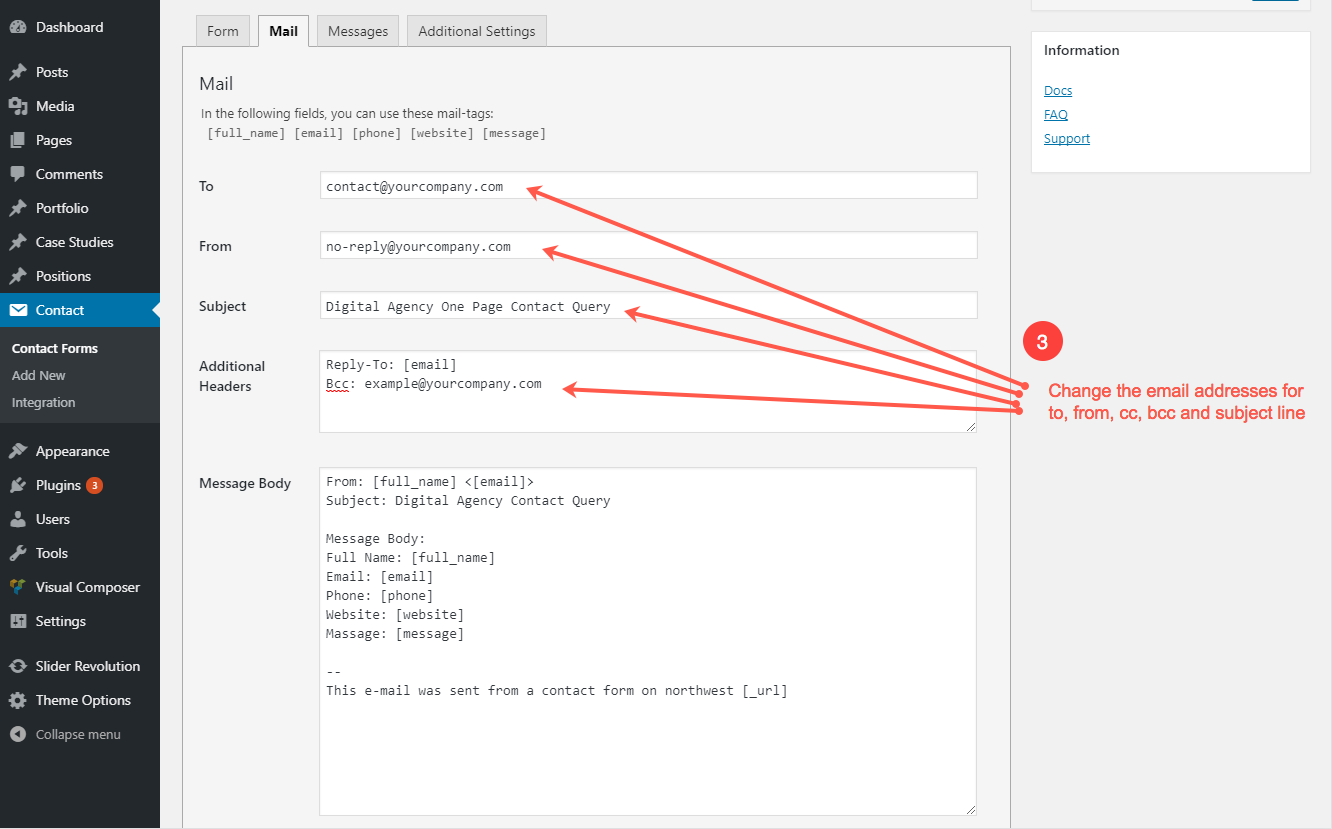
Contact Form 7 documentation for further help
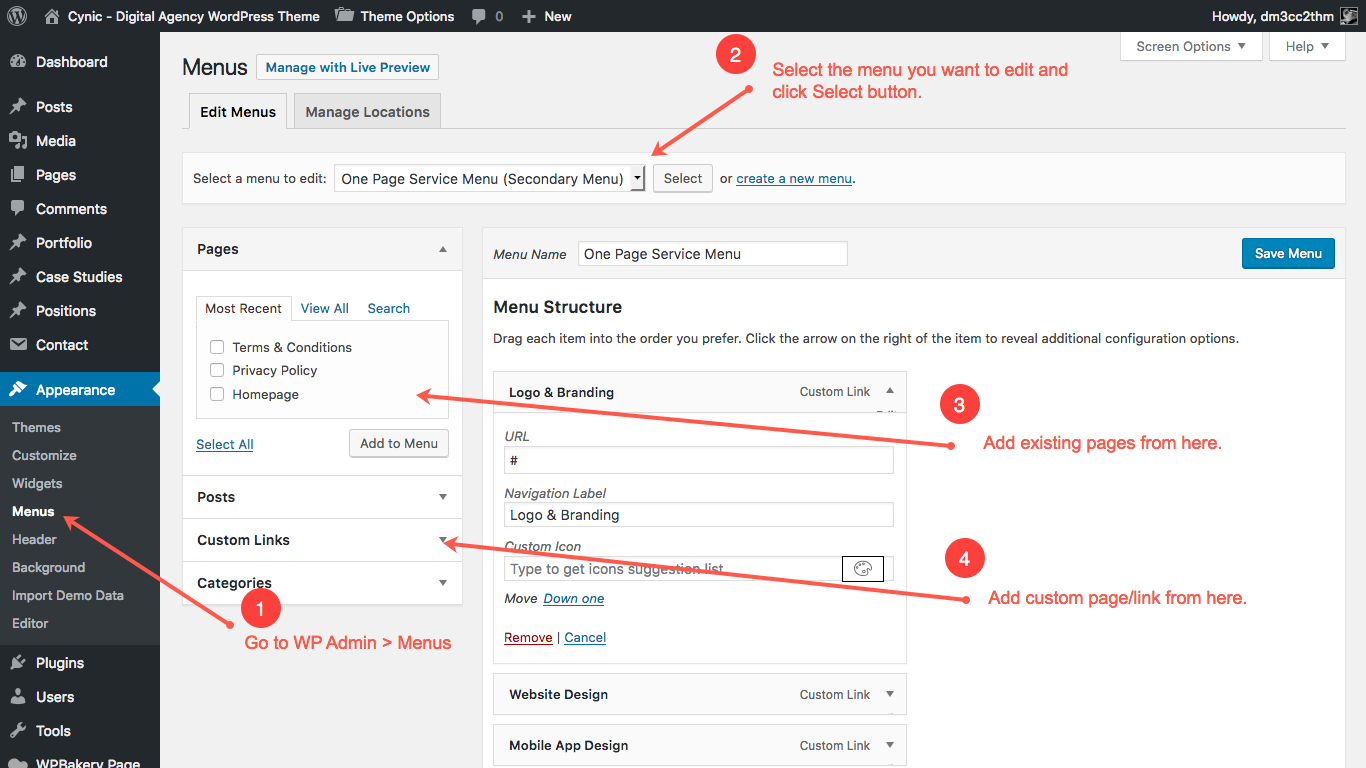
https://contactform7.com/docs/6.5 Main Menu and Footer Menu
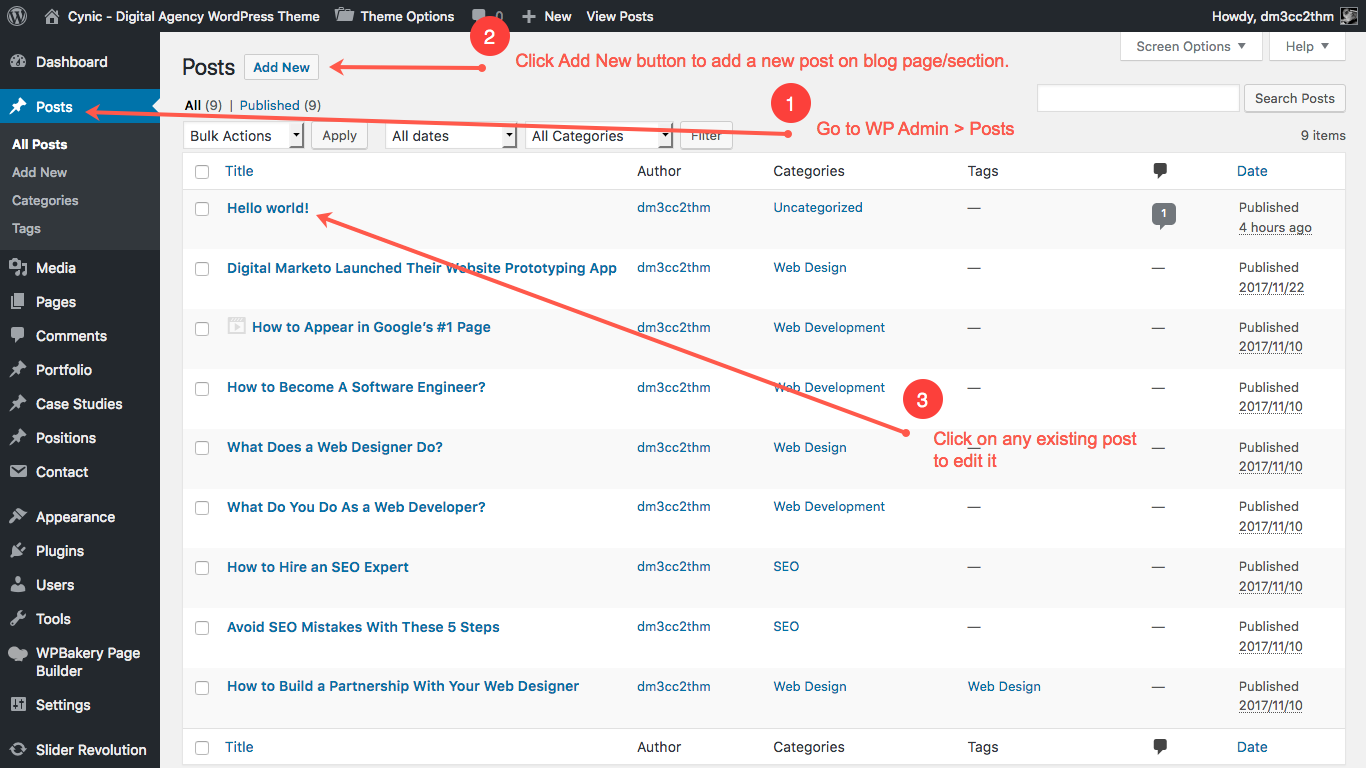
6.6 Add/Modify Blog Post
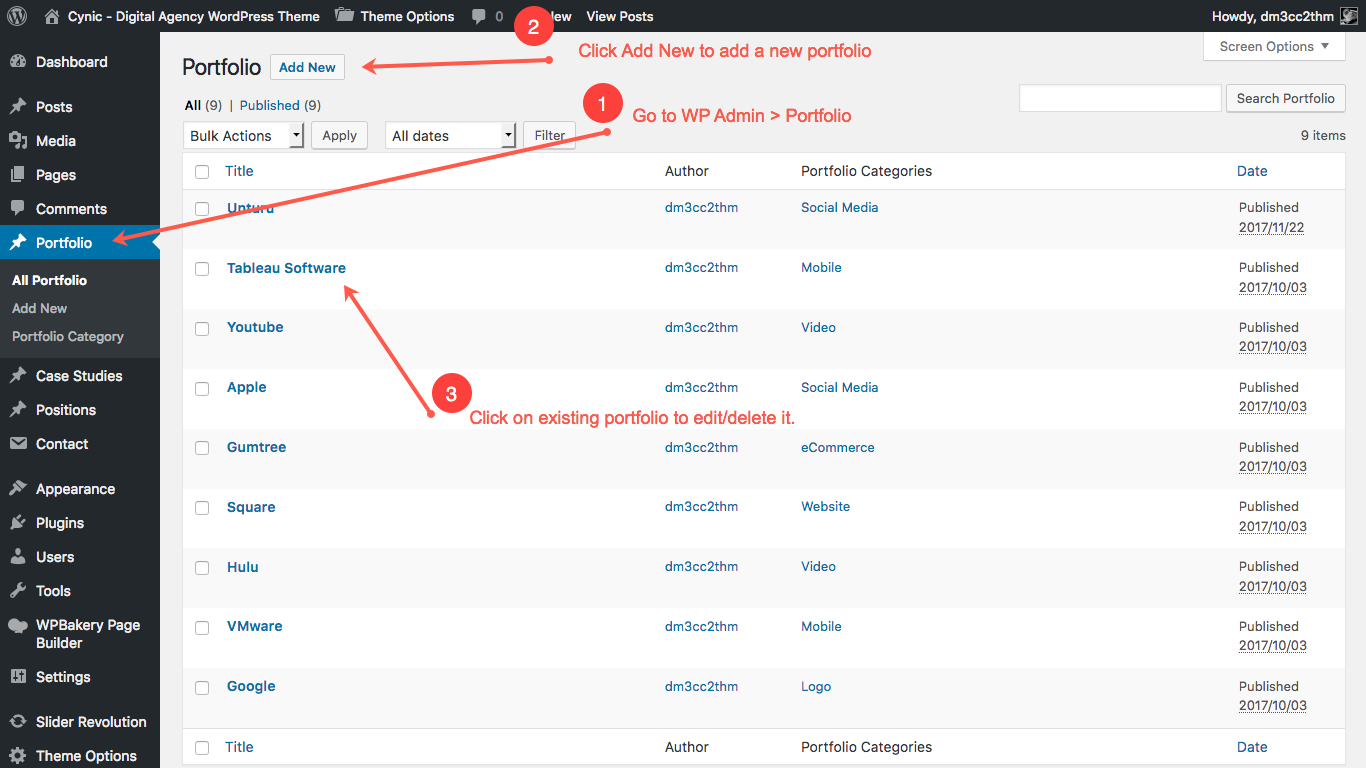
6.7 Add/Modify Portfolio
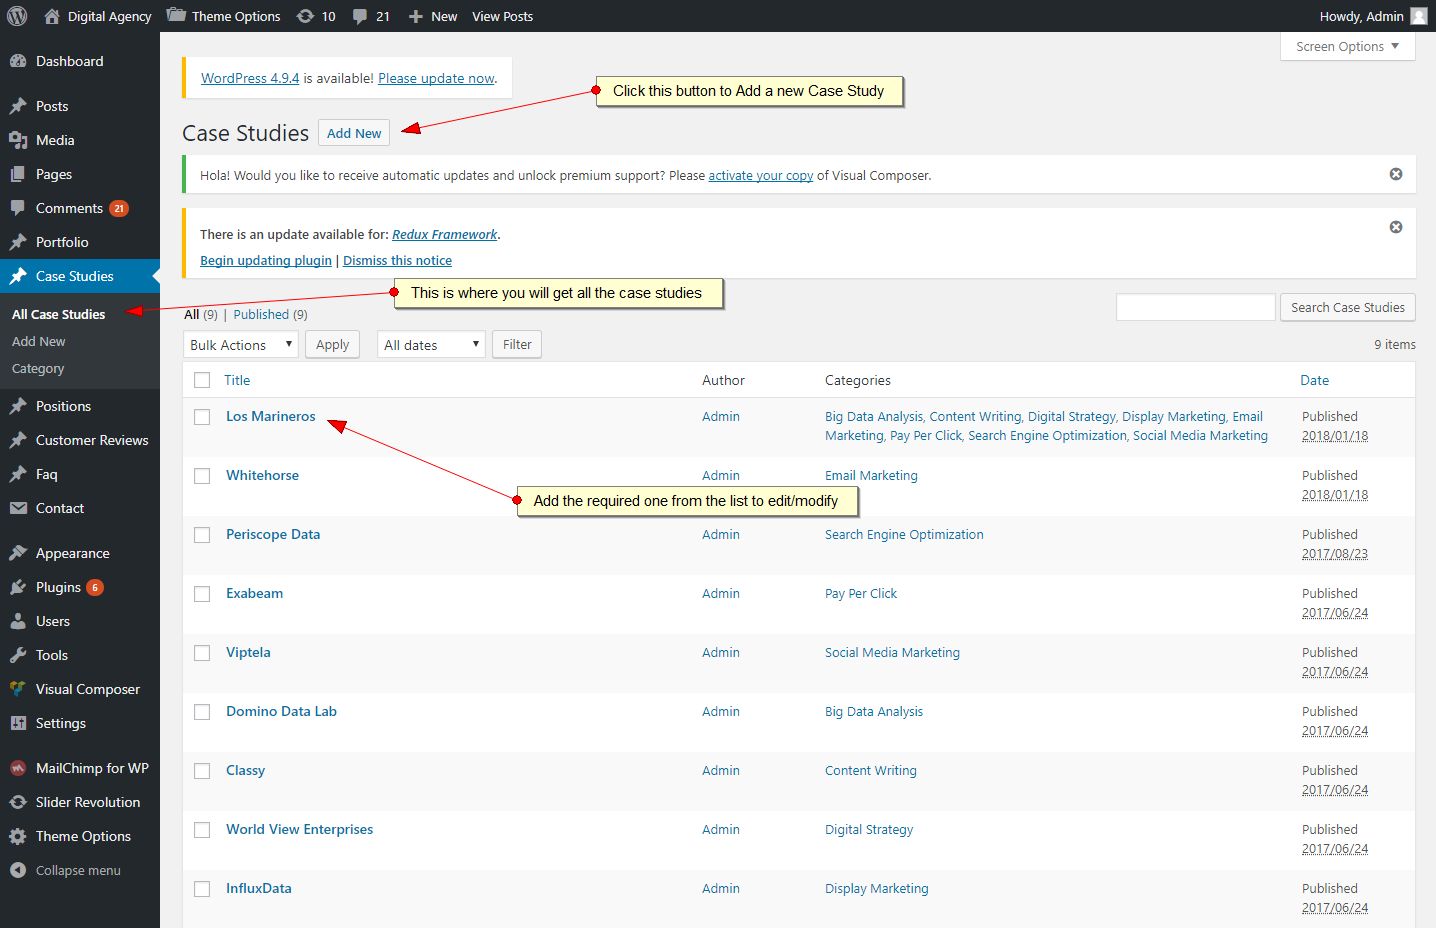
6.8 Add/Modify Case Studies
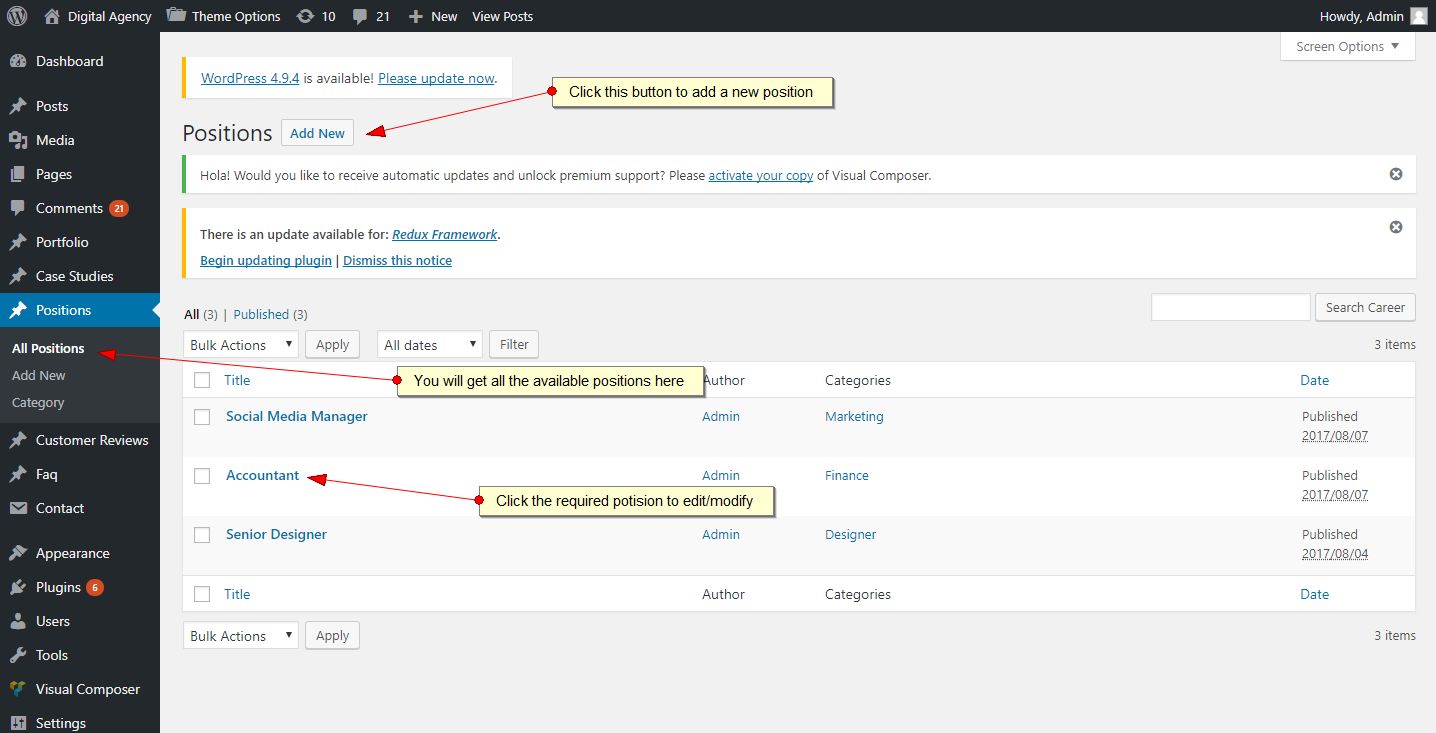
6.9 Add/Modify Positions
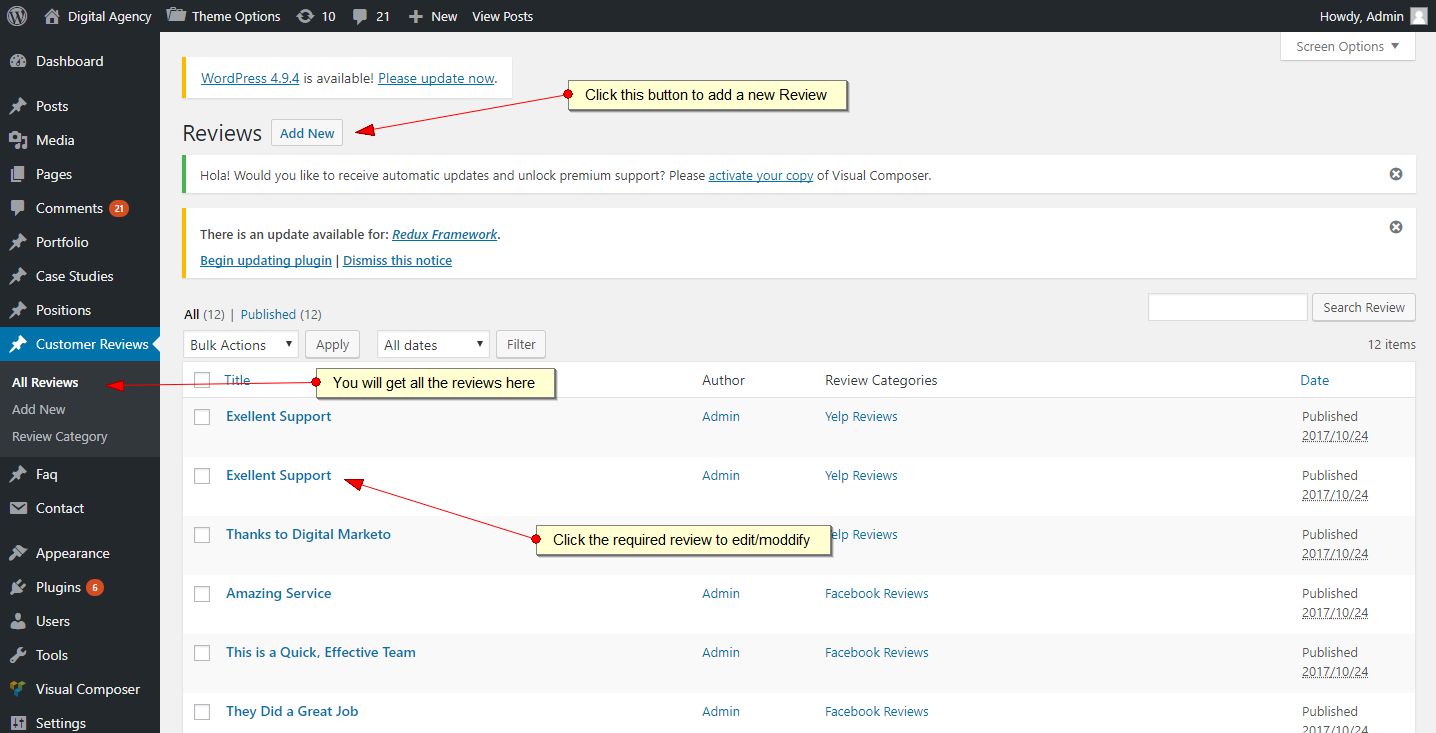
6.10 Add/Modify Customer Reviews
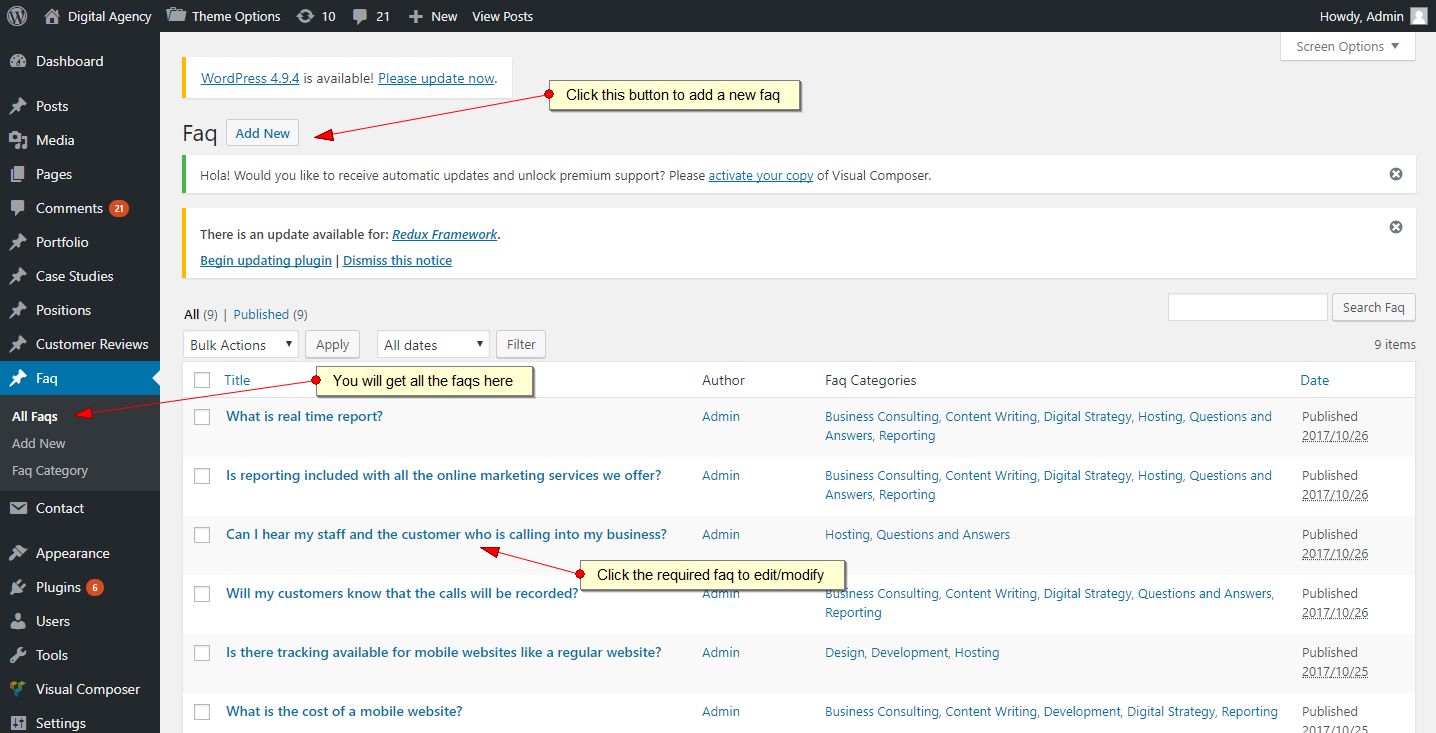
6.11 Add/Modify Faqs
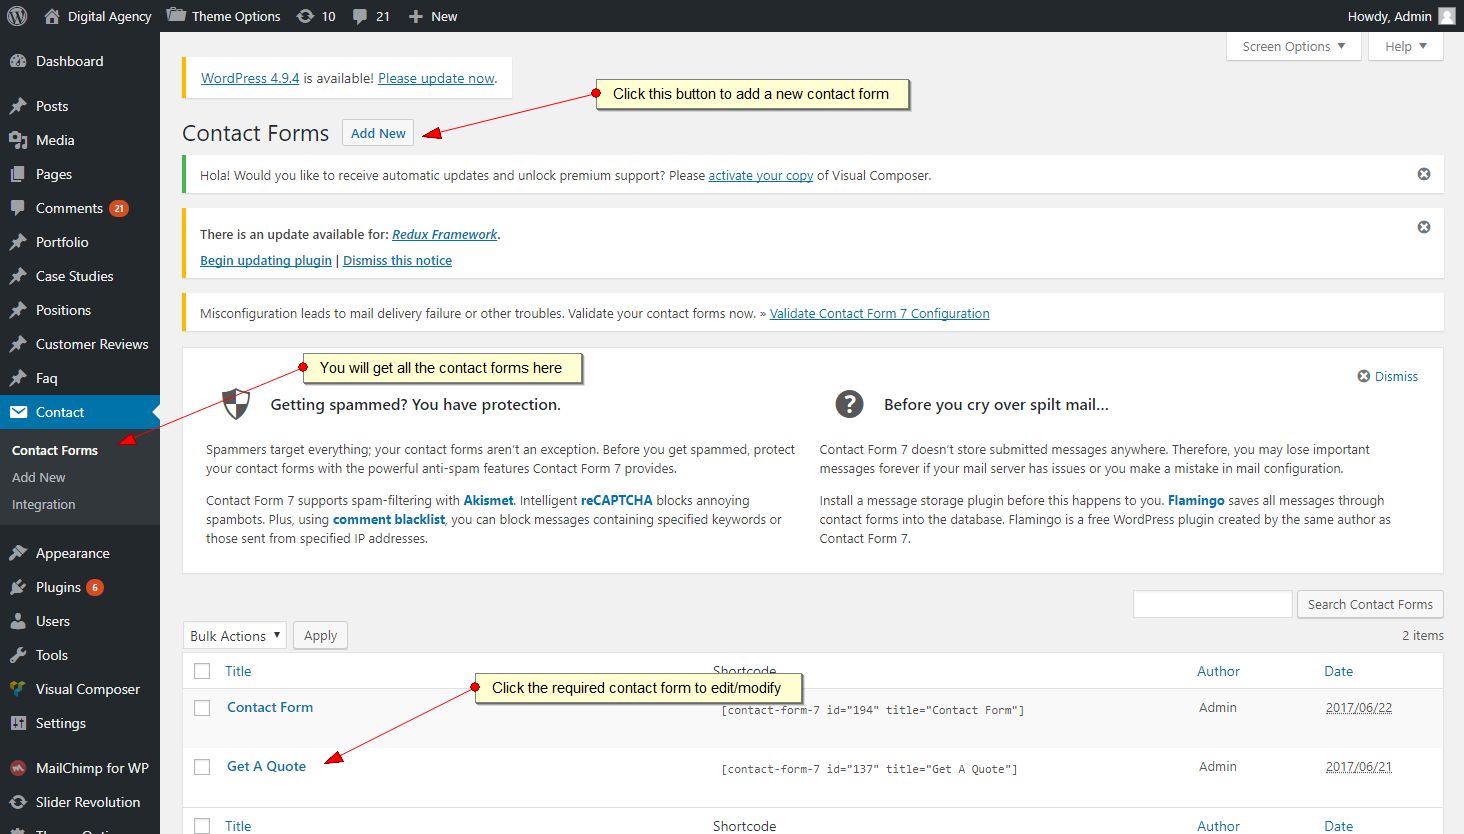
6.12 Add/Modify Contact
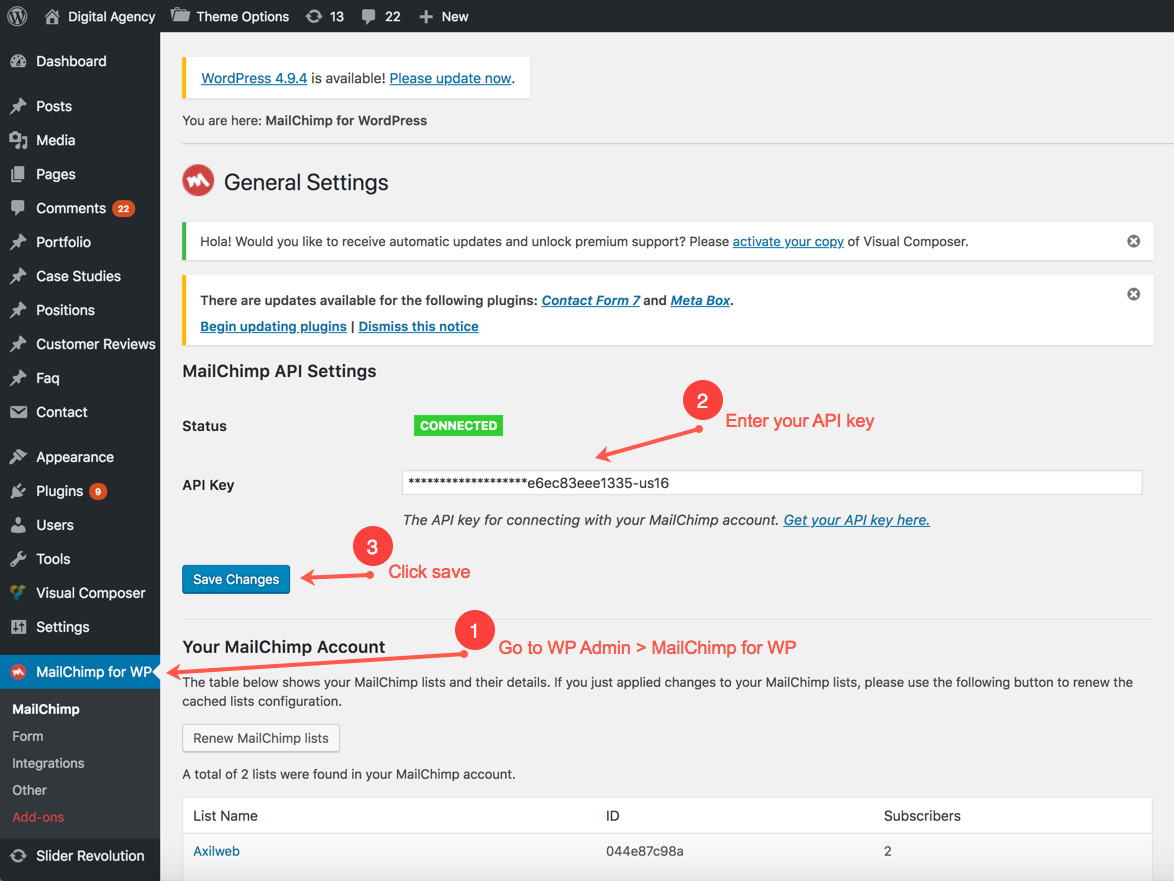
6.13 MailChimp Configuration
- Generate your API key from your MailChimp account. See video tutorial here:
- Enter the API key on Cynic WordPress admin panel. See below for instruction.
7. Others
7.1 Optimize Website
Prerequisites
- Install theme
- Import demo
- Setup your website
Optimization Process
Step 1
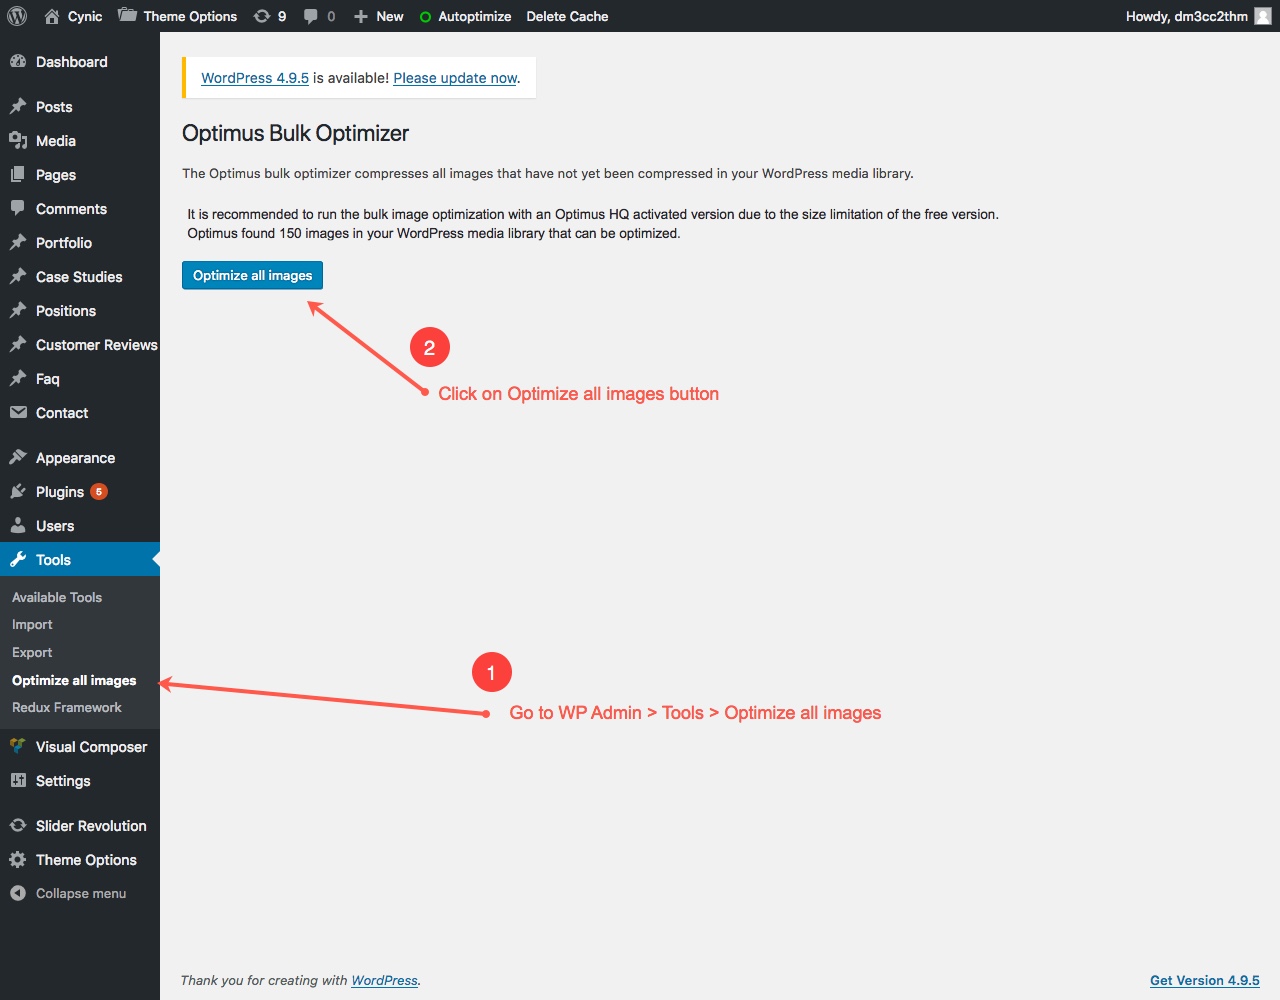
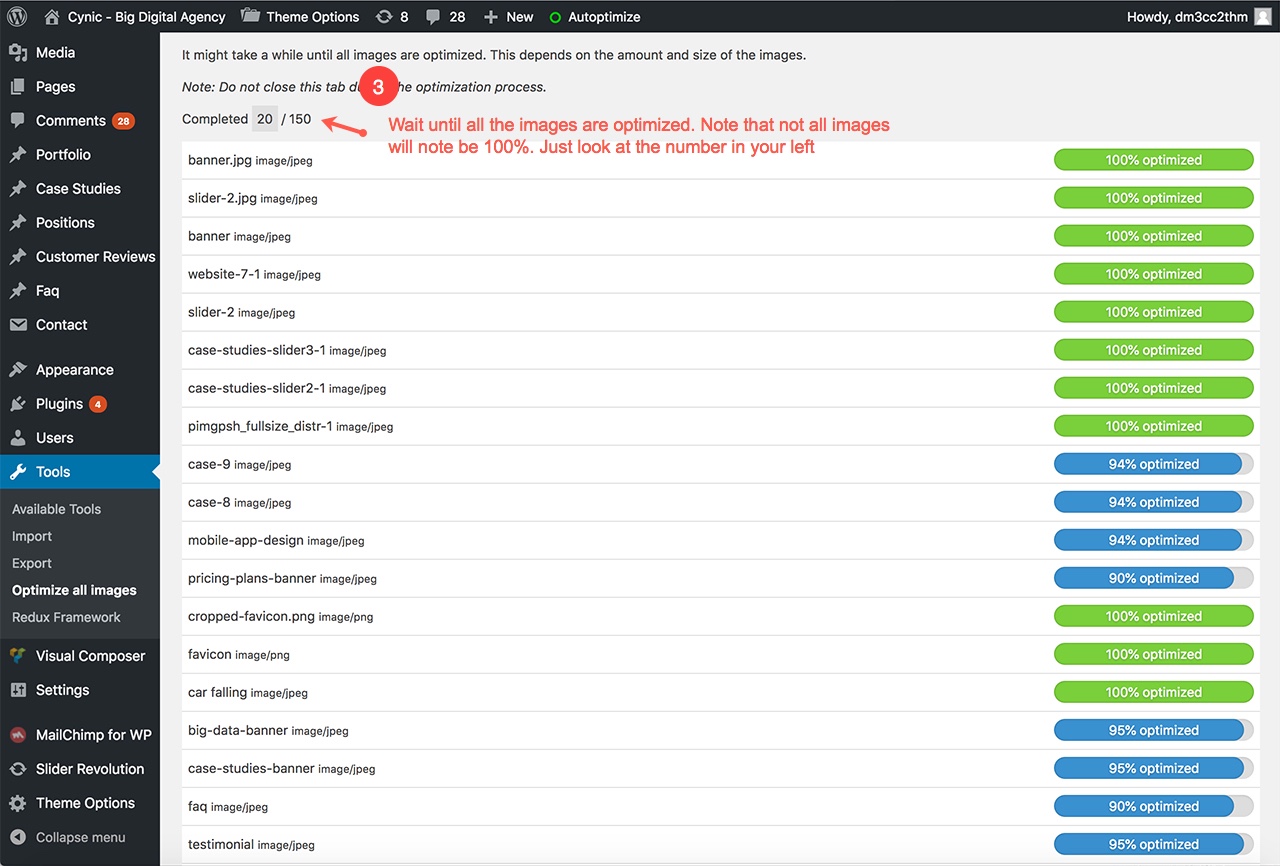
Install the following plugins in your WordPress:
- Optimus https://wordpress.org/plugins/optimus/
- WP Super Cache: https://wordpress.org/plugins/wp-super-cache/
- Autoptimize: https://wordpress.org/plugins/autoptimize/
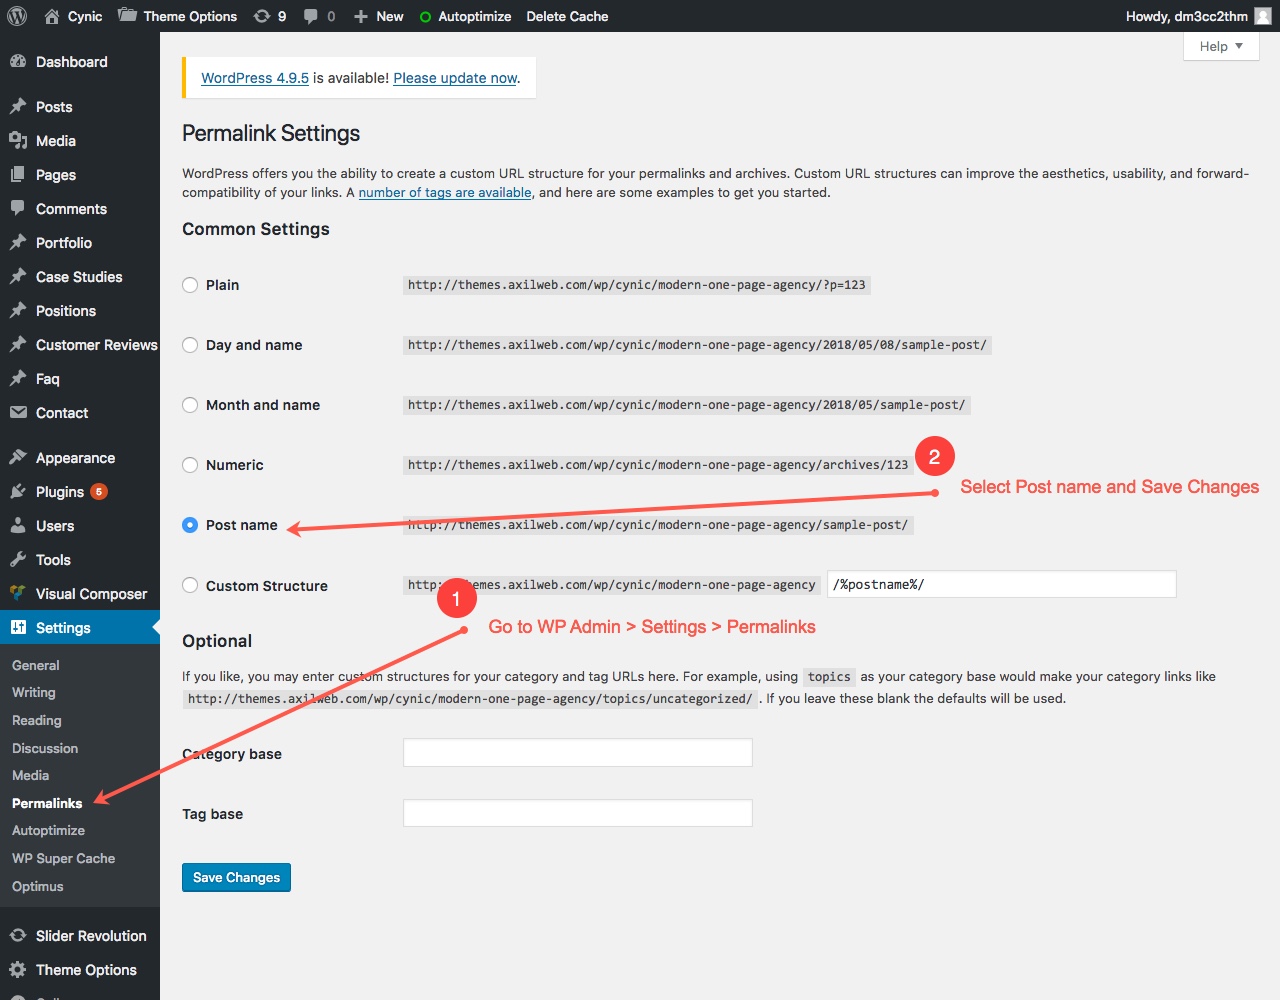
Step 2
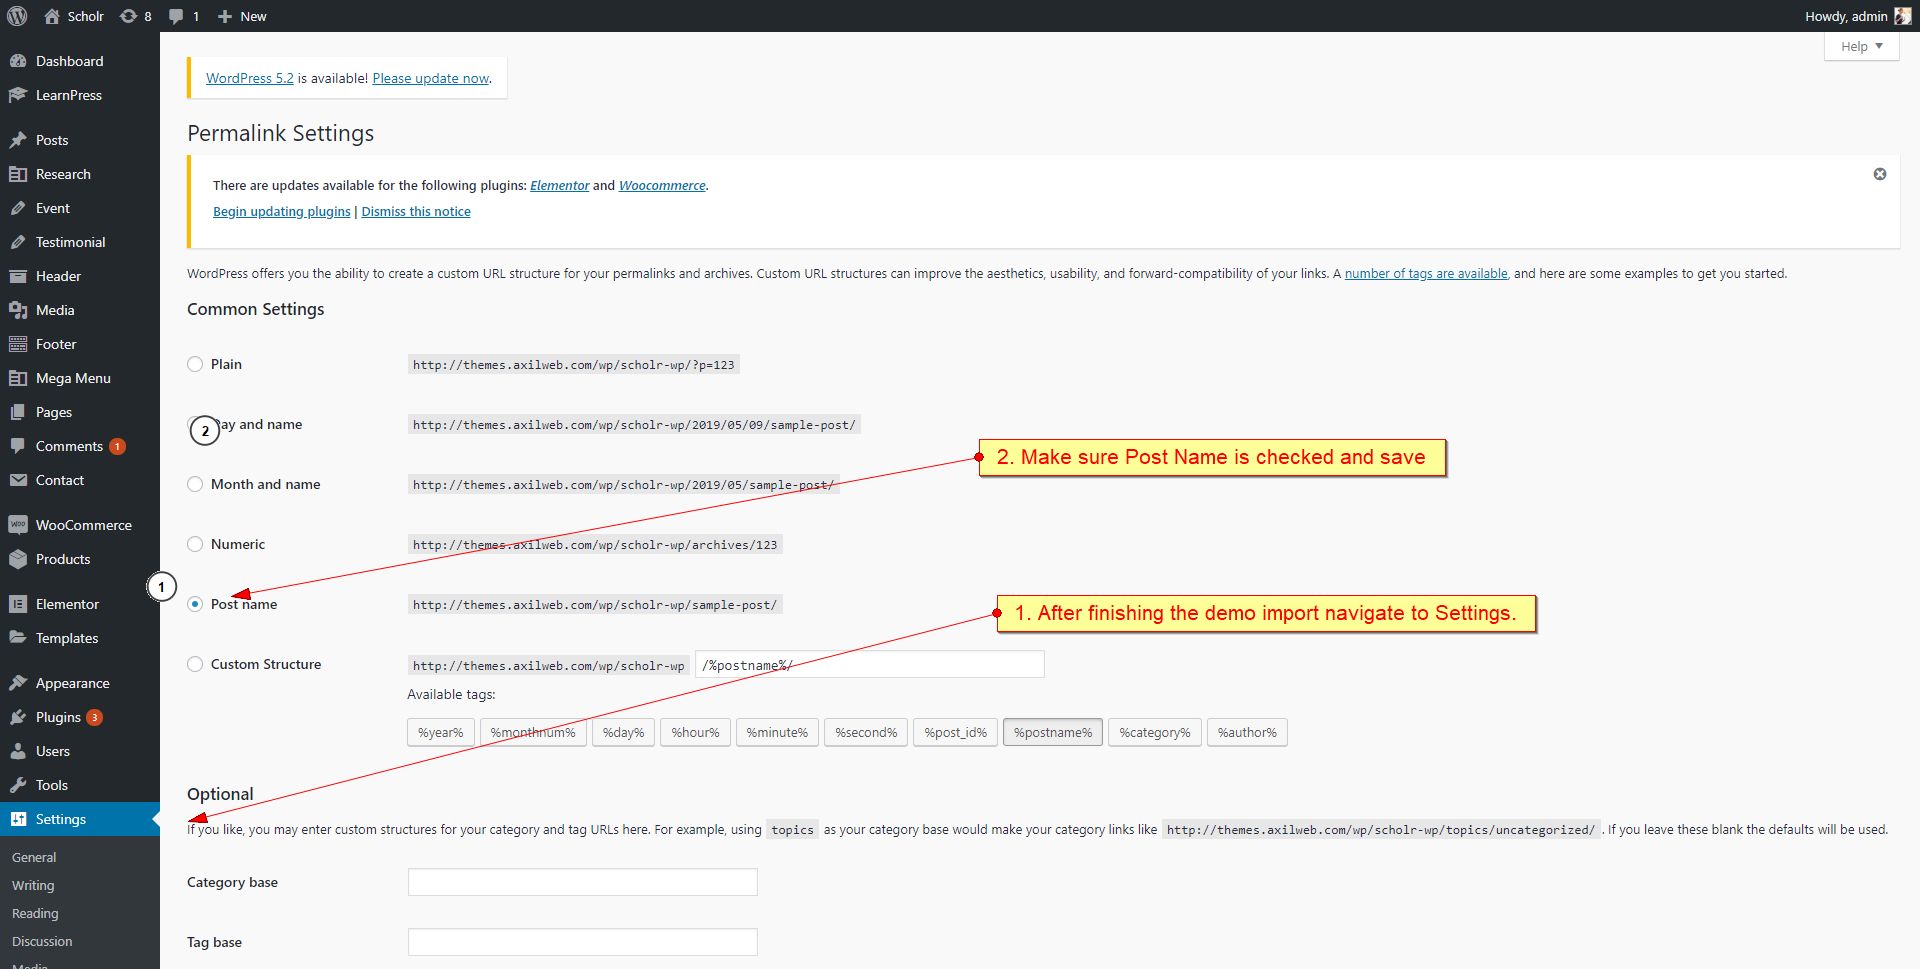
Change permalinks:
Step 3
Insert the following code in .htaccess in root folder:
<IfModule mod_expires.c>
ExpiresActive On
ExpiresByType text/css A31536000
ExpiresByType text/x-component A31536000
ExpiresByType application/x-javascript A31536000
ExpiresByType application/javascript A31536000
ExpiresByType text/javascript A31536000
ExpiresByType text/x-js A31536000
ExpiresByType text/html A3600
ExpiresByType text/richtext A3600
ExpiresByType image/svg+xml A3600
ExpiresByType text/plain A3600
ExpiresByType text/xsd A3600
ExpiresByType text/xsl A3600
ExpiresByType text/xml A3600
ExpiresByType video/asf A31536000
ExpiresByType video/avi A31536000
ExpiresByType image/bmp A31536000
ExpiresByType application/java A31536000
ExpiresByType video/divx A31536000
ExpiresByType application/msword A31536000
ExpiresByType application/vnd.ms-fontobject A31536000
ExpiresByType application/x-msdownload A31536000
ExpiresByType image/gif A31536000
ExpiresByType application/x-gzip A31536000
ExpiresByType image/x-icon A31536000
ExpiresByType image/jpeg A31536000
ExpiresByType application/json A31536000
ExpiresByType application/vnd.ms-access A31536000
ExpiresByType audio/midi A31536000
ExpiresByType video/quicktime A31536000
ExpiresByType audio/mpeg A31536000
ExpiresByType video/mp4 A31536000
ExpiresByType video/mpeg A31536000
ExpiresByType application/vnd.ms-project A31536000
ExpiresByType application/x-font-otf A31536000
ExpiresByType application/vnd.ms-opentype A31536000
ExpiresByType application/vnd.oasis.opendocument.database A31536000
ExpiresByType application/vnd.oasis.opendocument.chart A31536000
ExpiresByType application/vnd.oasis.opendocument.formula A31536000
ExpiresByType application/vnd.oasis.opendocument.graphics A31536000
ExpiresByType application/vnd.oasis.opendocument.presentation A31536000
ExpiresByType application/vnd.oasis.opendocument.spreadsheet A31536000
ExpiresByType application/vnd.oasis.opendocument.text A31536000
ExpiresByType audio/ogg A31536000
ExpiresByType application/pdf A31536000
ExpiresByType image/png A31536000
ExpiresByType application/vnd.ms-powerpoint A31536000
ExpiresByType audio/x-realaudio A31536000
ExpiresByType image/svg+xml A31536000
ExpiresByType application/x-shockwave-flash A31536000
ExpiresByType application/x-tar A31536000
ExpiresByType image/tiff A31536000
ExpiresByType application/x-font-ttf A31536000
ExpiresByType application/vnd.ms-opentype A31536000
ExpiresByType audio/wav A31536000
ExpiresByType audio/wma A31536000
ExpiresByType application/vnd.ms-write A31536000
ExpiresByType application/font-woff A31536000
ExpiresByType application/font-woff2 A31536000
ExpiresByType application/vnd.ms-excel A31536000
ExpiresByType application/zip A31536000
</IfModule>
## EXPIRES HEADER CACHING ##
<IfModule mod_expires.c>
# Enable expirations
ExpiresActive On
# Default directive
ExpiresDefault "access plus 1 month"
# My favicon
ExpiresByType image/x-icon "access plus 1 year"
# Images
ExpiresByType image/gif "access plus 1 month"
ExpiresByType image/png "access plus 1 month"
ExpiresByType image/jpg "access plus 1 month"
ExpiresByType image/jpeg "access plus 1 month"
# CSS
ExpiresByType text/css "access plus 1 month"
# Javascript
ExpiresByType application/javascript "access plus 1 year"
</IfModule>
## EXPIRES HEADER CACHING ##
<IfModule mod_expires.c>
ExpiresActive On
ExpiresDefault A0

<FilesMatch "\.(txt|xml|js)$">
ExpiresDefault A691200
</FilesMatch>

<FilesMatch "\.(css)$">
ExpiresDefault A691200
</FilesMatch>

<FilesMatch "\.(flv|ico|pdf|avi|mov|ppt|doc|mp3|wmv|wav|mp4|m4v|ogg|webm|aac)$">
ExpiresDefault A691200
</FilesMatch>

<FilesMatch "\.(jpg|jpeg|png|gif|swf|webp)$">
ExpiresDefault A691200
</FilesMatch>
</IfModule>

<IfModule mod_headers.c>
<FilesMatch "\.(txt|xml|js)$">
Header set Cache-Control "max-age=691200"
</FilesMatch>

<FilesMatch "\.(css)$">
Header set Cache-Control "max-age=691200"
</FilesMatch>

<FilesMatch "\.(flv|ico|pdf|avi|mov|ppt|doc|mp3|wmv|wav|mp4|m4v|ogg|webm|aac)$">
Header set Cache-Control "max-age=691200"
</FilesMatch>

<FilesMatch "\.(jpg|jpeg|png|gif|swf|webp)$">
Header set Cache-Control "max-age=691200"
</FilesMatch>
</IfModule>
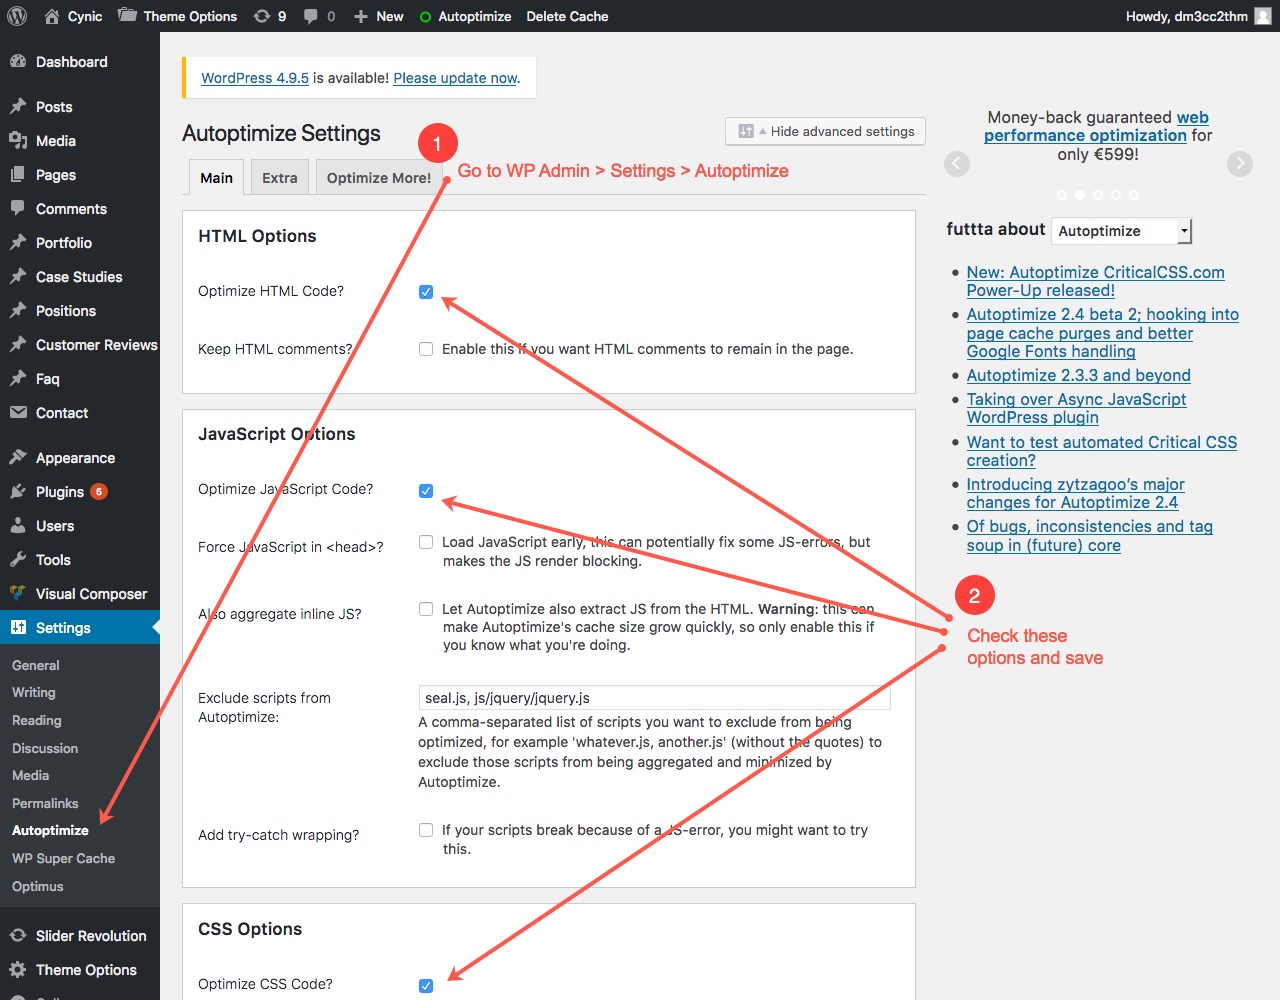
Step 4
Make changes in Autoptimize plugin:
Step 5
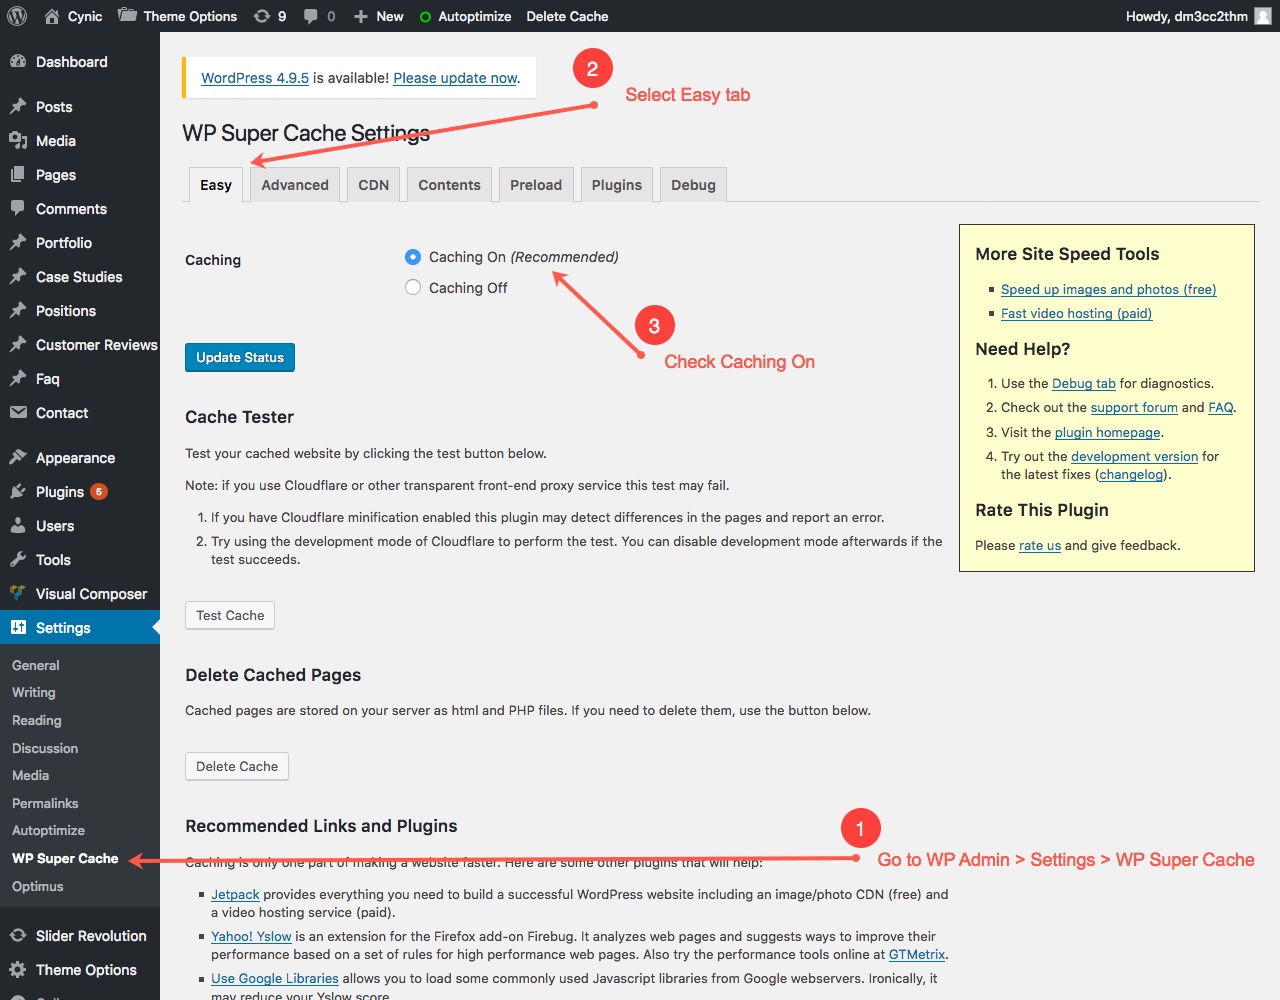
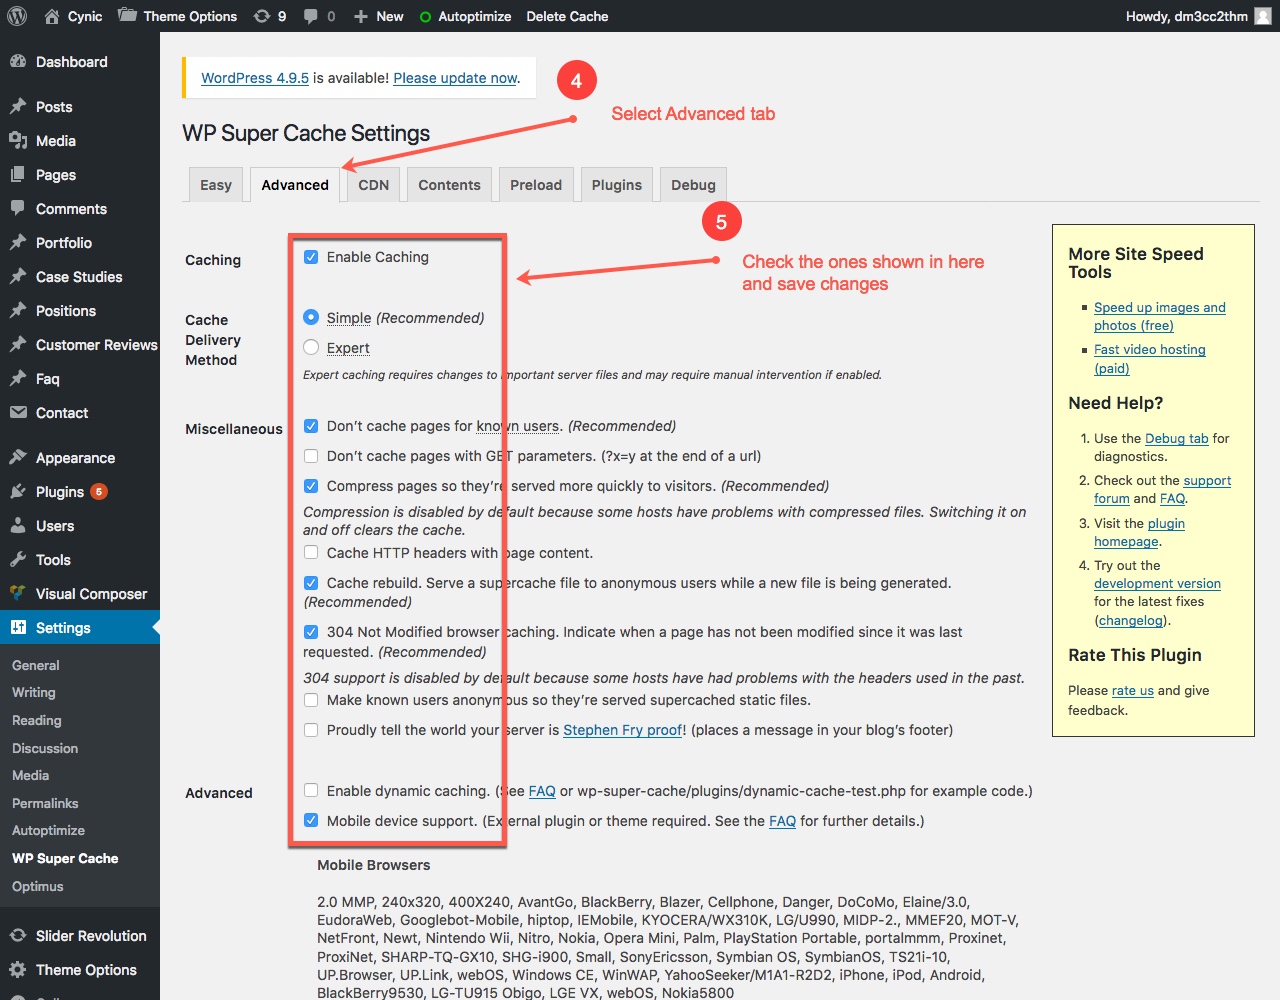
Make changes in WP Super Cache plugin:
Step 6
Make changes in Tools menu:
That's all. Enjoy your super fast website!
7.2 Update Theme and Plugins
Caution! Please read before proceeding.
There is no risk on losing your settings and pages. The standard procedure of updating theme appearance is by using child theme.
However if you had done modifications in parent theme files, then they will be lost or new bugs may appear. Understand that if you modify the theme files and then bugs appear due to theme update, we won't be responsible for that.
Before updating the theme, we recommend you to make backup of your modified files and database.
To get new updates, you will require to update both our theme and core feature plugin.
7.2.1 Update Theme
We release updates for our theme to fix bugs and add new features. These new updates are essential if you want to have a bug free website as we give new features and improvements to the theme over time. Some of these updates might be needed in order to make the theme compatible with WordPress newer versions.
Caution! Please read before proceeding.
There is no risk on losing your settings and pages. However if you had done modifications in parent theme files, then they will be lost or new bugs may appear. Understand that if you modify the theme files and then bugs appear due to theme update, we won't be responsible for that.
Before updating the theme, we recommend you to make backup of your modified files. Also deactivate the current version before uploading the new theme file.
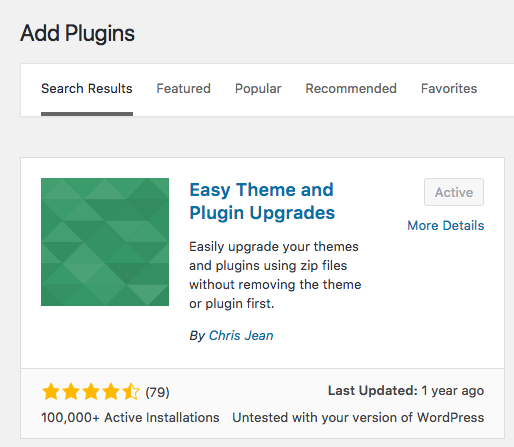
Install Required Plugin
- Go to WP Admin > Plugins > Add New > And search for "Easy Theme and Plugin Upgrades" in the search box in right hand side.
- Install and activate the plugin.
Theme Upgrade
- Go to ThemeForest download page.
- Download the updated theme file.
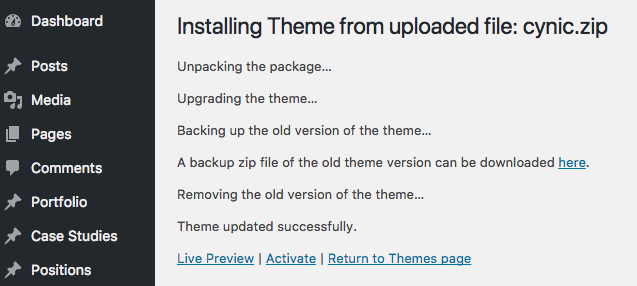
- Go to WP Admin > Appearance > Add New > Upload Theme
- Choose the theme file (e.g., cynic.zip) and click Install Now button.
- It will automatically install the new theme and backup the old theme and give you a link to download the backup.
- Make sure that your theme is active.
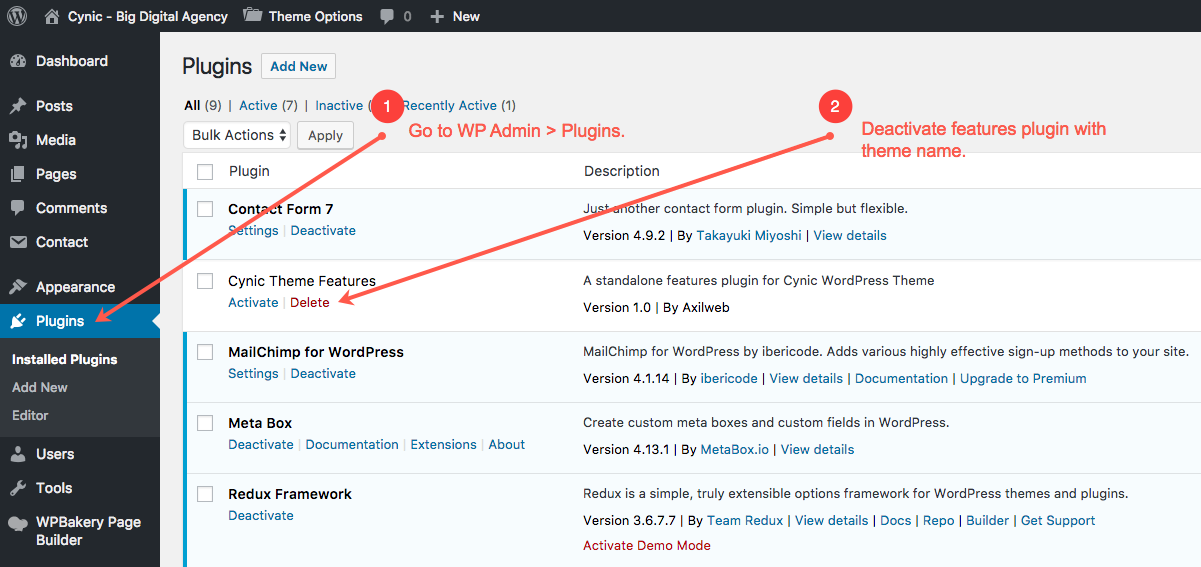
7.2.2 Update Plugins
To get all the new updates and fixes, you will need to update our core plugins as well.
Note: Please deactivate the core plugin and delete it. Then upload the updated plugin and activate it.
Follow the steps below to update the core plugin.

7.3 Exchange Cynic HTML Version with WordPress Version
If you have already purchased Cynic HTML version and interested in purchasing our WordPress version, you can simply request for an exchange. In that case, you will require to purchase the WordPress version first and you will get the refund for HTML version. Here is the procedure for exchange:
- Purchase Cynic WordPress theme: https://themeforest.net/item/cynic-digital-agency-wordpress-theme/20779317
- Send us a refund request for Cynic HTML version from this URL: https://themeforest.net/refund_requests/new
7.4 Plugins
Digital Agency comes with some premium plugins such as Visual Composer and Resolution Sliders.
- Cynic Theme Features
- Visual Composer
- Slider Revolution
- Contact Form 7
- MailChimp for WordPress
- Meta Box
- Redux Framework
7.5 Source & Credits
Icons
Images
Note: Images are used only for preview purpose. To use this images, please contact with the authority of Envato Elements and All Free Photos for licensing information.
8. Support
Click the button below to submit a ticket. You will response within 1 business day.
Submit a TicketSuggestions
Send your suggestions to themes@axilweb.com. You will appreciate your feedback and try to add the suggested features on next release.
We hope you are enjoying our product. Please give us a 5 star rating that will encourage us to keep up the good work.
Regards,
Syed Tahmim Islam
Axilweb Support Team