1. Introduction
We have like to thank you for choosing eTrade.
Based on our vast experience of developing functional and aesthetically pleasing themes, we are proud to introduce eTrade. It's is a state-of-the-art WordPress theme. We made eTrade from the ground up with flexibility in mind. Each element of eTrade is easily customizable, where you can make eTrade reflect your branding styles. The guide gives you detailed methodologies about how you can customize eTrade and make it fit your brand perfectly!
eTrade is also made with UI/UX in mind. The easy-to-navigate features mean your users will always be able to find what they are looking for with much fewer clicks. Bold and bright color combinations also ensure that each page is unique, helping your desired content stand out from the rest. eTrade is a product of Axilthemes.
1.1. Requirements
There are system requirements to install and set up the eTrade theme and its components properly. Make sure that you are running the latest version of WordPress, PHP version 5.6 or higher, and MySQL version 5.6 or higher. We also recommend the following PHP configuration limits.
Recommended PHP configuration limits
- upload_max_filesize = 32M
- post_max_size = 32M
- max_execution_time = 600
- max_input_time = 600
- memory_limit = 256M
1.2. What's Included
After purchasing the eTrade theme on themeforest.net with your Envato account, go to your Download page. You can choose to download the eTrade theme only (Installable WordPress Theme) or the entire eTrade theme package that contains the following files:
- eTrade theme: An Installable WordPress Theme zip file.
- eTrade child-theme: A child-theme zip file and a readme.txt note about the child-theme.
- Bundled Plug-ins: Pro Plugins
- Demo Content Files: You can import demo data manually
- Documentation: A link to this documentation.
- Licensing.
2. WordPress Installation
Please follow the instructions in the video to see how you can install WordPress on your hosting:
- For local host: https://www.youtube.com/watch?v=snFzbPm_RUE
- For cPanel: https://www.youtube.com/watch?v=t-YBqV2ReR0
3. Upload and Activate Theme
When you are ready to install a theme, you must first upload the theme files and then activate the theme itself. The theme files can be uploaded in two ways:
How to Setup and Demo Import (Video): https://youtu.be/ClCmn8ueYp0
Create Home Page Like Demo Without Demo Import (Video): https://youtu.be/albB011W8lg
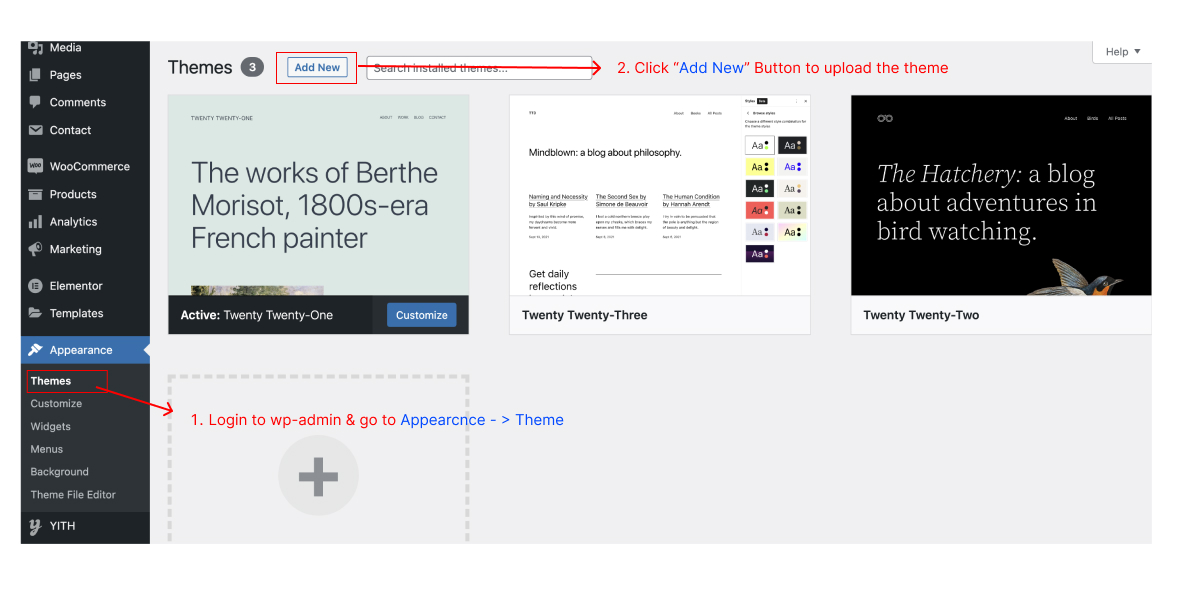
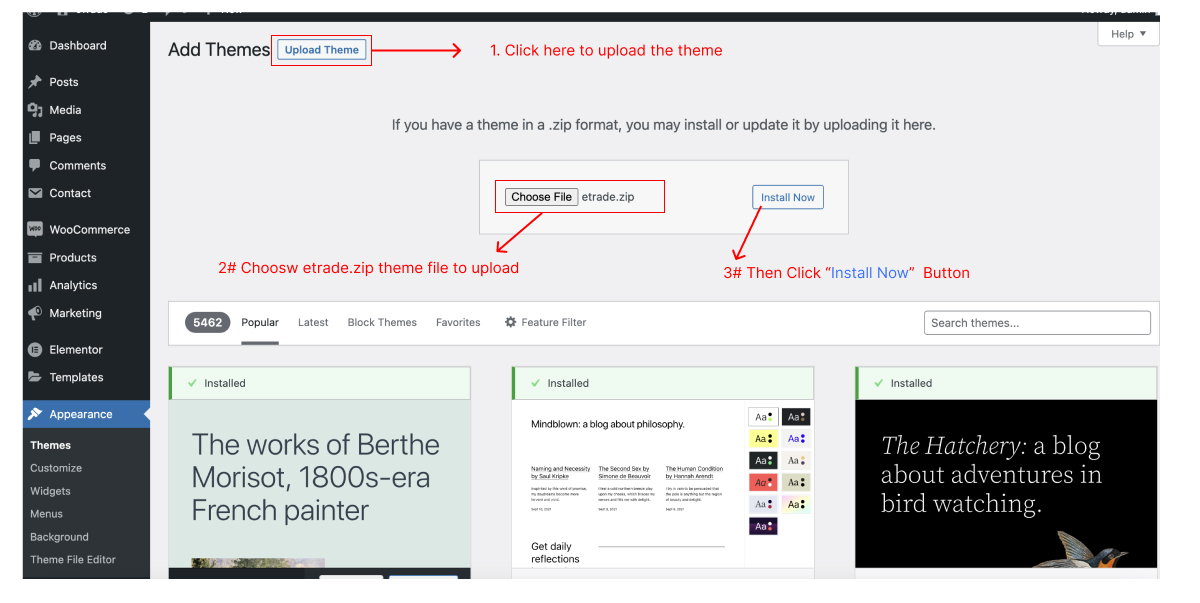
3.1. Using Theme Uploader
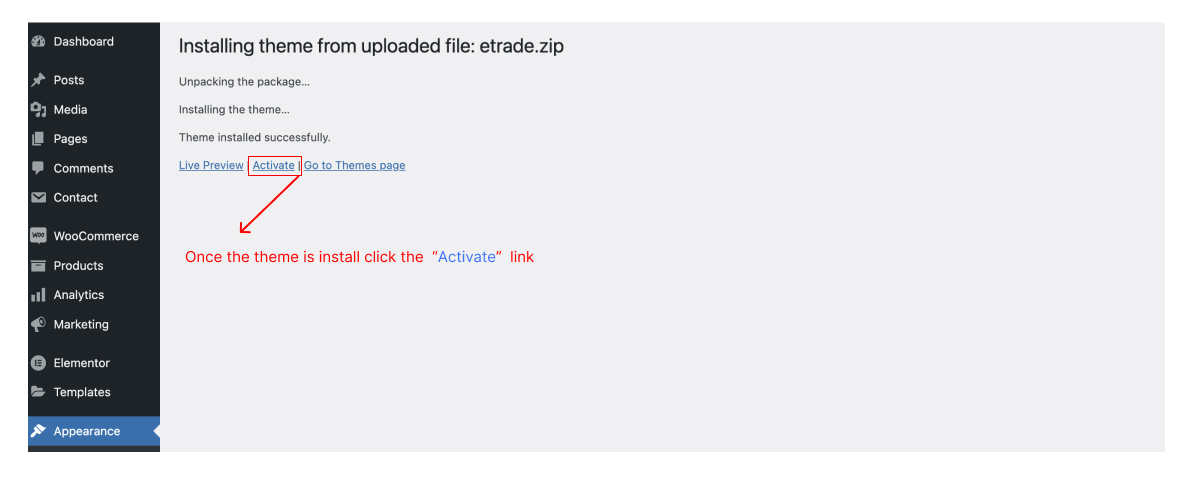
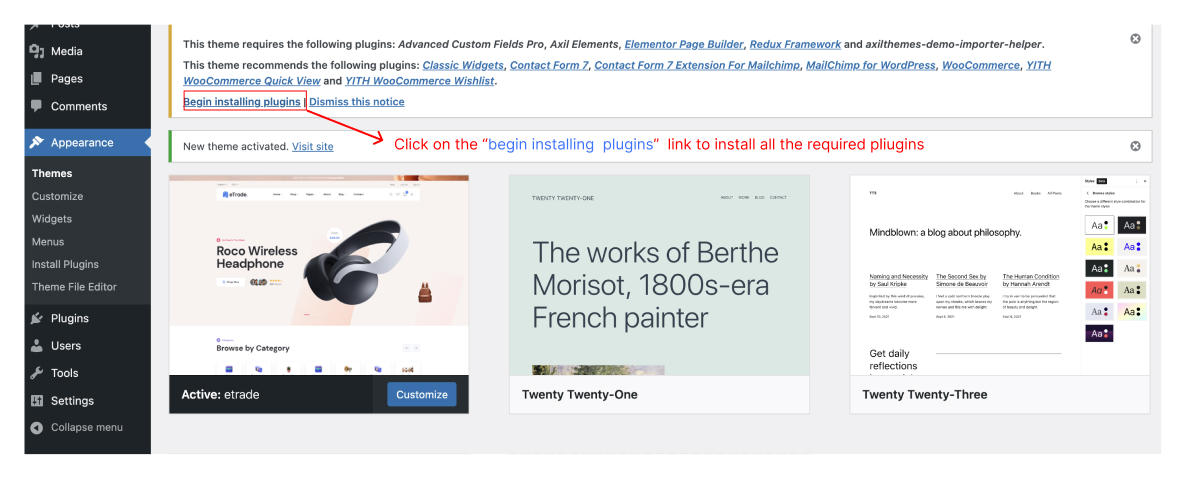
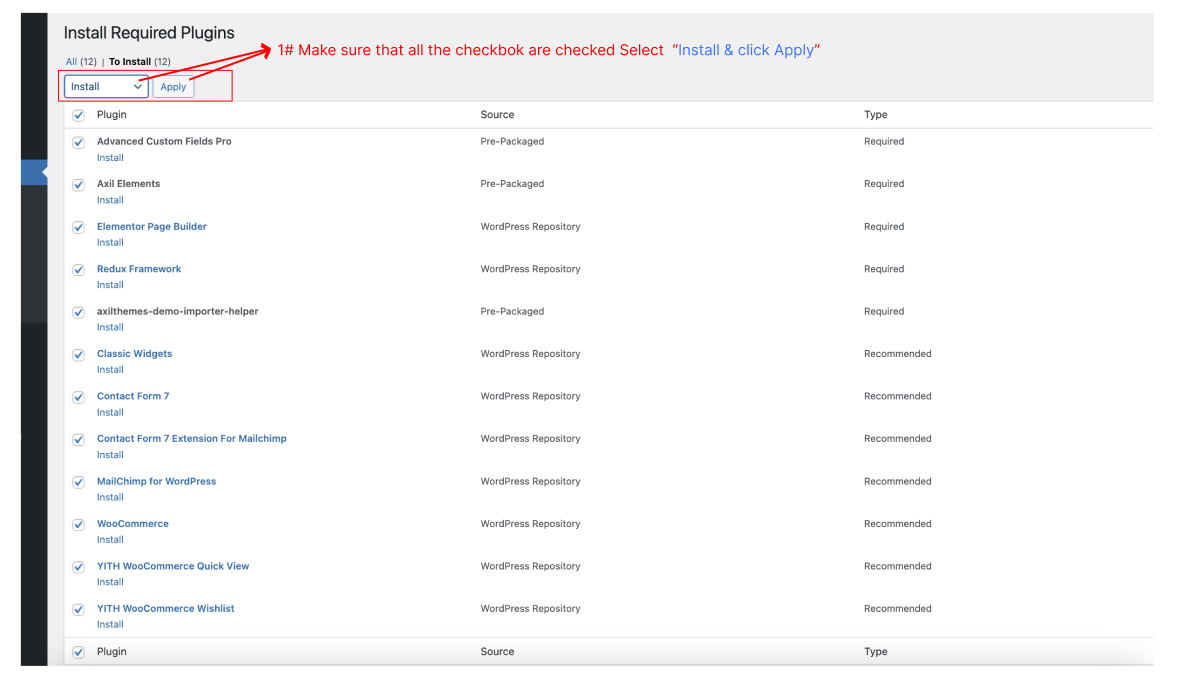
Follow the steps as instructed in the images below:
3.2. Using FTP Clients
Follow the following steps to upload your theme using FTP clients:
- Use an FTP such as FileZilla and go to your WordPress installation director
- Navigate to /wp-content/themes/ folder and upload the theme folder there
- Log in to your WP Admin Dashboard and open the 'Appearance / Themes' menu
- You will now see the eTrade Theme listed among the other themes. Click on Activate and you’re done!
4. Importing Demo Contents
eTrade is an easy solution for the demo content you saw on our preview website. Please follow the instructions below:
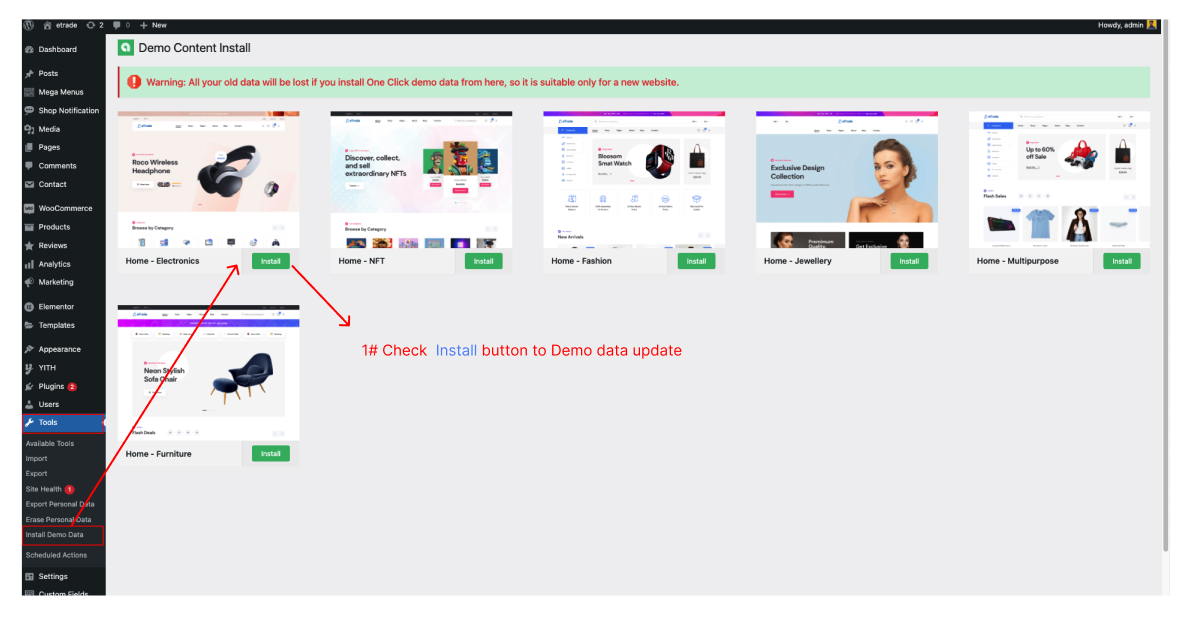
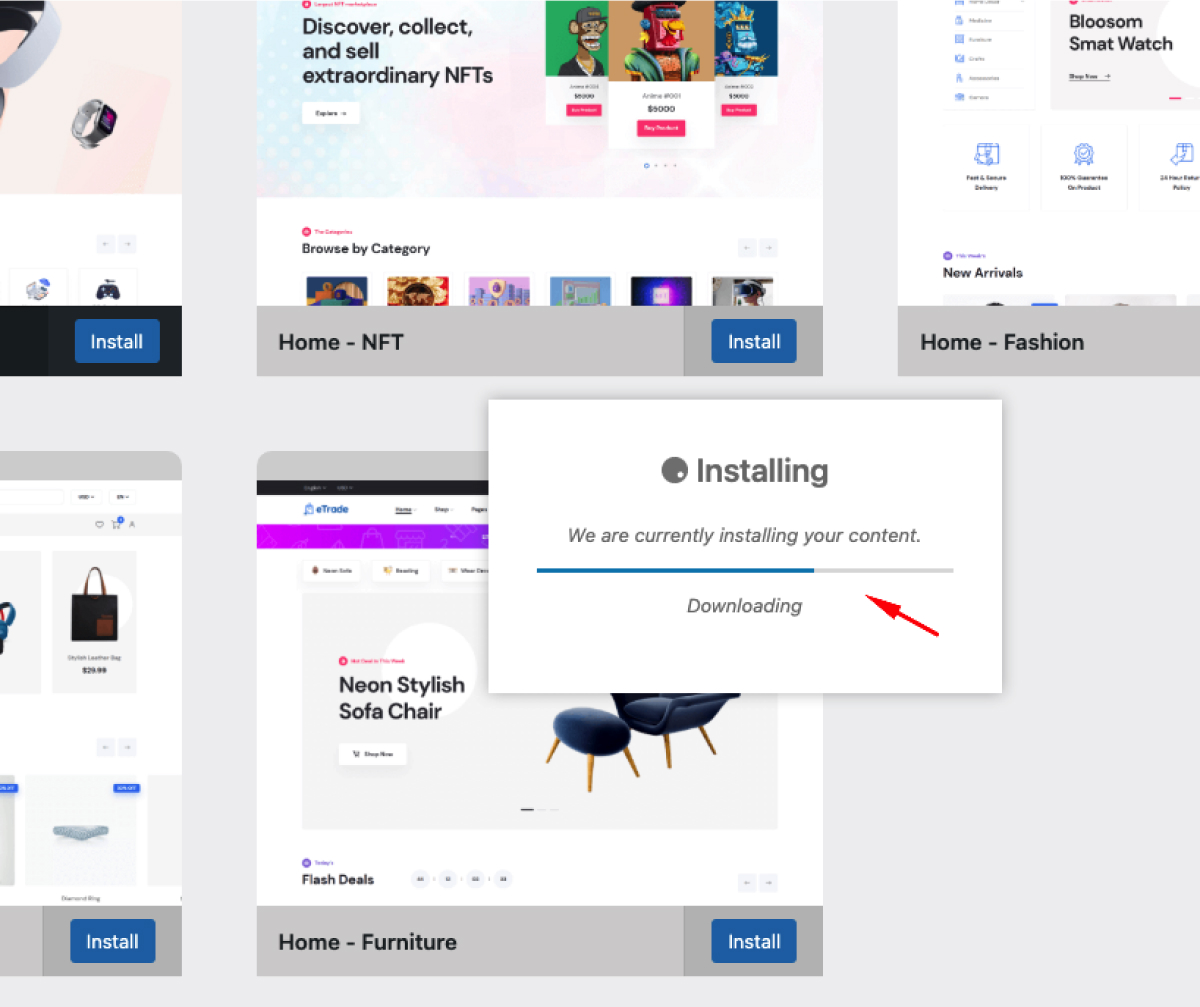
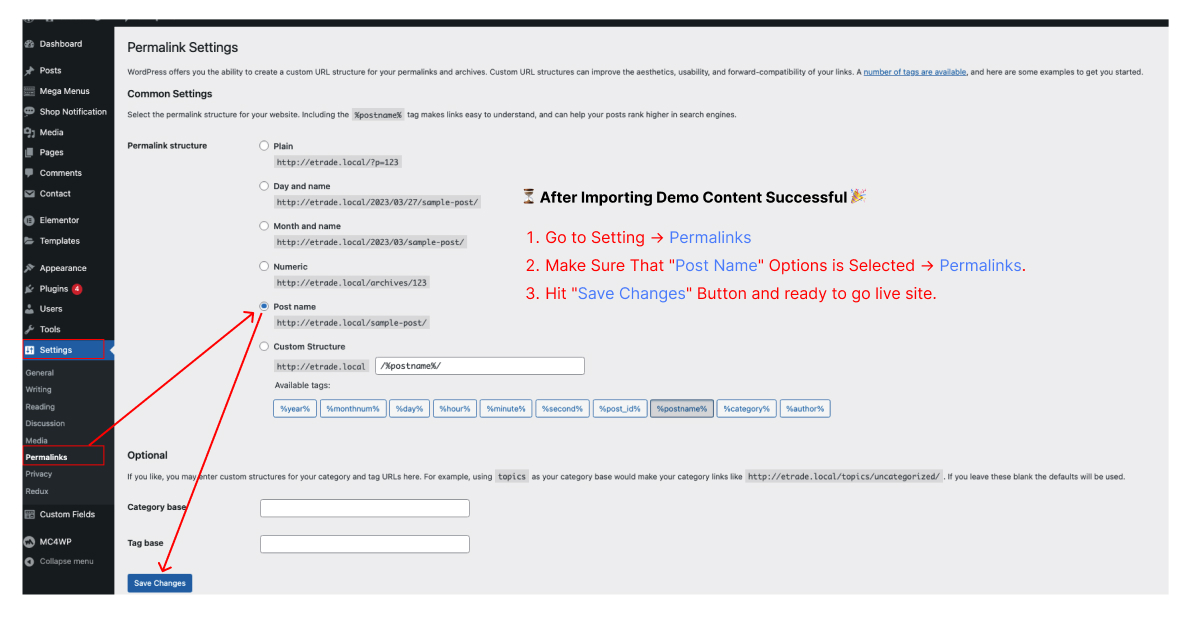
⏳ After Importing Demo Content Successful 🎉
- Go to Setting -> Permalinks
- Make Sure That "Post Name" Options is Selected -> Permalinks.
- Hit "Save Changes" Button and ready to go live site.
4.1. Manual Demo Import
4 steps to manual demo import
- 1# Dashboard -> Tools -> Import: (WordPress) Run Importer
- 2# Dashboard -> Plugins -> Add New: search Plugin (Customizer Reset - Export & Import) Run Importer
- 2# Dashboard -> Plugins -> Add New: search Plugin (Widget Importer & Exporter) Run Importer
- 2# Dashboard -> Appearance -> Theme Options -> Import / Export -> Upload file: Click Import
4.1. Where Is My Purchase Code?
When you buy a product from Envato you get a purchase code. To learn about how to find your purchase code visit the following link:
https://help.market.envato.com/hc/en-us/articles/202822600-Where-Can-I-Find-my-Purchase-Code5. Change Site Title and Favicon
To change your Site title and Favicon login to wp-admin and navigate to Dashboard > Appearance > Customize > Site Identity and follow the following steps:
- Navigate To Dashbord -> Appearance -> Site Identity then change your Title.
- To change The Site tagline
- To change The favicon hit the change Image button and upload a new image.

6. Change Global Colors
To change all global colors login to wp-admin and navigate to Dashboard > Appearance > Customize > Colors and follow the following steps:
- To Change global colors click on any of the select color buttons
- Change any color according to your color

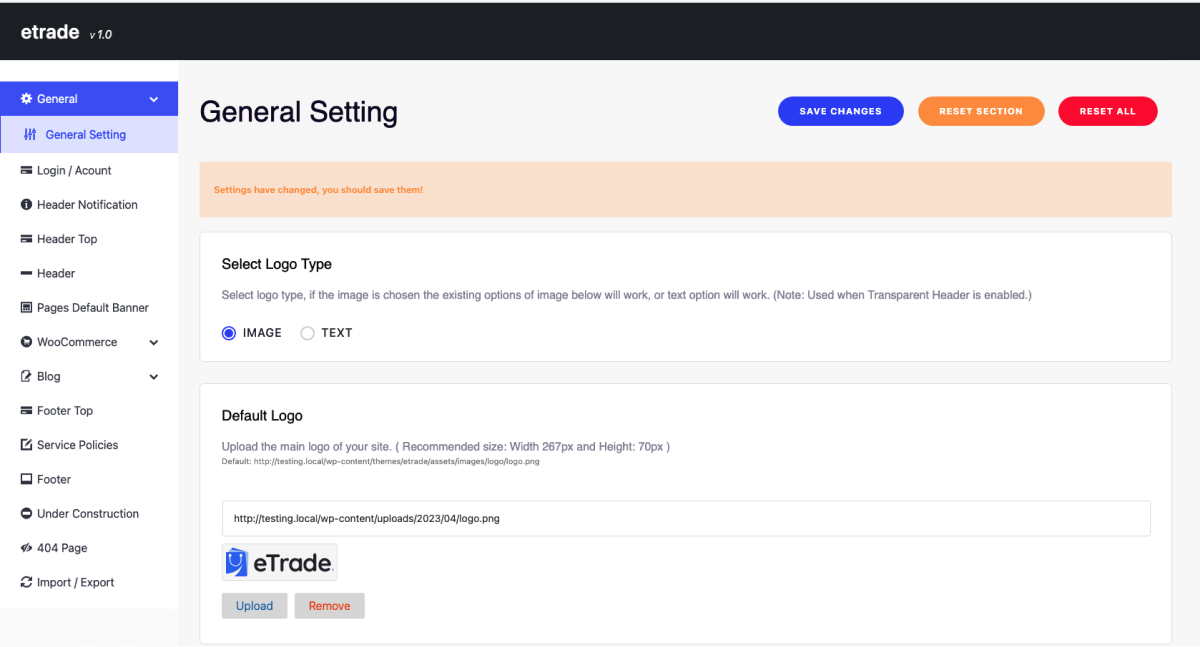
7. Change Logo
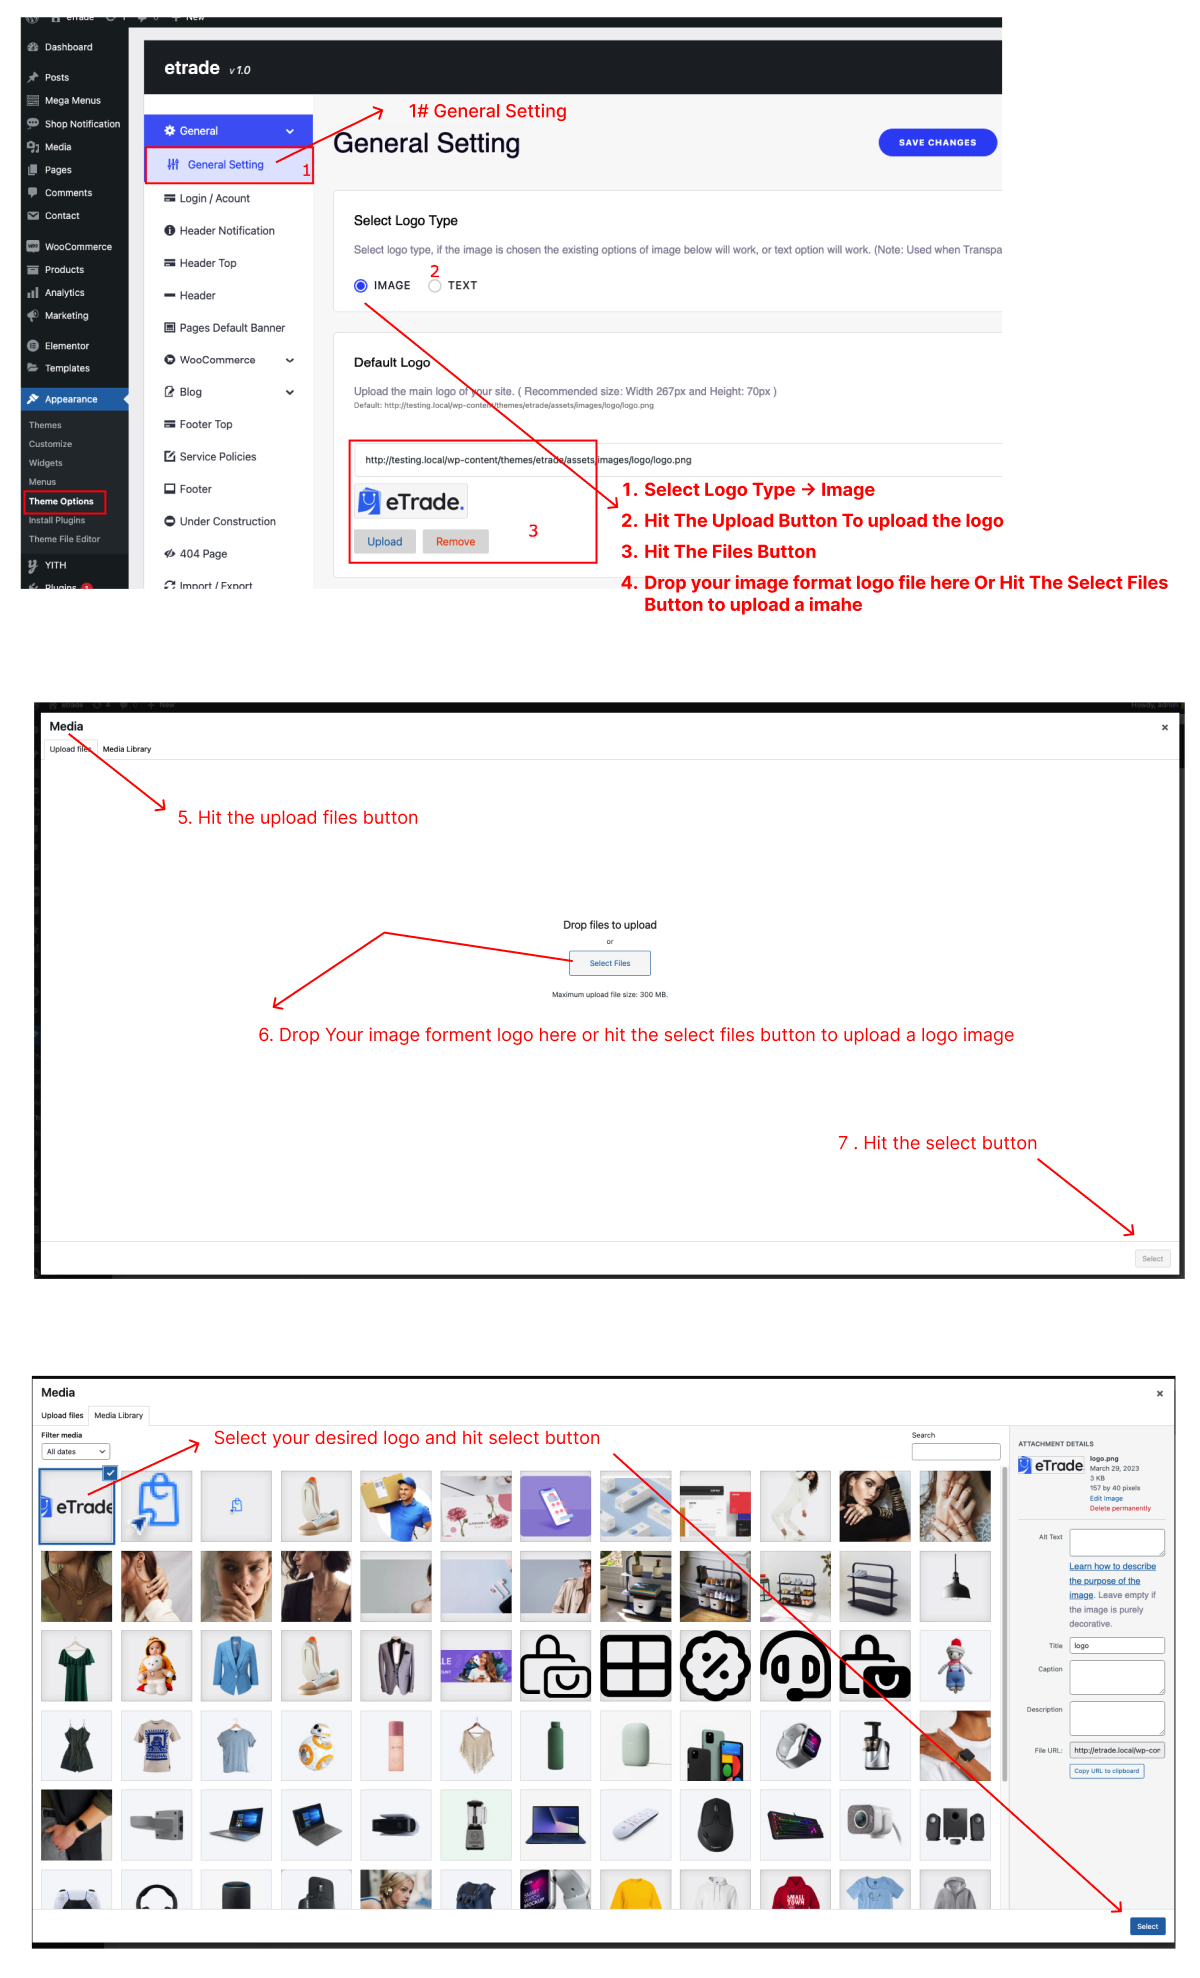
To change the site logo login to your wp-admin and navigate to Dashboard > Theme Options > General and follow the following steps:
- General Setting
- Select Logo Type -> Image
- Hit The Upload Button To upload the logo
- Hit The Files Button
- Drop your image format logo file here Or Hit The Select Files Button to upload a imahe
8. Pages Default Banner
To change the typography of your site navigate to Appearance > eTrade Options > Pages Default Banner.

9. Set Home and Blog Page
To set the default Home and Blog page please login to wp-admin and navigate to Dashboard > Settings > Reading

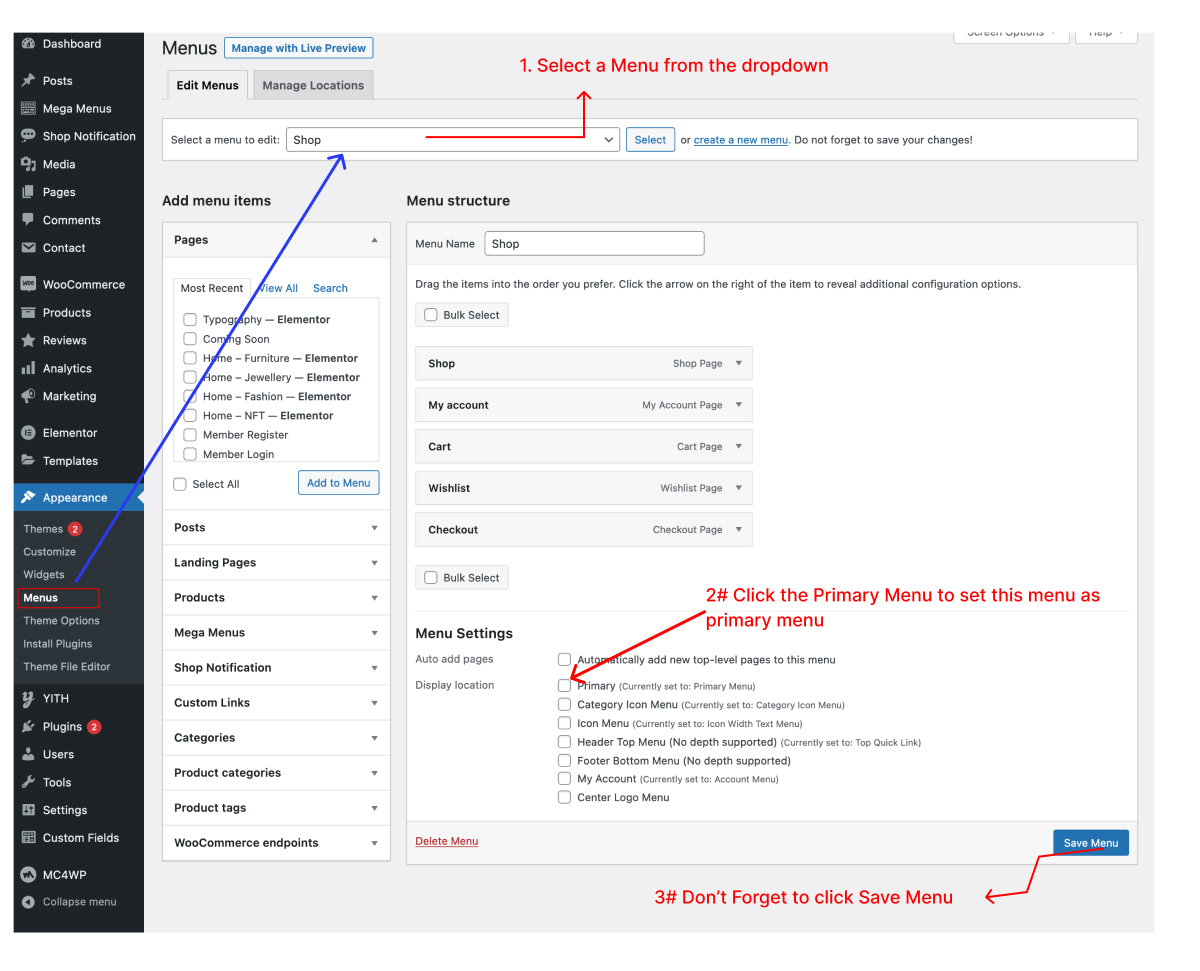
10. Customize Menu
To customize the menu and megamenu please log in to wp-admin and navigate to Appearance > Menus and follow the following steps:
11 eTrade Options / General
To change eTrade Options navigate to Appearance > Axil Theme Options.

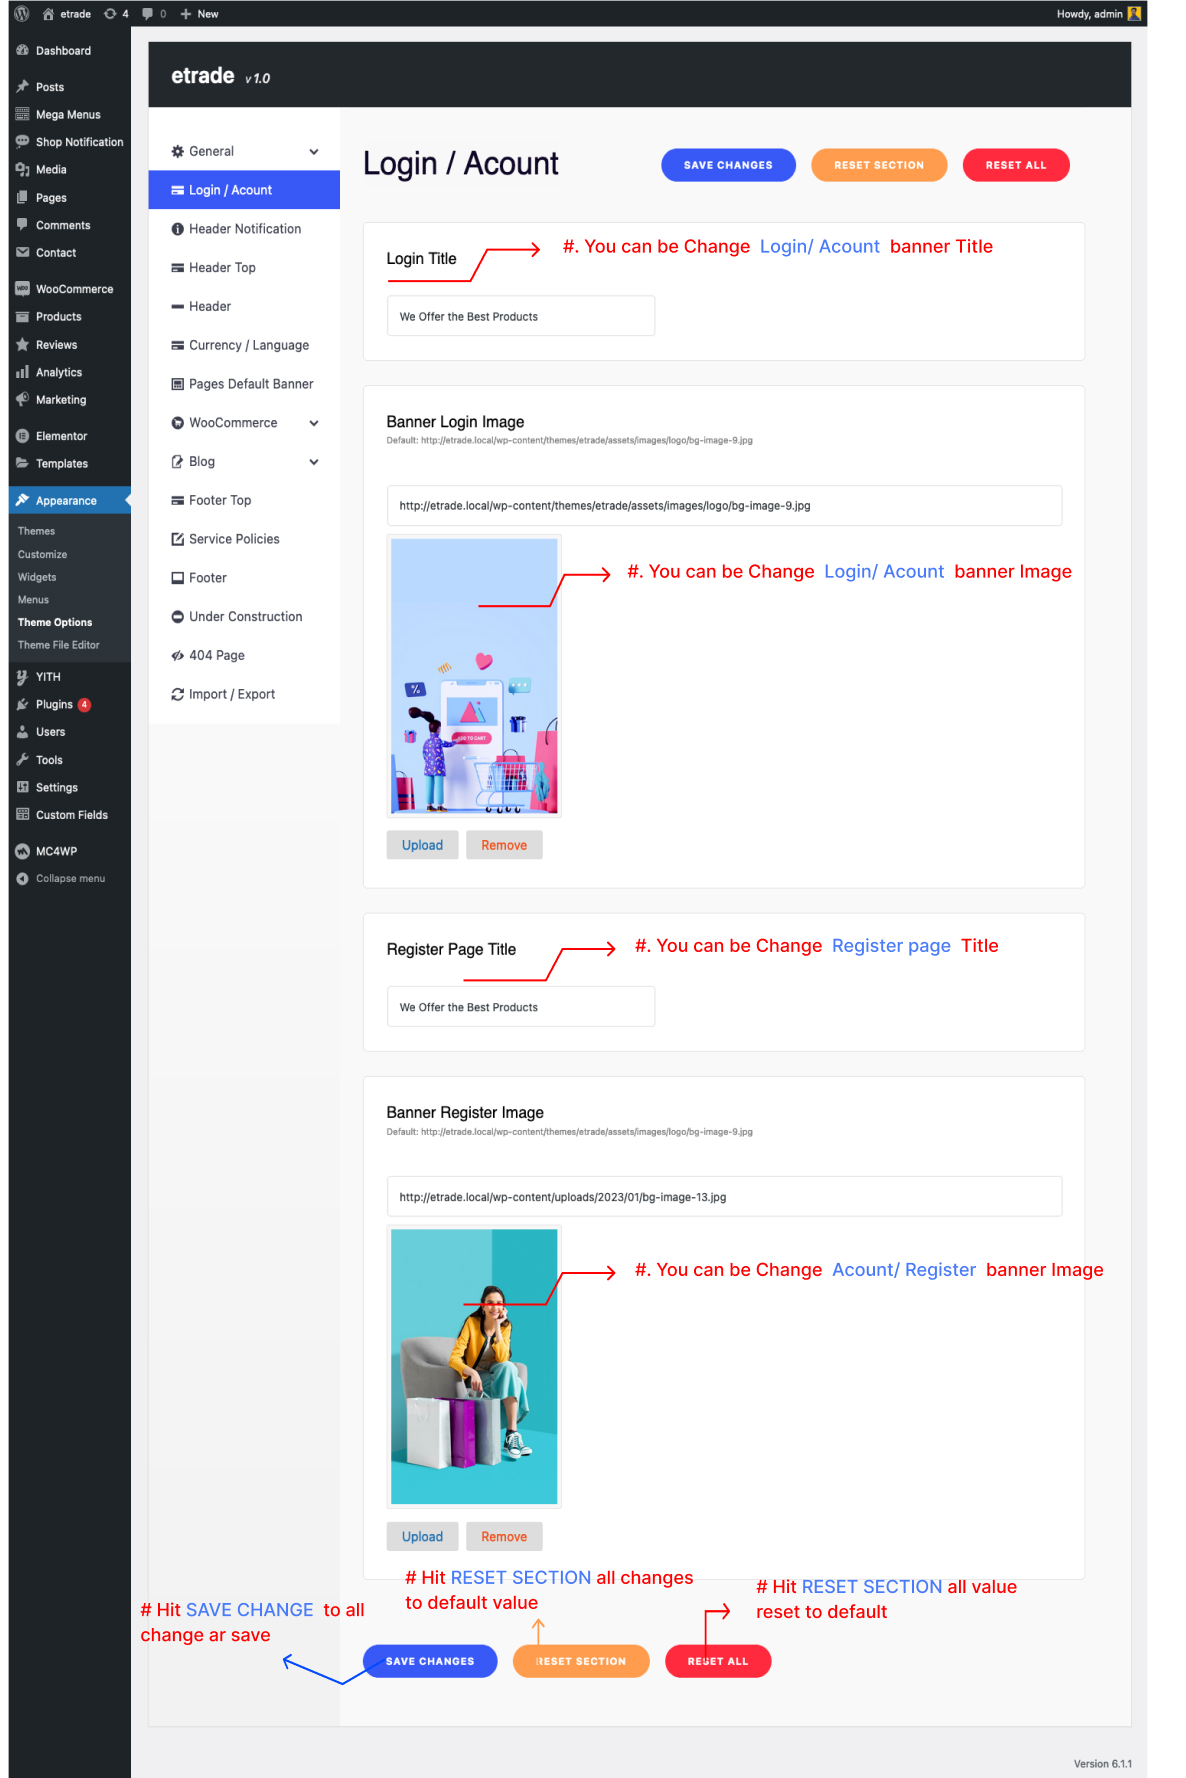
11.1.1. Login / Acount
To change Contact & Social information in eTrade, navigate to Appearance > Axil Theme Options.
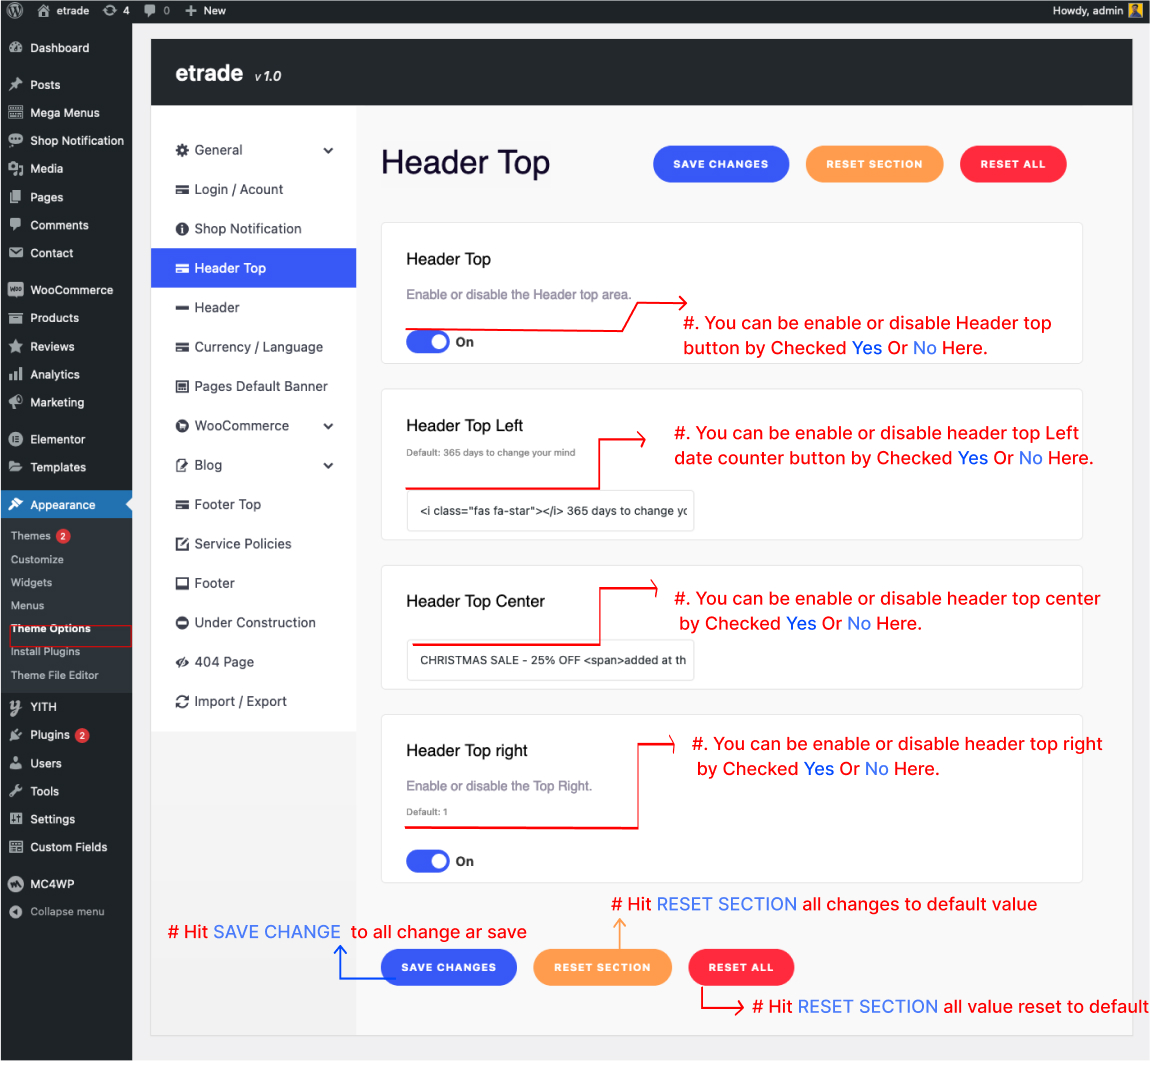
11.2.1 Header Top
To change the header top in eTrade, navigate to Appearance > Axil Theme Options.
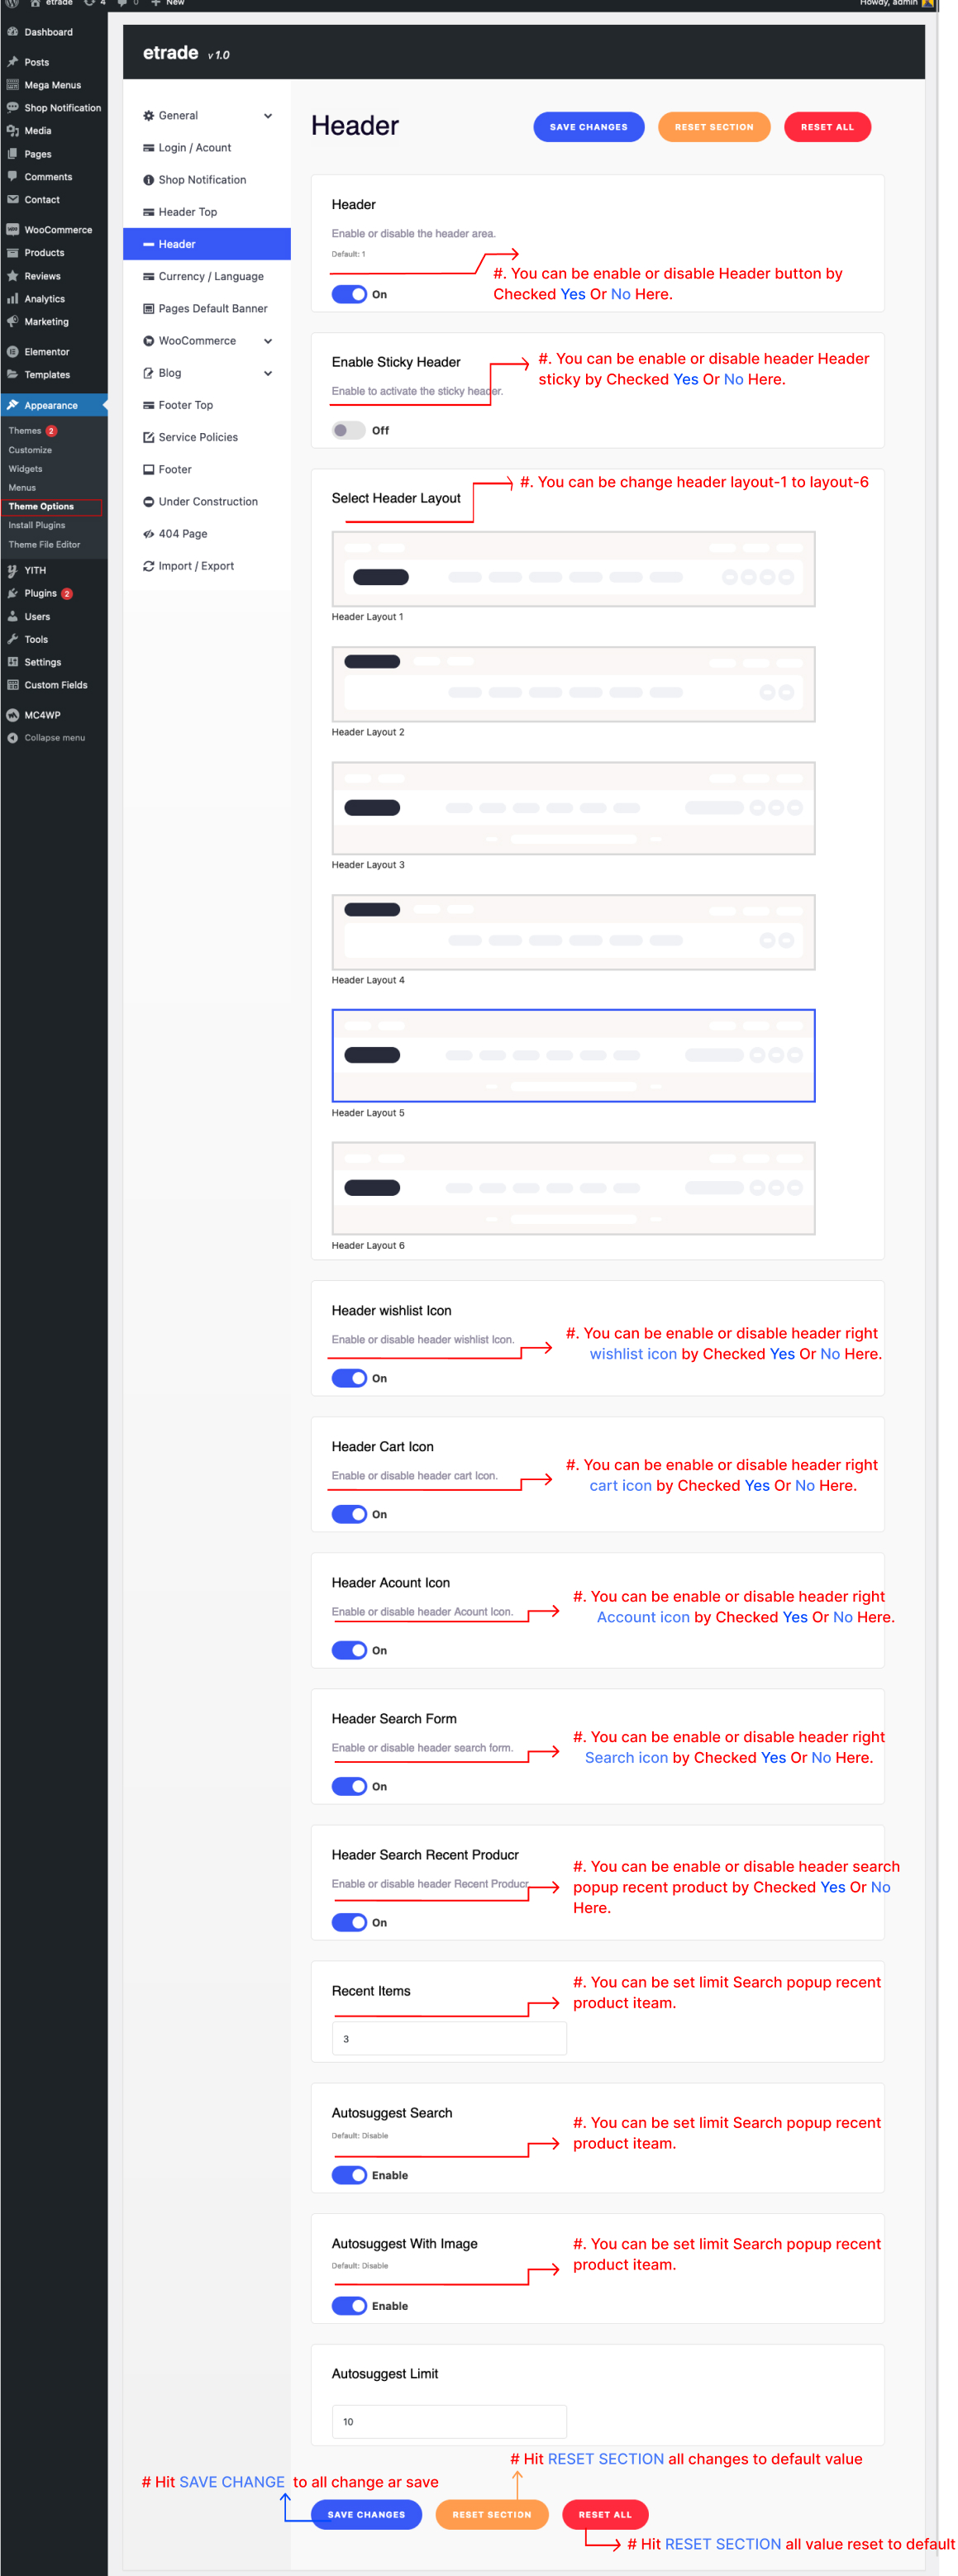
11.2.1 Header
To change the header in eTrade, navigate to Appearance > Axil Theme Options.
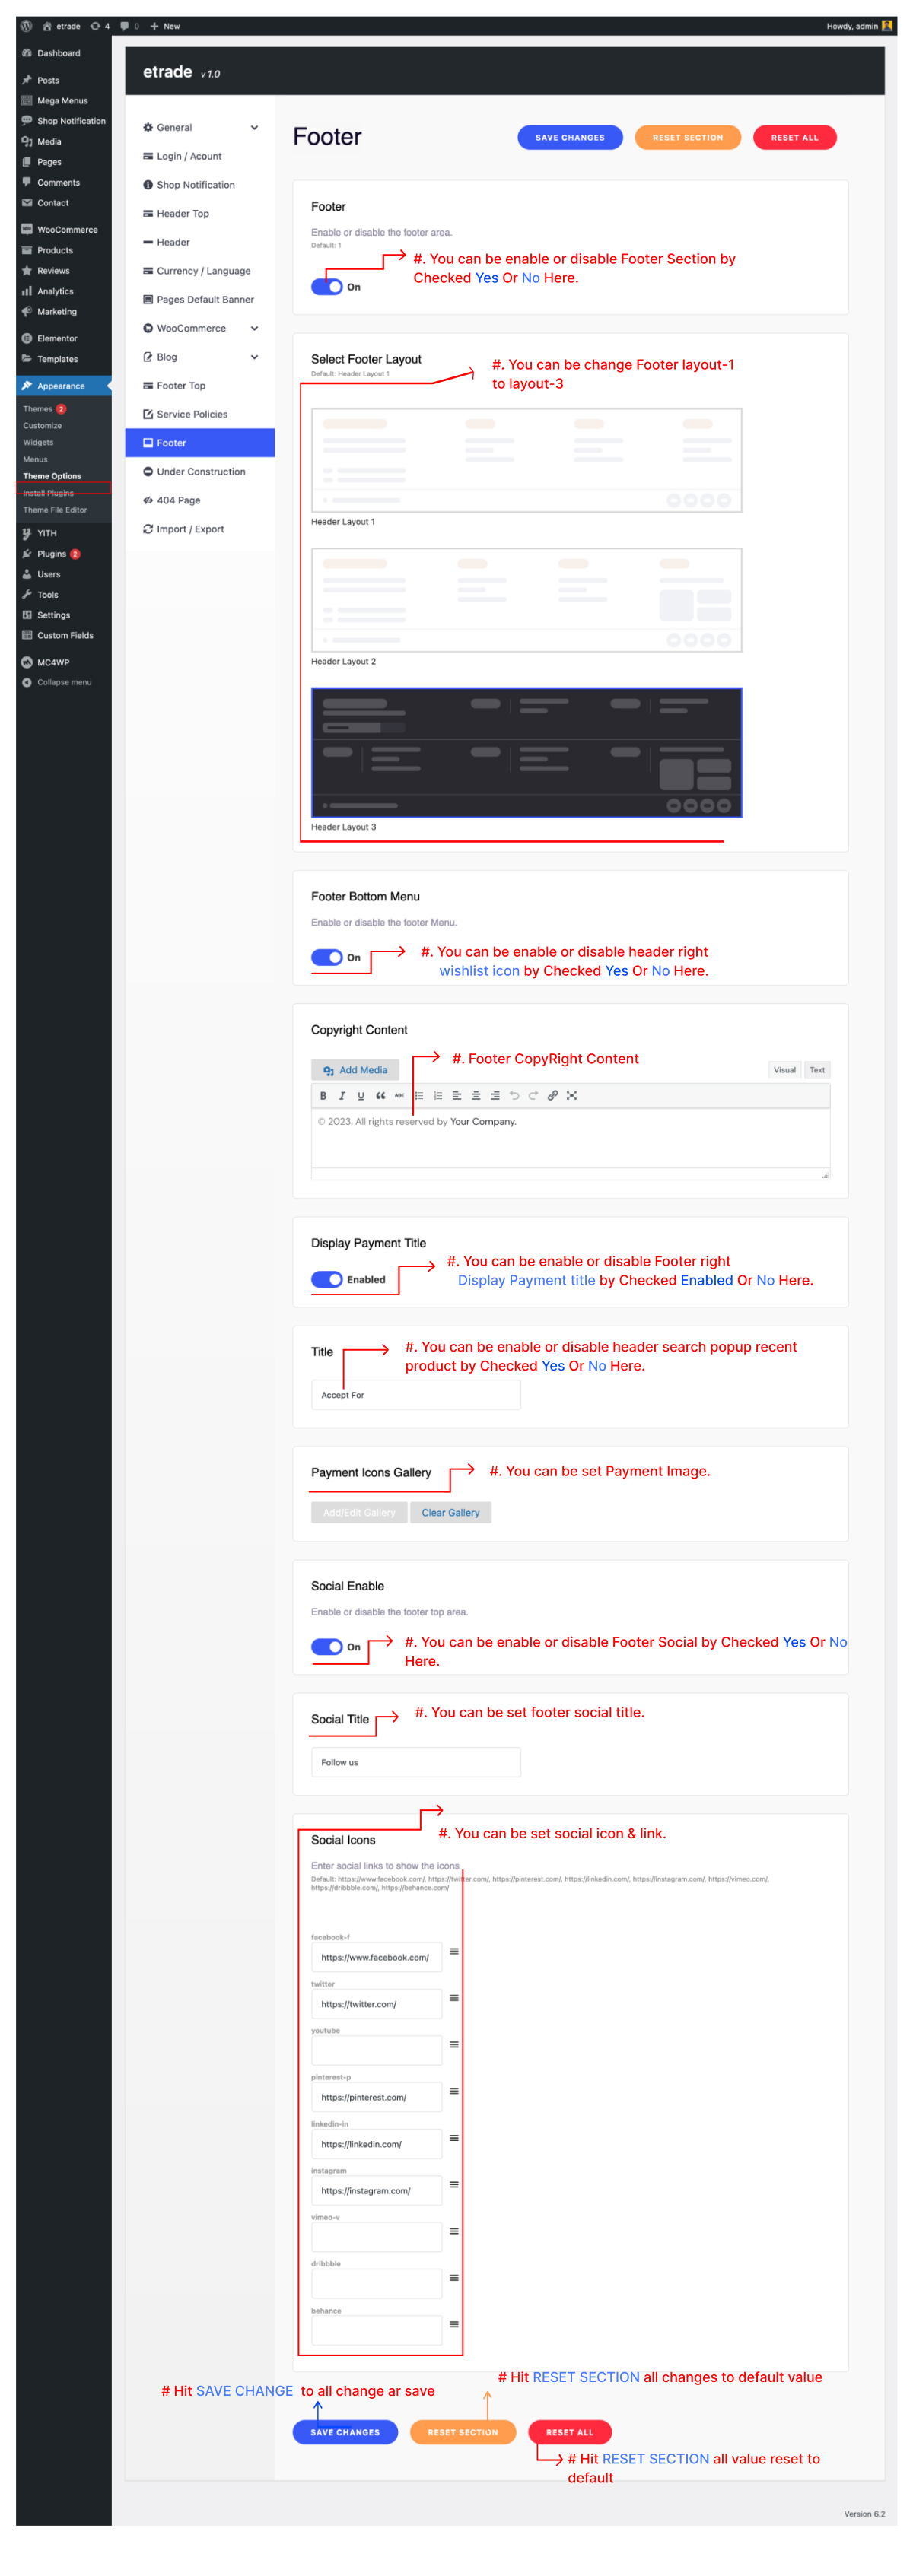
11.3.1 Footer
To change the footer in eTrade, navigate to Appearance > Axil Theme Options.
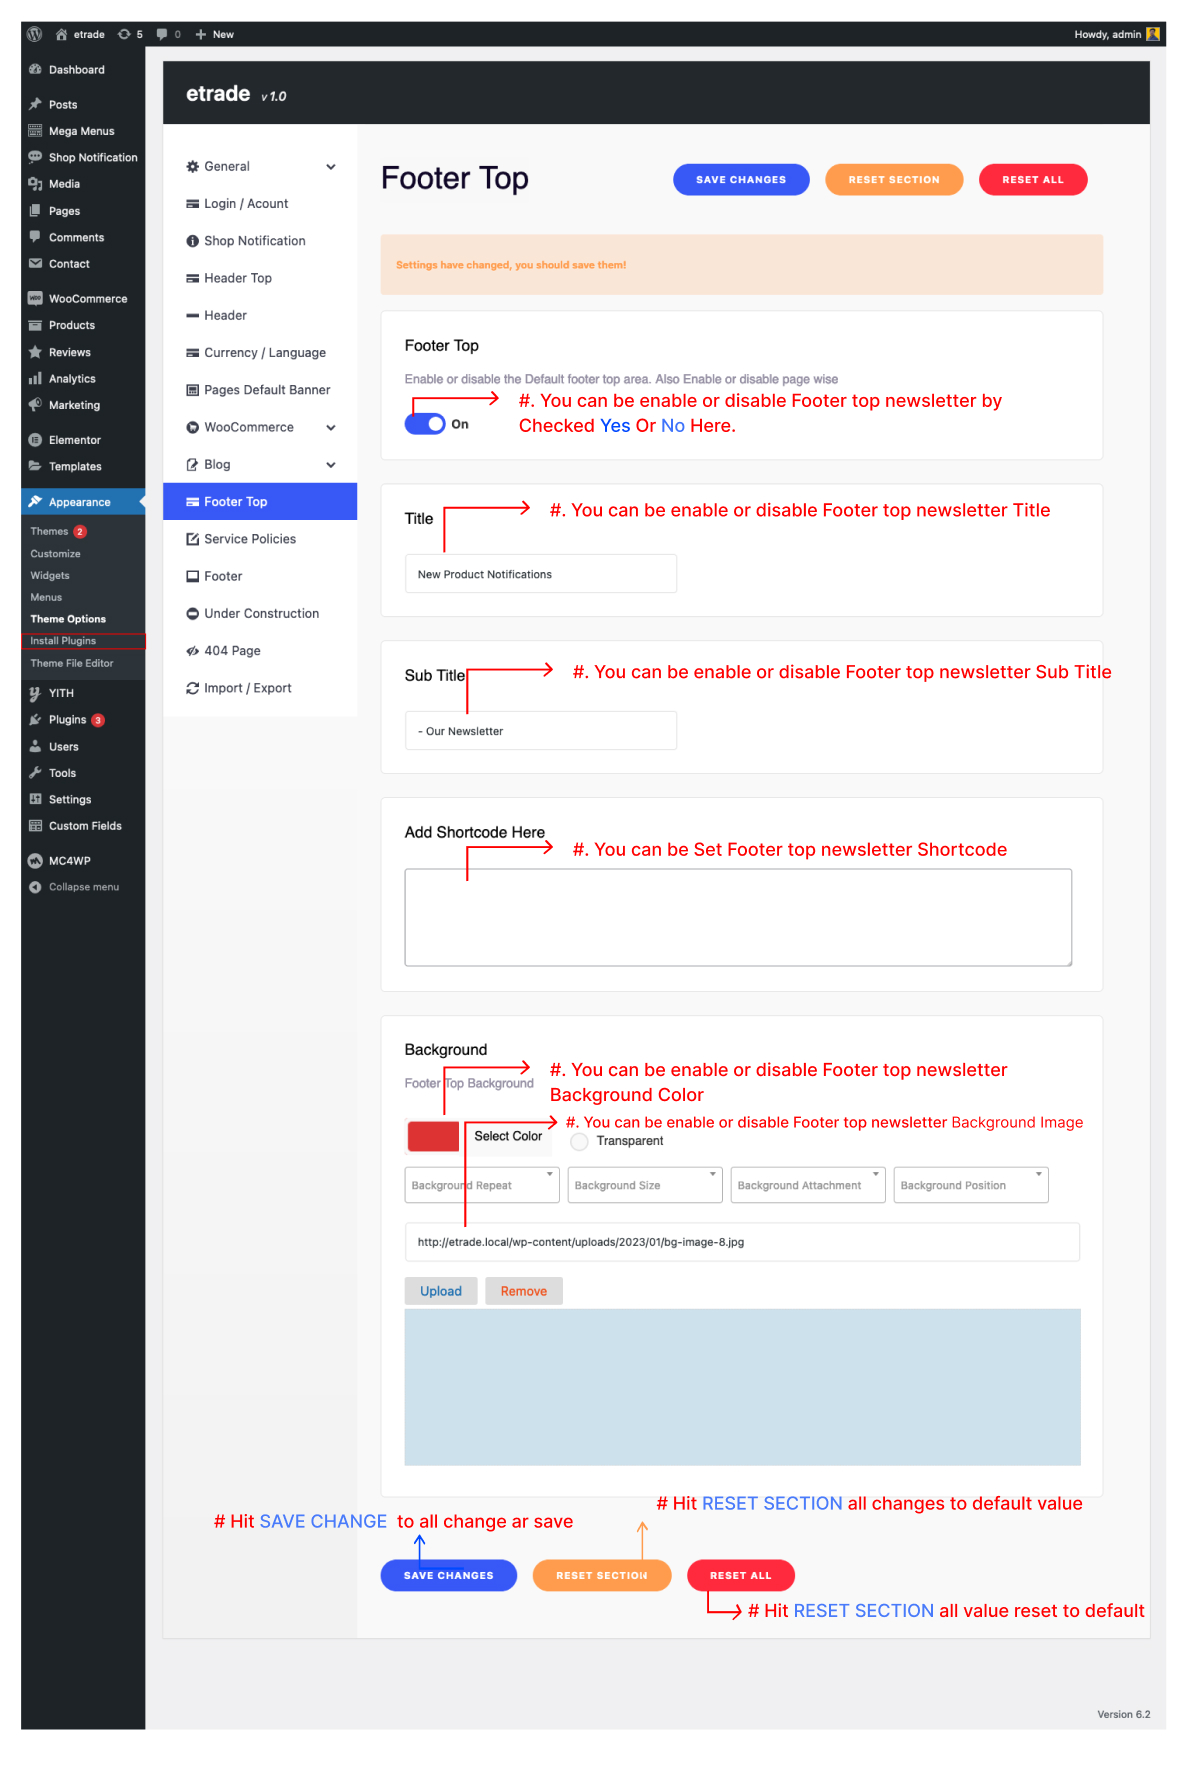
11.3.2 Footer Top
To change the copyright notice in eTrade, navigate to Appearance > Axil Theme Options.
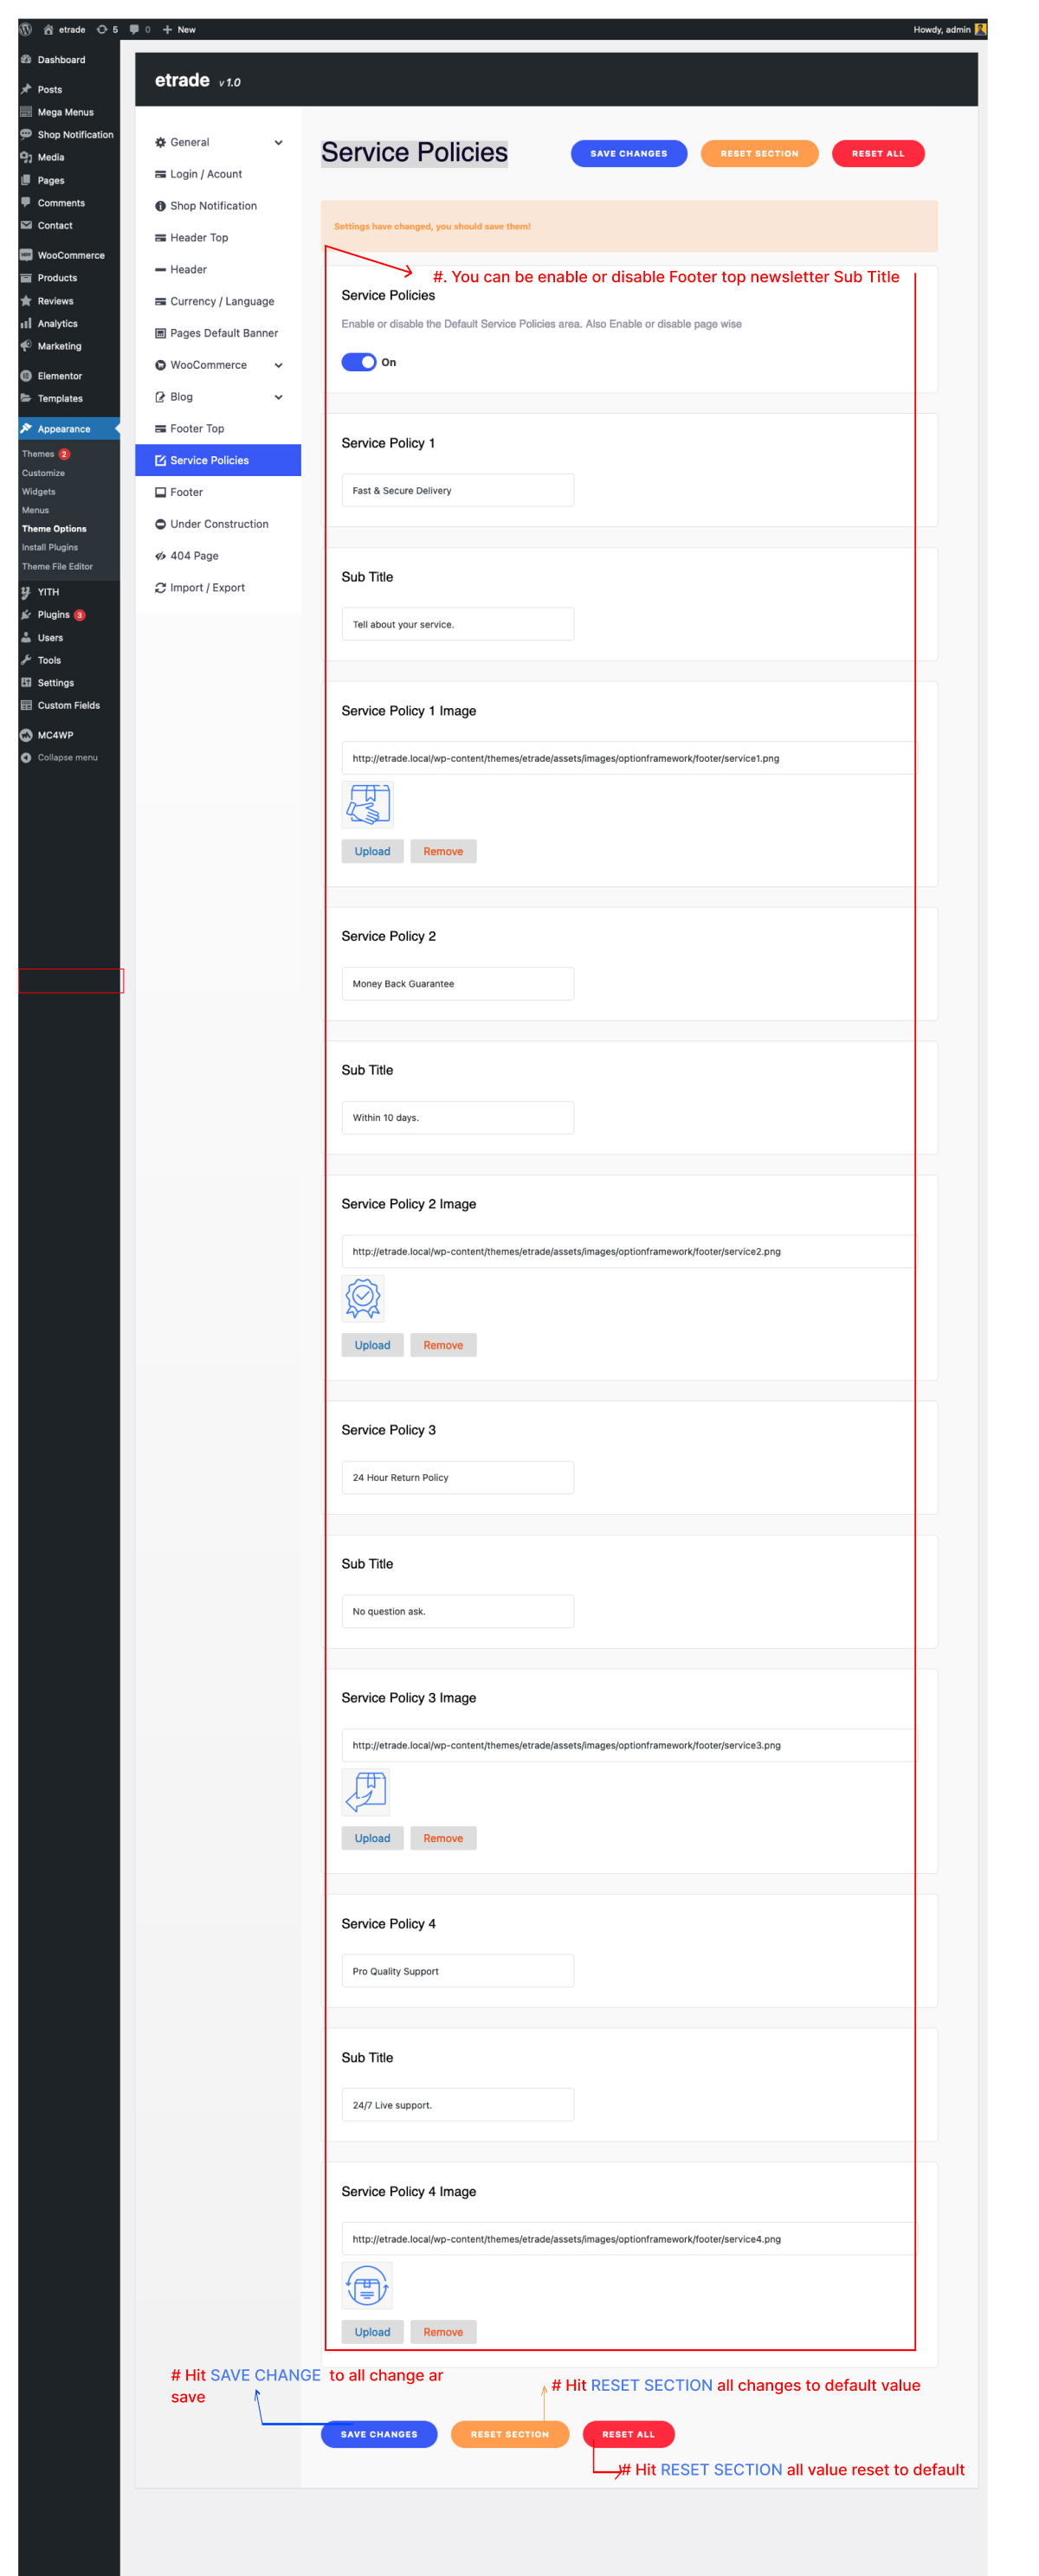
11.3.3 Footer Service Policies
To change the copyright notice in eTrade, navigate to Appearance > Axil Theme Options.
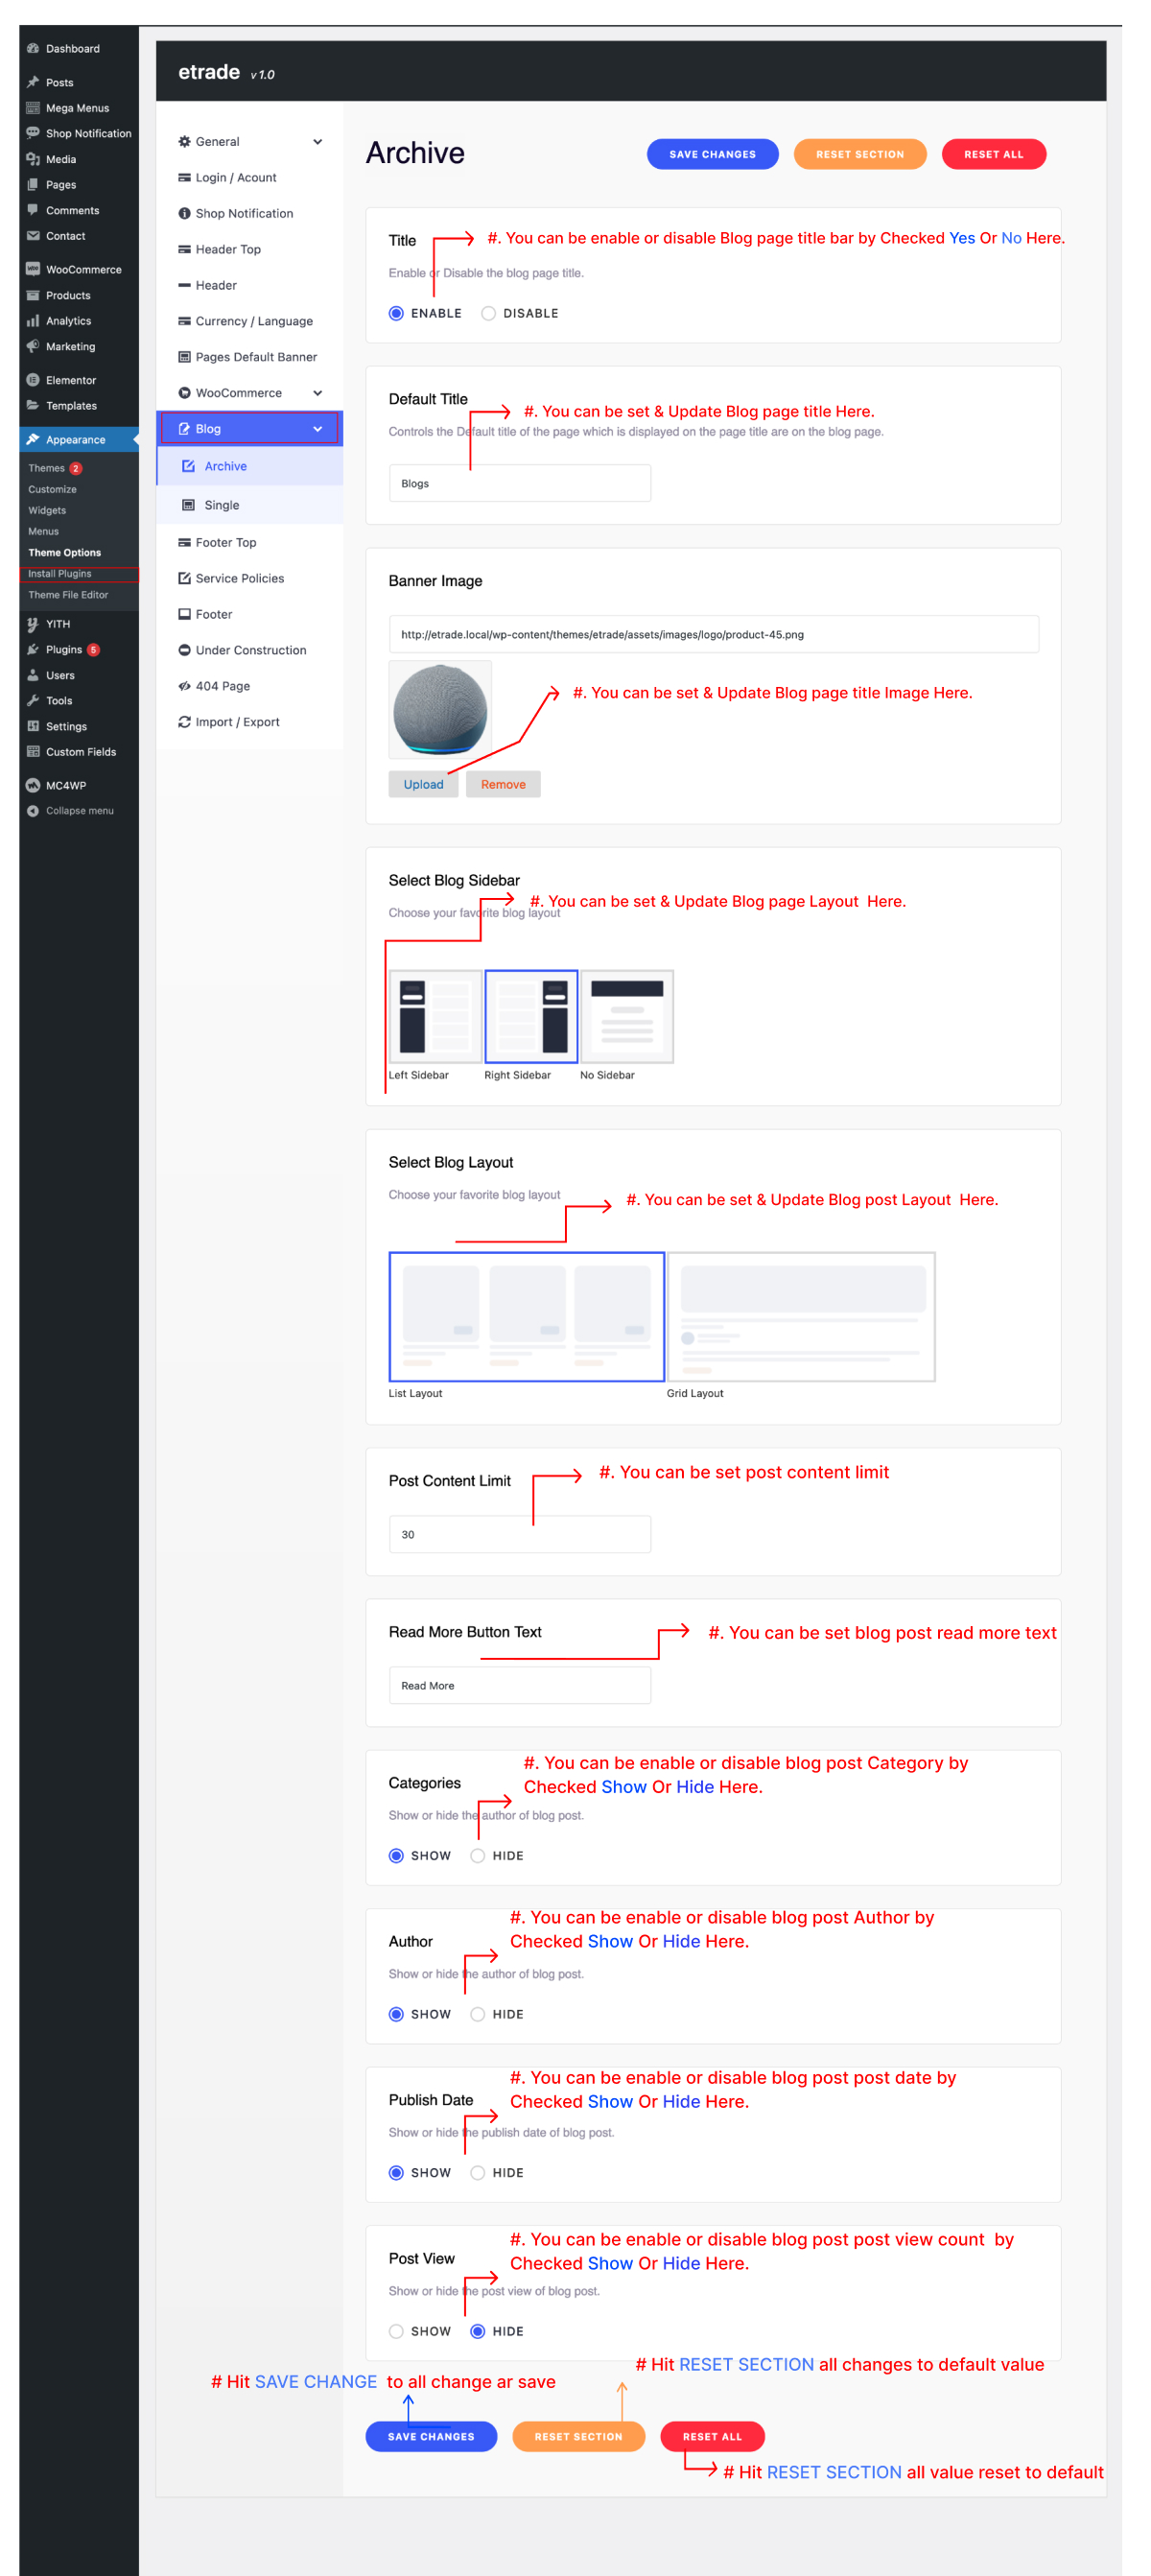
11.4.1 Blog/Archive
To customize the default Blog options in eTrade, navigate to Appearance > Axil Theme Options.
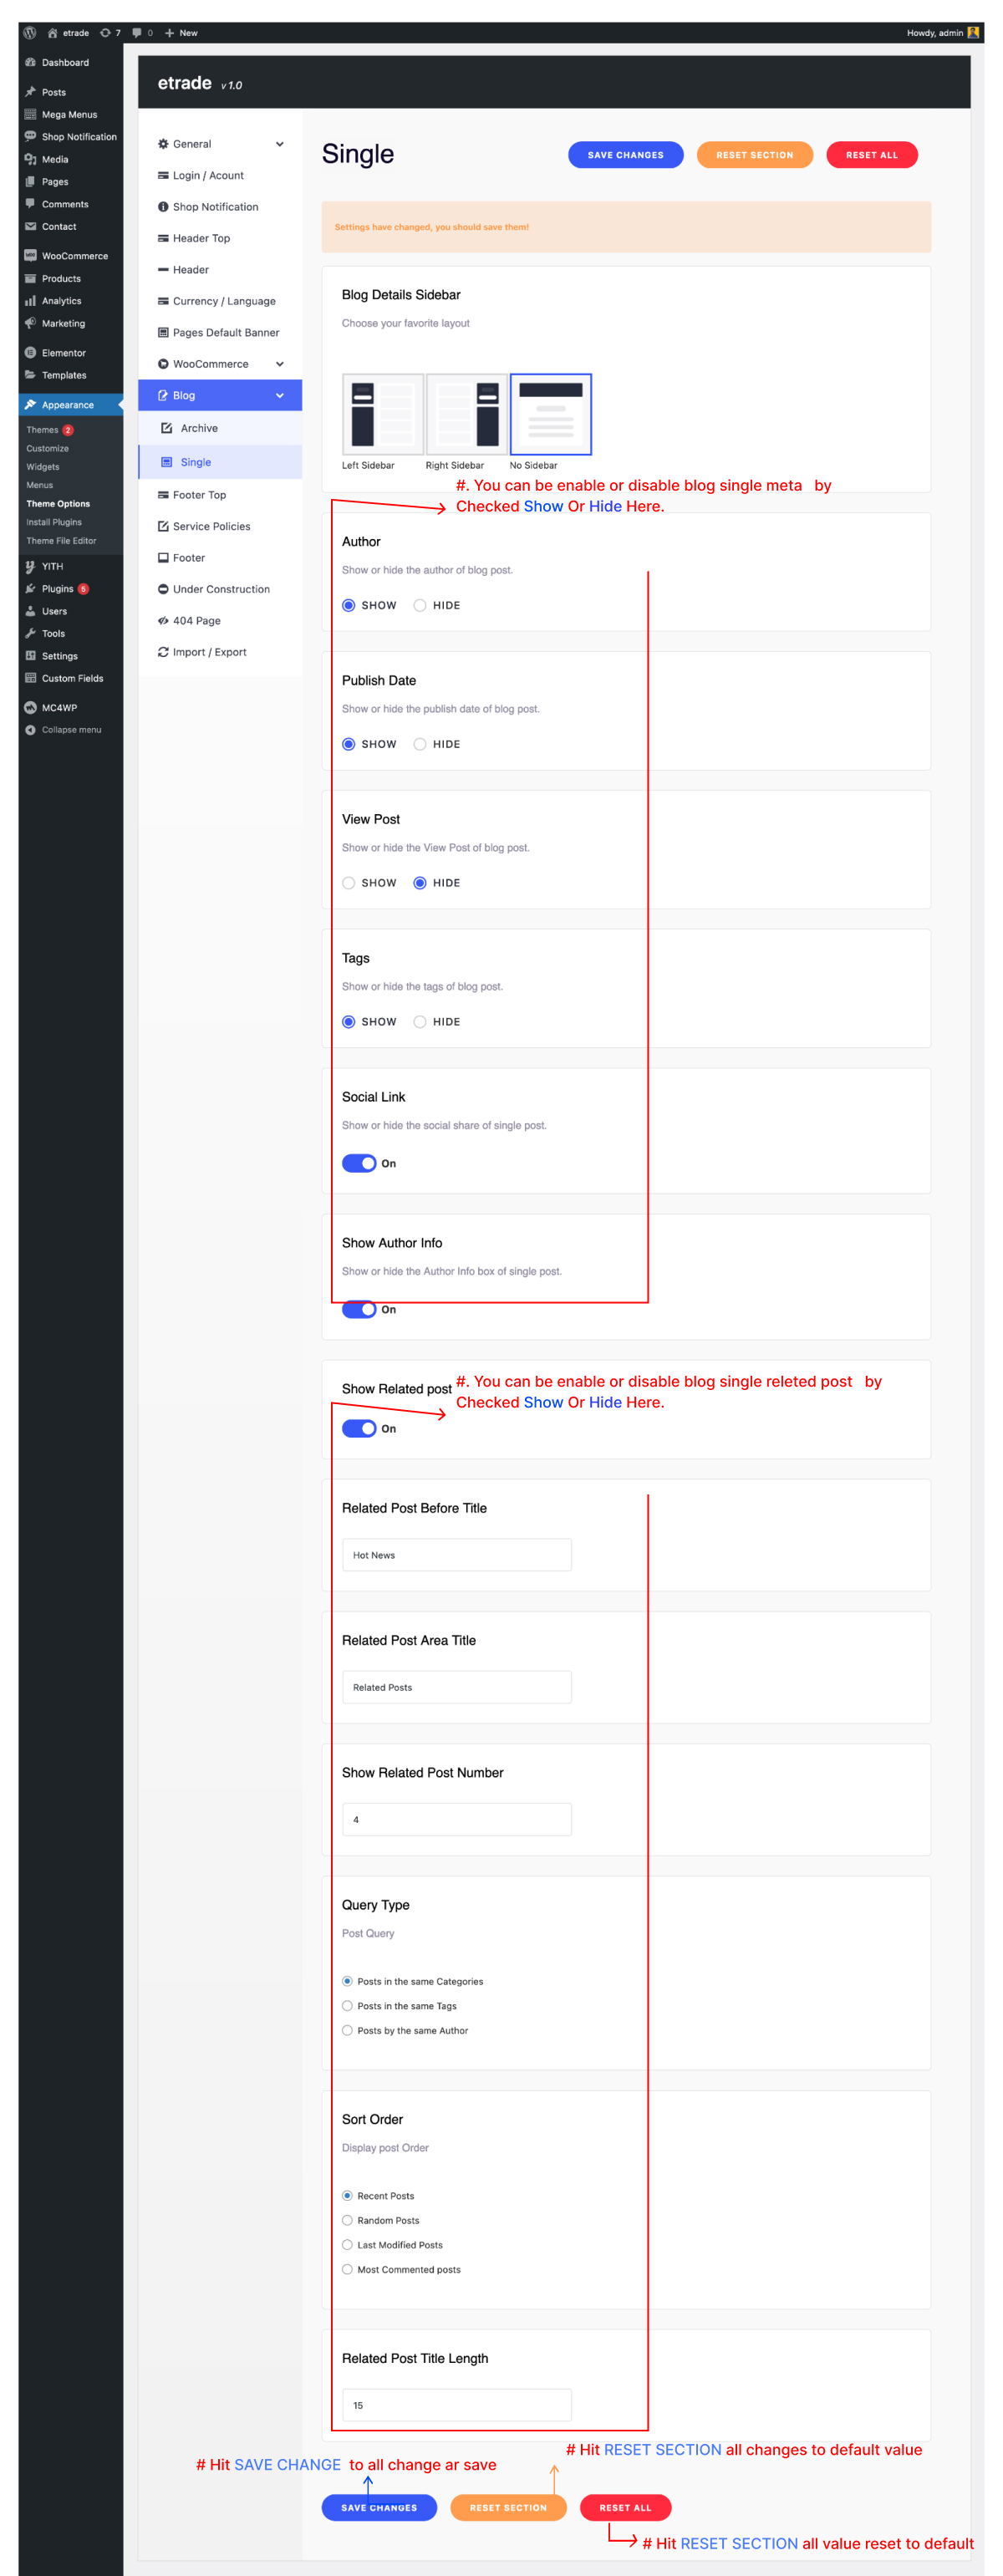
11.4.2 Blog/Single
To customize the default Blog options in eTrade, navigate to Appearance > Axil Theme Options.
11.5 WooCommerce ( Shop )
To customize the default Shop page options in eTrade, navigate to Appearance > Axil Theme Options.

11.5.1 WooCommerce (Product)
To customize the default Shop page options in eTrade, navigate to Appearance > Axil Theme Options.

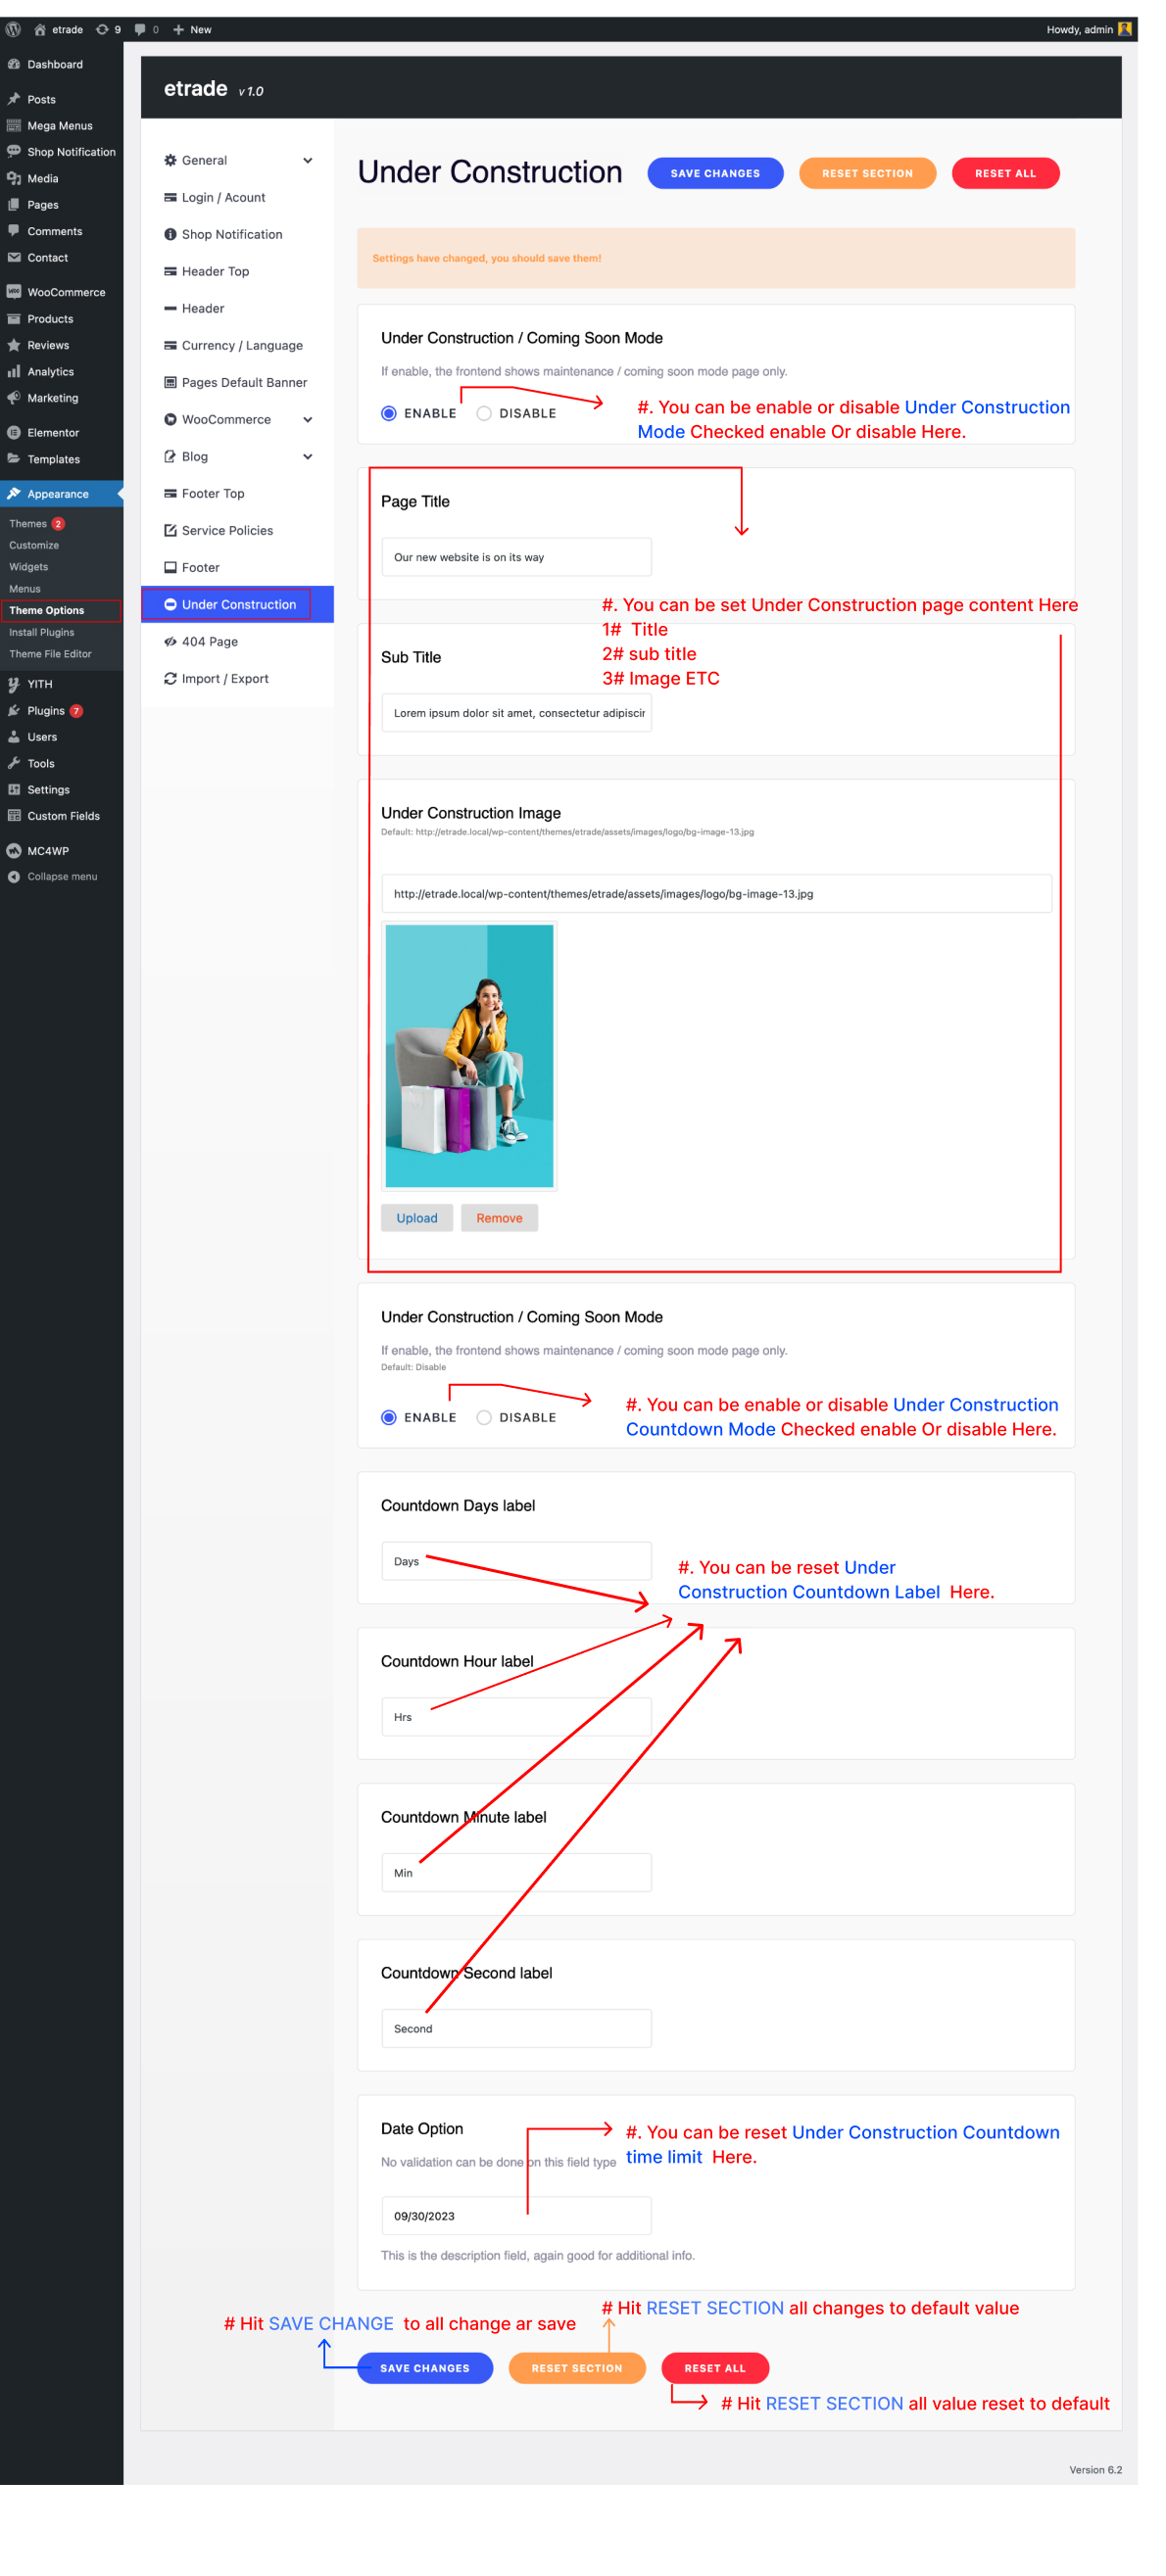
11.8 Under Construction Page Settings
To change the Under Construction page options, navigate to Appearance > Axil Theme Options.
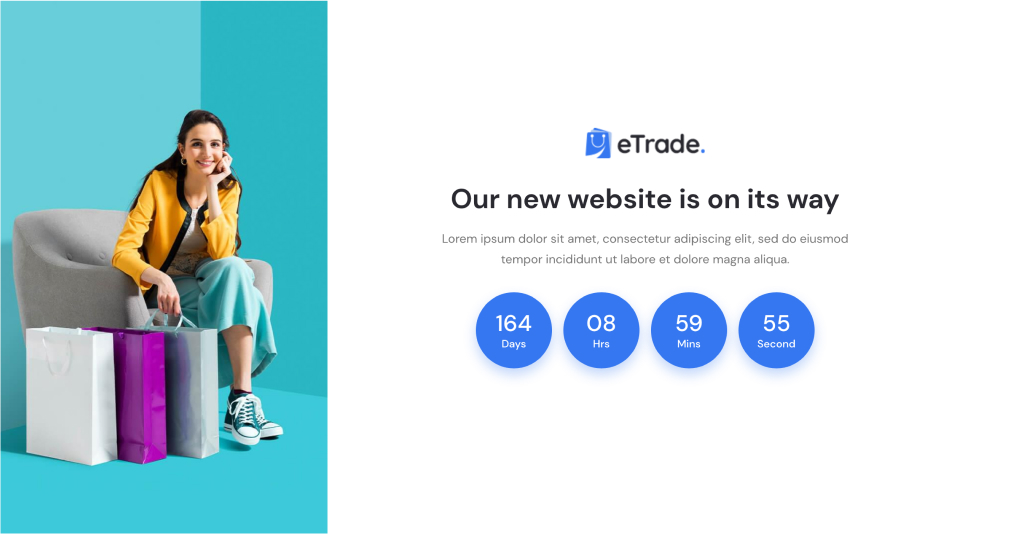
Under Construction Page View
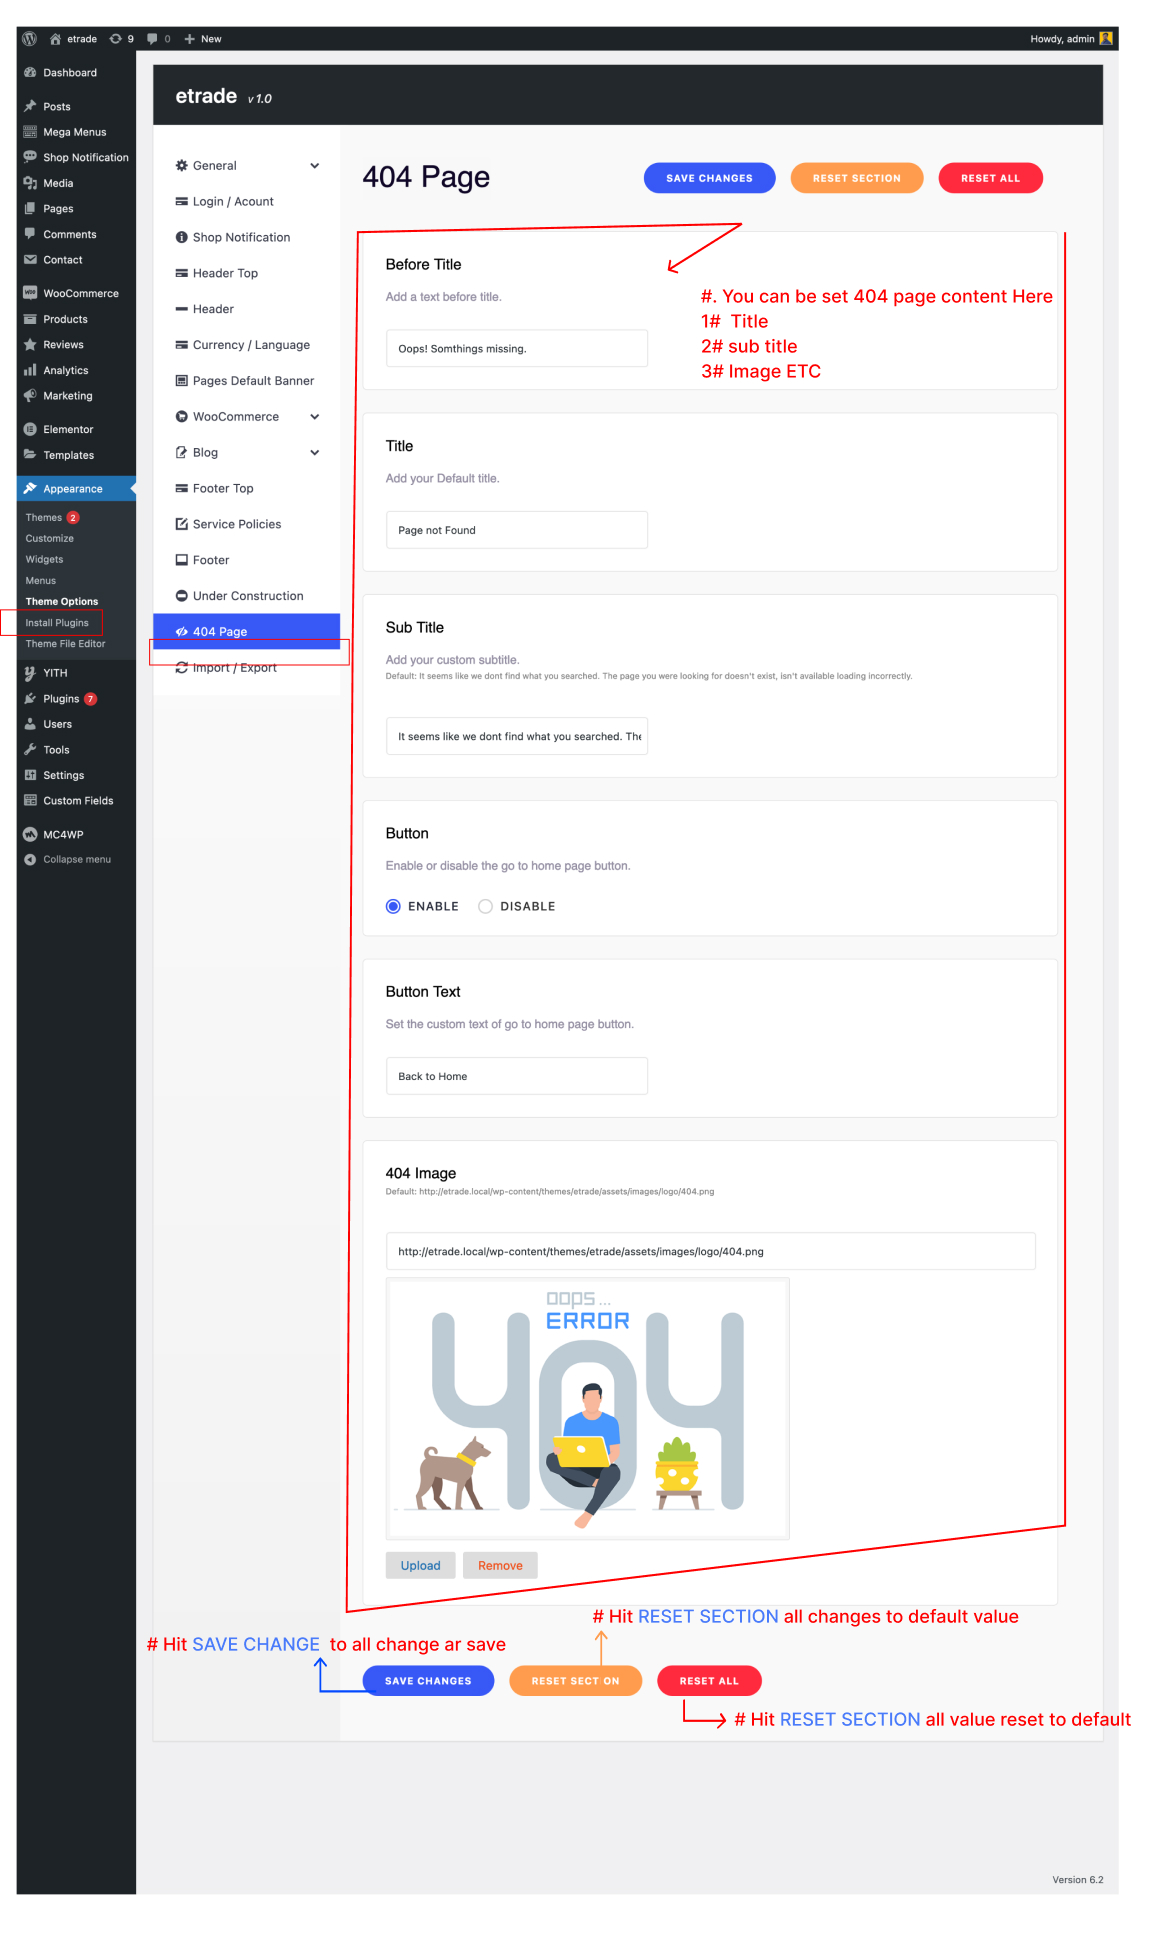
11.9 Error 404 Page Settings
To change the 404 error page options, navigate to Appearance > Axil Theme Options.
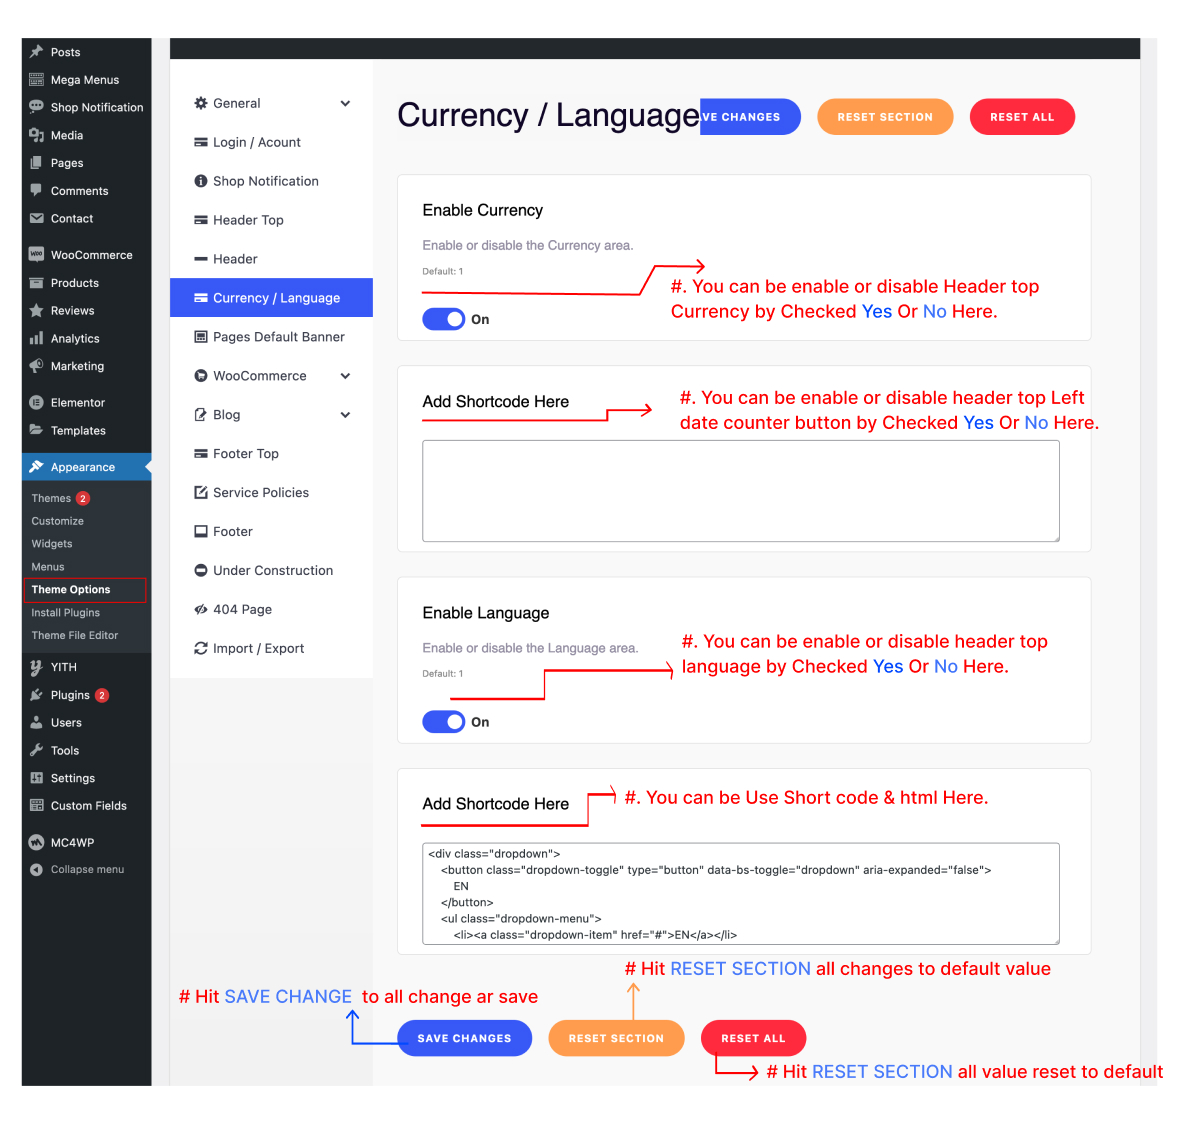
11.10 Currency / Language
To change the Currency / Language options, navigate to Appearance > Axil Theme Options.
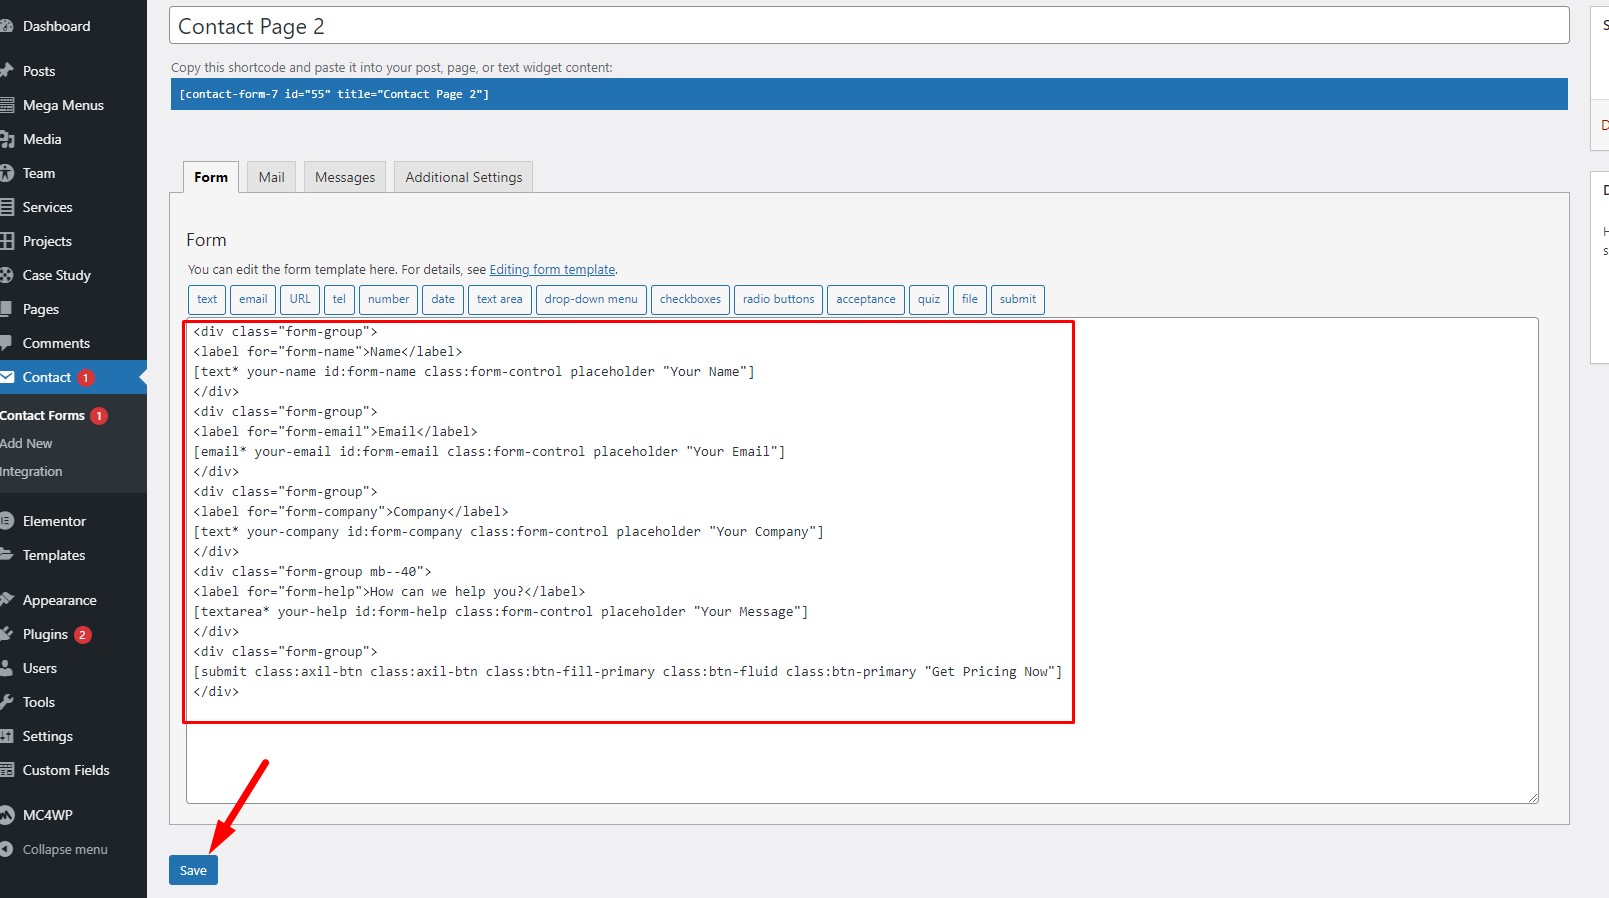
12. Contact Form 7
To customize the contact form visit the official documentation of Contact Form 7: https://contactform7.com/docs/


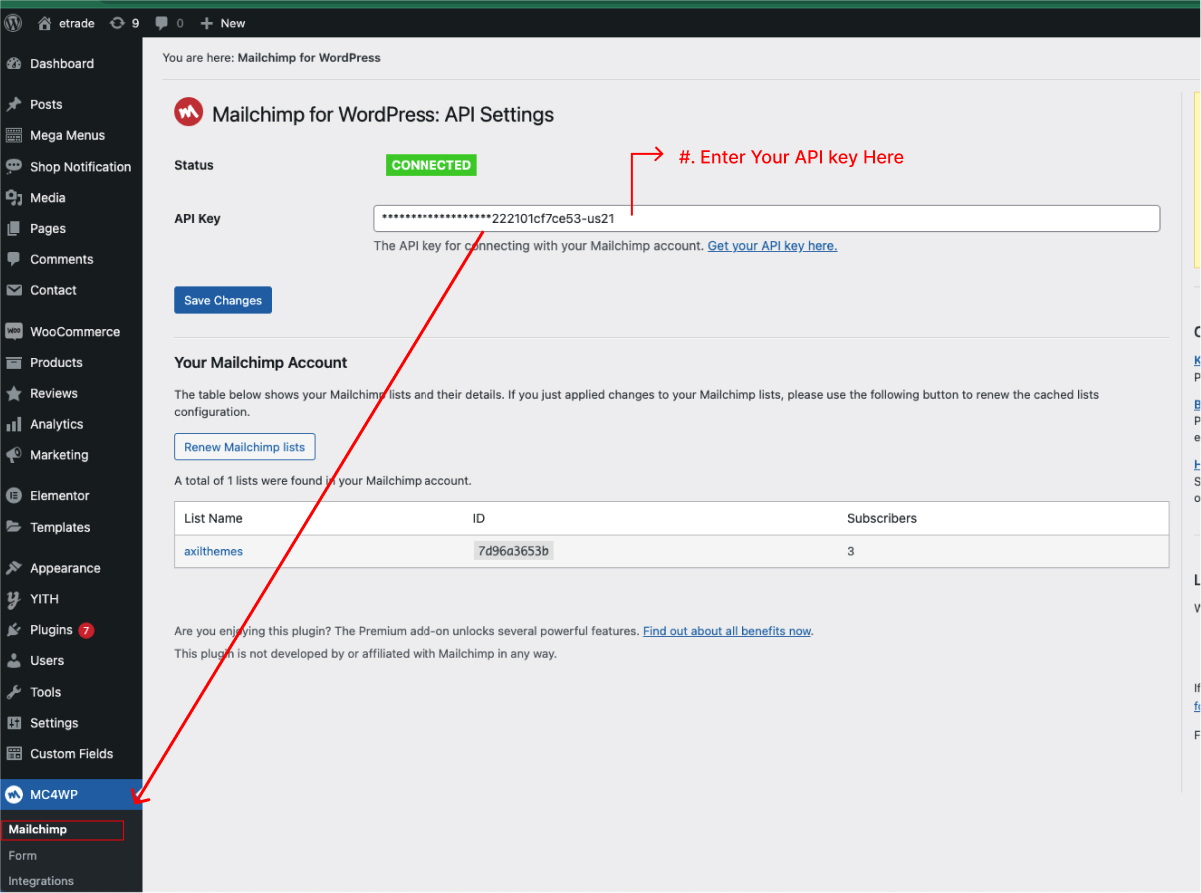
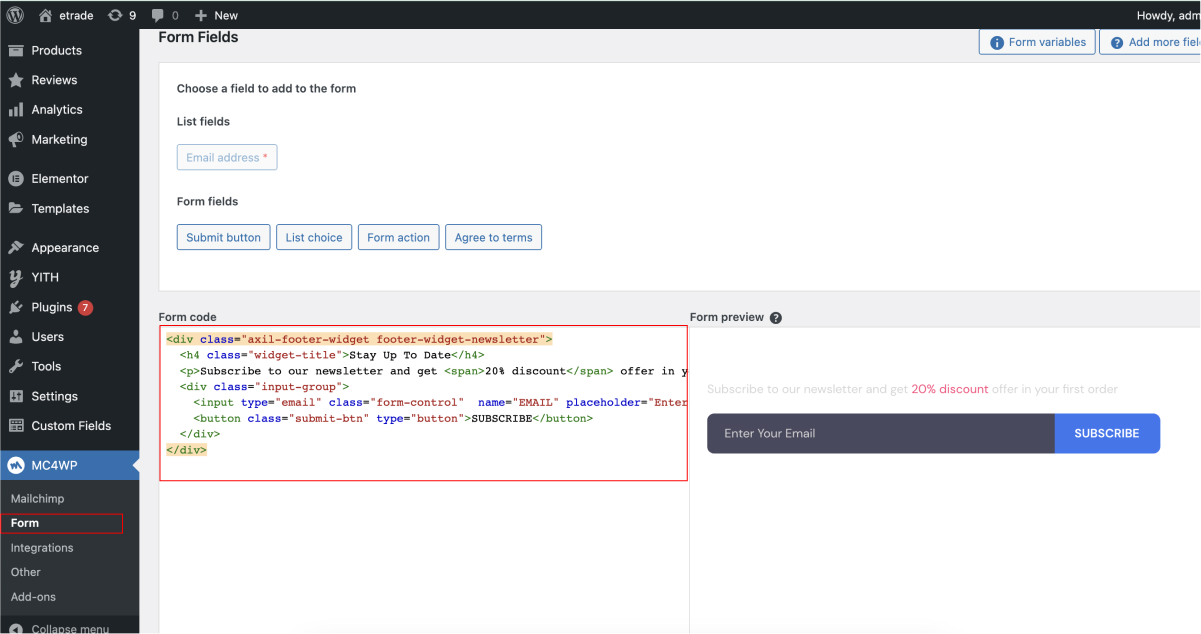
14. MailChimp for WordPress
To know how to customize MailChimp options for your website, visit the official documentation of MailChimp for WordPress: https://kb.mc4wp.com/#utm_source=wp-plugin&utm_medium=mailchimp-for-wp&utm_campaign=sidebar

